
ABC Transcription Tools is a free, web-based, open-source tool for converting music in ABC, MusicXML, BWW, and MIDI format to both standard notation and tablature for a wide variety of instruments.
Imports and exports tunes in ABC, MusicXML, and MIDI formats.
Imports bagpipes tunes in BWW format.
Search for ABC tunes by name from a built-in database of over 60,000 ABC tune settings and quickly add them to your tunebooks.
Play your tunes with over 500 high-quality, sampled instruments.
Use the Tune Trainer to practice your tunes with increasing tempos.
Create PDF tunebooks with title pages, table of contents, tune index, custom headers, footers, hyperlinks, tune incipits (notation or raw ABC), and sharing QR codes using the tool's built-in Export PDF feature.
Quickly transpose a single ABC tune or entire ABC tunebooks to any key.
Sort your tunes by name, key, meter, or rhythm.
You can fully customize the look of your notation using the standard ABC spacing and font annotations.
Easily share your tunes with others via Share URLs and QR Codes.
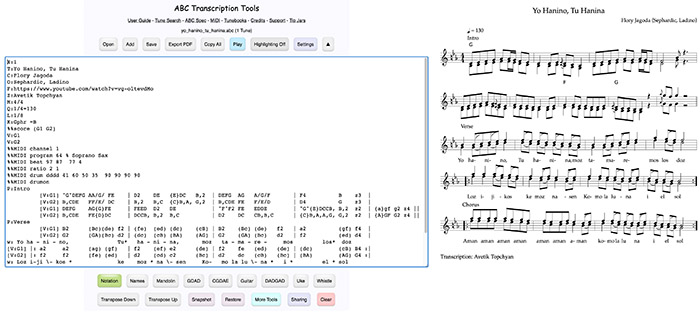
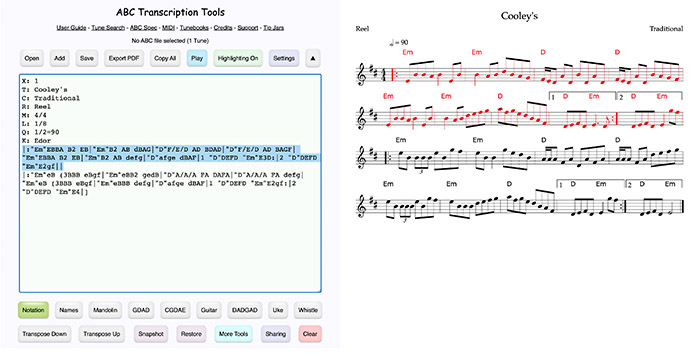
On desktop browsers, when the tool is run, you should be seeing a side-by-side view with the ABC editor on the left and the notation on the right:
On a desktop browser, if you are seeing a single column view with the ABC editor at the top and the notation below, or the welcome dialog is taller than the screen, try zooming your browser view out using the following keystrokes:
Windows: Ctrl -
Mac: ⌘ -
Note: On iOS and Android devices the tool runs in a portrait-mode single-column layout with the ABC editor on the top and the notation below.
Click the ? at the top-left of the window or any dialog to open the related User Guide topic in a new browser tab.
When notation is present, you can:
- Click the Zoom arrows at the top-right of the window to view the notation full screen.
- Click the Play icon button at the bottom-right of the window to play the currently selected tune.
- Click the PDF icon button at the bottom-left of the window to export a PDF of the tunebook.
The Play and PDF icon buttons are always available in the notation full screen view mode on both desktop and mobile browsers.
They are both available in ABC edit mode on desktop browsers but not mobile device browsers to avoid interfering with the notation display on narrow screens.
Most features in the tool have tool tips you can view by hovering your mouse cursor over the button or other control.
Type or paste your ABC notation here.
Changes are reflected immediately in the displayed notation below the ABC Editor.
You may also paste some ABC text into the ABC Editor or just start typing.
Click on any tune in the ABC to have the notation scroll into view.
Click in the notation for any tune and the ABC area will be autoscrolled so that the ABC for the tune is displayed (or within a few lines, browser dependent).
Note: The tune autoscroll features are not available on iOS or Android devices.
On desktop browsers, the ABC text area can be resized by dragging the lower right corner.
When you resize the text area while in the "side-by-side" display mode, the notation will slide over to the right as much as it can:

Open:
Opens an ABC, MusicXML, BWW, or MIDI file.
Add:
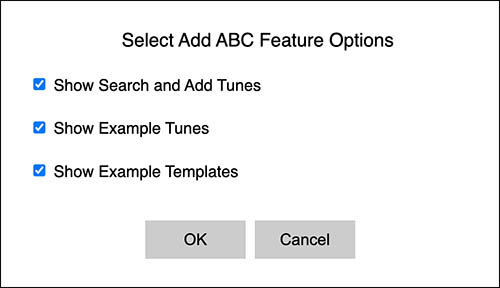
Brings up a dialog where you can add your own ABC, MusicXML, BWW, or MIDI tunes, restore from previously saved Snapshots, re-order the tunes, add example ABC tunes, add useful ABC templates, or inject PDF tunebook feature commands.
Save:
Saves the contents of the ABC editor to a .abc file.
If you specify .xml as the file extension, the first ABC tune in the editor will be saved out as a MusicXML file with the entered filename.
Export PDF:
Exports the currently displayed score as a high quality PDF file.
The saved ABC or PDF file will be in your browser's Downloads directory.
On iOS the downloaded files will be found in the "Downloads" directory in the iOS "Files" app.
On desktop browsers, you can also click the PDF icon at bottom-left of the window.
Copy All:
Copies all the ABC text to the system clipboard so you can easily paste it into social media posts, emails, or other tools.
Play:
Opens the ABC Player where you can play the current tune. Full details below in the Playing Your Tunes section.
On desktop browsers can also click the Play icon at the bottom-right of the window.
Holding down the Shift key on your keyboard while clicking the toolbar play button will open the current tune in the Tune Trainer.
If multiple tunes are in the ABC editor, holding down the Alt key on your keyboard while clicking the toolbar play button will play a random tune from the tunes available.
Highlighting On/Off:
Toggles Notation/ABC automatic highlighting On/Off.
Full details below in the Notation and ABC Highlighting section.
Brings up a menu of useful commands:

Find and Replace (Desktop browsers only)
Brings up a dialog where you can search and replace text in the ABC editor.
You may use Javascript regular expressions in the Find and capture groups in the Replace.
Also available by pressing ⌘+F on Mac or Ctrl+F on Windows/Linux when working in the ABC editor.
Toggle Top/Bottom Toolbars
Hides/shows the header at the top and any visible controls below the ABC text area so you can have more room to work on your music.
Maximize Editor
Maximizes the width of the ABC text editing area.
Align Bars (One Tune)
Aligns the measures in the ABC text for the current tune you are working on.
Align Bars (All Tunes)
Aligns the measures in the ABC text for all the tunes in the tunebook.
Split Long Tags and Text
abcjs doesn't wrap long text lines in descriptive tags or text annotations:
%%text, %%center, or %%begintext / %%endtext blocks.
This feature allows you to split any long text in the ABC at a specific length in your tags, text, or both so that they display properly.
You may select which tags you want to split.
You may choose to split either the current tune being worked on or all tunes in the ABC editor.
The splitter attempts to split the text at a word boundary.
Reformat Using MusicXML
Round-trips either the current tune or all the tunes in the ABC through MusicXML export and import back to ABC.
This can be useful for cleaning up some ABC files that have odd formatting or use & measure note overlays which sometimes cause rendering and playback issues:
It can also be used to quickly reformat the number of bars-per-staff on an existing ABC tune:
MusicXML import formatting is done using the values set in MusicXML/MIDI Import Settings.
When reformatting large ABC collections, since MusicXML-based reformatting doesn't require rendering the tunes, I suggest using the "Quick Editor" which only renders the first tune in the collection.
This can be particularly helpful if the initial rendering of the collection is slow in the standard editor because of "one measure per ABC line" formatting of the ABC.
From the "Quick Editor" you can then run "Reformat Using MusicXML", save the resulting ABC, then open the reformatted ABC in the standard editor.
Settings
Brings up the default playback instruments and other tool-wide settings dialog.
Full details below in the ABC Transcription Tools Settings section.
Advanced Settings
Brings up a dialog where you can configure low level tool features and settings.
Launch Quick Editor (Standard Editor only)
Launches the Quick Editor in a new tab.
Launch Offline-Enable Editor (Standard Editor only)
Launches the Offline-Enabled version of the Editor in a new tab.
Launch Standard Editor (Quick Editor only)
Launches the Standard editor in a new tab.
About the Quick Editor (Quick Editor only)
Opens the User Guide section for the Quick Editor.
Open:
The tool supports reading ABC, MusicXML, BWW, and MIDI files.
The file of type being opened depends on the file extension:
.abc or .txt
Opens an ABC file from your computer and loads it into the ABC Editor.
.xml, .musicxml, or .mxl
Imports a MusicXML file from your computer, converts it to ABC, and loads it into the ABC Editor.
If there is a title tag present in the MusicXML, it will be used for the tune title, otherwise one will be created from the filename.
.bww
Imports a Bagpipes Reader/Player .bww file from your computer, converts it to ABC, and loads it into the ABC Editor.
Pitch is shifted to A=480 Hz using the following directive:
%voice_tuning_cents 48 148
For more information on the %voice_tuning_cents directive, see the Setting the Tuning Offset for Individual Voices section below.
To inject drone and chanter sounds into a tune imported from a BWW file, check out the Inject Bagpipe Sounds command on the More Tools dialog.
.mid, or .midi
Imports a MIDI file from your computer, converts it first to MusicXML, converts the MusicXML to ABC, and loads it into the ABC Editor.
Details on MusicXML and MIDI import settings below in the MusicXML/MIDI Import Settings section.
On desktop browsers, you may also drag-and-drop a single ABC, MusicXML, BWW, or MIDI file on the editor area to add it.
If you have unsaved work, you will be asked to confirm that you want to abandon your work in progress and load a new ABC file.
Add:
Brings up a dialog where you can add your own ABC, MusicXML, BWW, or MIDI tunes, restore from previously saved Snapshots, re-order the tunes, delete tunes, add example ABC tunes, add useful ABC templates, or inject the commands for PDF tunebook features:

If you would like to only show the buttons for the features you commonly use and hid the others, click the controls icon at the top-right of the dialog to choose features of the dialog you would like to show/hide:
The most commonly used buttons are always shown.
Your preferences are saved and restored the next time you use the tool.
Choose File to Add:
Browse your system for an ABC, MusicXML, BWW, or MIDI file with one or more tunes to add to the end of the current tunes.
Restore from Snapshot:
This button appears if there is a saved Snapshot available in browser storage.
When clicked, restores a saved Snapshot from browser storage, replacing the contents of the ABC editor.
There are four Snapshots available in browser storage.
Hold down the following modifier keys while clicking the button to select which Snapshot to restore:
Click - Snapshot #1
Shift-Click - Snapshot #2
Alt-Click - Snapshot #3
Shift-Alt-Click - Snapshot #4
If you click the button and no Snapshot is available for the selected slot based on the modifier keys held down, the next highest available Snapshot will be used.
Since it completely replaces the contents of the ABC editor, you will be asked to confirm the operation.
Restore from Auto-Snapshot: (Desktop browsers only)
This button appears if there is a saved Auto-Snapshot available in browser storage.
When clicked, restores the last Auto-Snapshot, replacing the contents of the ABC editor.
Since it completely replaces the contents of the ABC editor, you will be asked to confirm the operation.
On desktop browsers, automatic Snapshots when closing or reloading the browser tab the tool is running in can be enabled in the tool's Settings dialog.
Brings up a dialog where you search either Gavin Heneghan's tune collection (over 20,000 tune settings) or the FolkFriend.app tune collection (over 45,000 tune settings) by tune name and style and then optionally add them to your tunebook:

When first entering this dialog or changing the search collection, the tool will need to load the tune collection.
The status will read "Ready to search" when the tune collection has been loaded.
Once loaded the tune collection is stored for future use and will load much quicker.
Enter some text to search for in the title of the tunes and click Search or press the Enter key.
By default, the search will return only the first variation of a tune found.
If you want all the variations for a tune, uncheck Only return first variation found?
If you want to match the search text only at the start of the tune name, check Match start of title?
If you want to only match tunes that also have chords, check Only return tunes with chords?
Select the tune style you want from the Tune style dropdown.
If you want to filter the results by key/mode, select the key/mode from the Key dropdown.
Select the maximum number of search results you want from the Maximum number of results dropdown.
Click Add Results to Tunebook to append the search results tunes at the end of the ABC editor.
If you don't want all the tunes in the search results added to your tunebook, you can simply copy and paste the results you want back into the ABC editor.
You can also get to this dialog by clicking the Search for Tunes link at the top of the tool.
On desktop browsers, brings up a dialog where you can drag and drop the tune names to change their order in the tunebook:
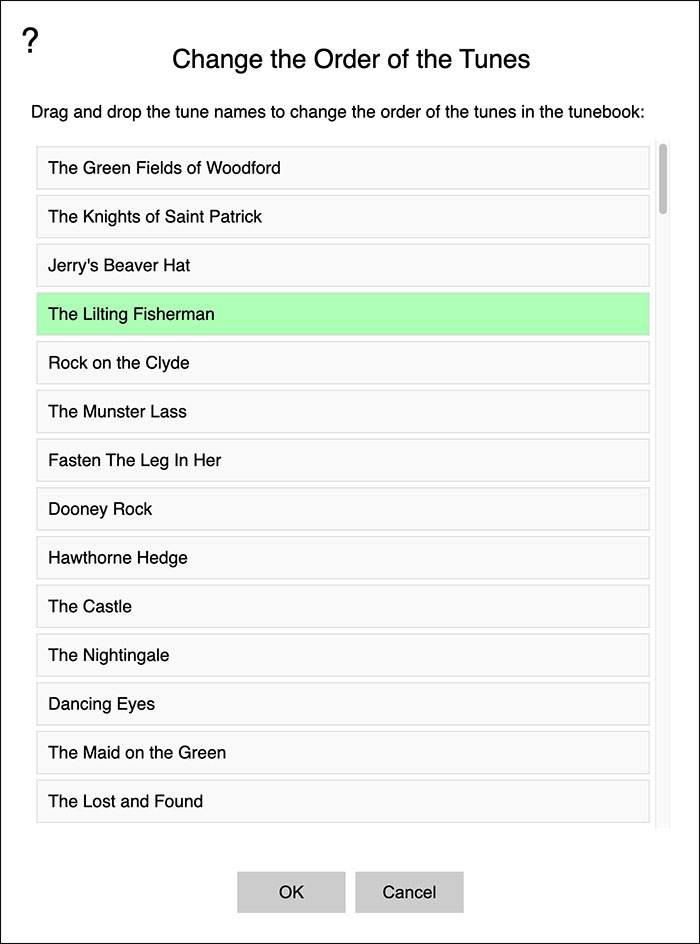
On mobile browsers, select a tune name and then use the Move Up and Move Down buttons to change the order of the tune in the tunebook.

Brings up a dialog where you can select tunes to delete from the tunebook:
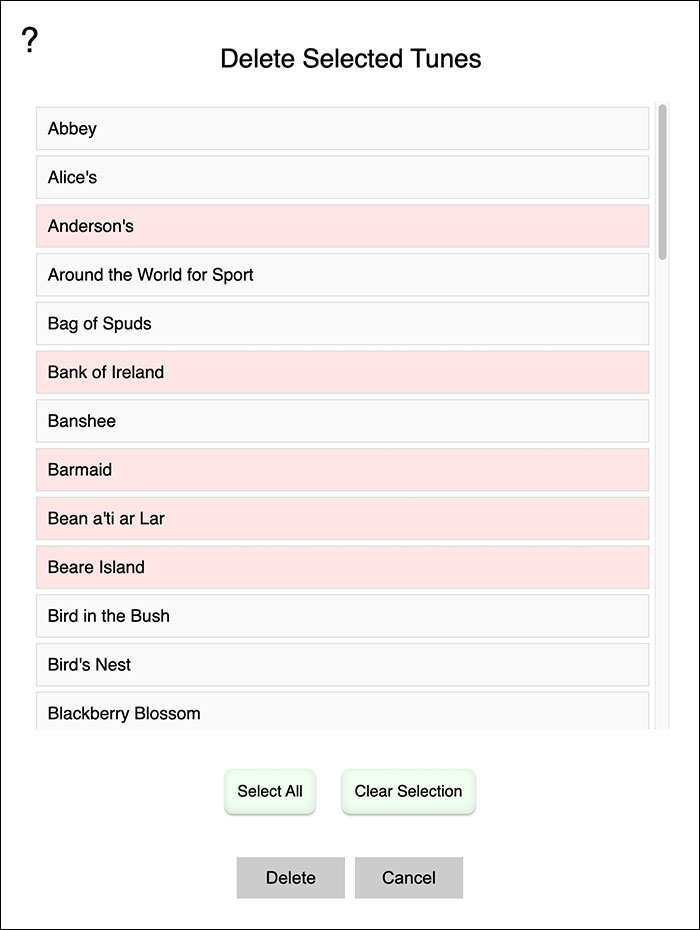
Click on the tune names to select/deselect them.
Click Select All to select all the tunes for deletion.
Click Clear Selection to unselect all the tunes for deletion.
Click Delete to delete the tunes after confirmation.
Add an Example Reel:
Adds "Cooley's" as an example of a typical reel.
Add an Example Reel:
Adds "Cooley's" as an example of a typical reel.
Add an Example Jig:
Adds "The Kesh" as an example of a typical jig.
Add an Example Hornpipe:
Adds "Alexander's" as an example of a typical hornpipe.
Add J.S. Bach Two-Part Invention #1:
Adds the J.S. Bach Two-Part Invention #1 for Harpsichord.
This piece was originally imported from a MusicXML transcription.
Add J.S. Bach BWV570 Fantasia:
Adds the J.S. Bach BWV570 Fantasia in four parts for Pipe Organ.
This piece was originally imported from a MusicXML transcription.
Add a Tune Template:
Adds a minimal ABC template for a tune.
Add a Song Template:
Adds a minimal self-documenting ABC template for a song with lyrics.
Add an Example Song:
Adds a detailed self-documenting example of ABC for a song with lyrics.
Add Bodhran Backing Track Tune Template:
Brings up a dialog where you can add a bodhran backing track for various tune styles to the end of the ABC.
These are two-voice templates.
Voice 1 is the melody. Replace the rests in the template with your tune.
Voice 2 is the Bodhran backing track. Use the existing template or edit to meet your needs.
You can change the tuning of the Bodhran by changing the value A in the template line:
to the pitch you'd prefer.
Valid values are: C, C#, Db, D, D#, Eb, E, F, F#, Gb, G, G#, Ab, A, A#, Bb, or B.
If no pitch is specified, the default is A.
Full details on the Bodhran ABC note-to-sound mapping are available in the following section:
Add Box Fingering Symbols Template:
Add a template with symbols for annotating box fingerings and tablature at the top of the ABC editor text.
Inject PDF Tunebook Features:
Brings up a dialog that you can use to inject commands at the top of the ABC that will add an optional Title Page, Table of Contents, Index, Page Header, Page Footer, playback links, and/or QR code to an exported PDF tunebook.
Notation and ABC Highlighting can be toggled On/Off by clicking the Highlighting On/Off button in the top toolbar.
When Highlighting is turned on:
- Select ABC text to highlight the corresponding notes in red in the notation.
- Click any element in the notation to select the corresponding ABC text in the editor.
- Highlighting requires redrawing all tunes on each change to the ABC.
- This may be slow on large numbers of tunes.
- All pre-processing of the ABC at notation drawing time is turned off. Any hiding of Annotations/Text/Chords selected in the More ABC Tools dialog as well as automatic injection of staff separation space will be disabled. Your settings will be restored when you turn highlighting off.
This feature is only available for desktop browsers.

If any ABC is present in the ABC Editor, this double-arrow control shows up on the top-right corner of the page.
The control hides or shows the ABC Editor and all controls so you can view your notation full screen.
Click once to hide the ABC Editor and all controls.
Click again to show the ABC Editor and all controls.
Click the ? at the top-left of the window for help using the tool in the full screen view.
Click the PDF icon at the bottom-left of the window to export the tunes in PDF format.
Click the Play icon at the bottom-right of the window to play the current tune.
The size of the full screen notation as a percentage of the browser window width is set in the Advanced Settings dialog. Default is: 50%.
If the resulting scaled width is less than 850 pixels (820 pixels for iOS/Android) the width will be set to 850 pixels (820 pixels for iOS/Android).
The instrument tablature button bar controls how the notation and tablature is displayed:

The instrument tablature button bar is shown by default, but can be hidden if desired.
Notation - Standard notation only.
Names - Shows standard notation with note names below.
Choose between standard ABC d e f style octave notes or Comhaltas-preferred "Blackboard ABC" D' E' F' octave note display in the Settings dialog.
Important: While the note Names display will show the Comhaltas-preferred note names, the ABC standard requires that the second octave C in the ABC itself either be represented by c or C' so that may requires some minor changes when pasting in your Comhaltas-formatted tunes.
Note names font and size in the tab is set by the Tab number font value in the Configure ABC Rendering Fonts dialog.
Mandolin - Shows standard notation and tablature for Mandolin.
GDAD - Shows standard notation and tablature for GDAD-tuned Irish Bouzouki.
This can be changed to CGDA for CGDA-tuned Mandola or Mandocello in the tool's Settings dialog.
CGDAE - Shows standard notation and tablature for 5-string CGDAE-tuned Fiddle.
This can be changed to DGDAE for 5-string DGDAE-tuned Bouzouki in the tool's Settings dialog.
Guitar - Shows standard notation and tablature for standard EADGBE-tuned Guitar.
DADGAD - Shows standard notation and tablature for DADGAD-tuned Guitar.
Uke - Shows standard notation and tablature for GCEA tuned Ukulele.
This tablature solution puts the majority of the notes on the CEA strings and only uses the G string for notes lower than C.
Whistle - Shows standard notation and fingering tablature for Tin Whistle in the key of D.
Note: For notes that go below D on of the whistle (lowest note supported is the G below middle-C), the suggested "folded" octave-up fingerings are shown.
Up to 8 voices may be displayed with tablature.
Showing/Hiding Stringed Instrument Tablature in Multi-Voice ABC Tunes
The two following annotations only work for stringed instrument tablatures and not the note names or whistle tablature.
To show the tablature on the first voice of a multi-voice tune and hide it on all the others, add the following comment based annotation anywhere in the tune:
To hide the tablature on the first voice of a multi-voice tune and show it on all the others, add the following comment based annotation anywhere in the tune:
If both are present in a tune, %tab_first_voice_only takes precedence over %tab_first_voice_exclude.
If a tunebook contains multiple tunes, all of the tunes in the tunebook should all either contain or not contain these annotations.
Mixed use of these annotations across multiple tunes in a tunebook may not produce the desired result.
These buttons perform common operations on the ABC:

Transpose Down - Transposes the selected tunes down one semitone. Shift-click transposes down one full step. Alt-click transposes down one octave.
Transpose Up - Transposes the selected tunes up one semitone. Shift-click transposes up one full step. Alt-click transposes up one octave.
To transpose multiple tunes, just click anywhere in the first tune you want to transpose, and drag to select any part of additional tunes you want transposed.
To transpose all the tunes at once, select them all before clicking the Transpose buttons.
To transpose tune(s) to a specific root key rather than in steps, see the section on Transpose to Key below.
Snapshot - Saves a Snapshot of the contents of the ABC editor to browser storage.
If you save a Snapshot and leave the tool, the next time you run the tool the Snapshot will be available to restore by either clicking the Restore button on the main toolbar or the Restore from Snapshot button in the Add dialog.
There are four Snapshots available in browser storage.
Hold down the following modifier keys while clicking the button to select which Snapshot to save into:
Click - Snapshot #1
Shift-Click - Snapshot #2
Alt-Click - Snapshot #3
Shift-Alt-Click - Snapshot #4
Restore - If one is available, replaces the current contents of the ABC editor with a saved Snapshot from browser storage.
There are four Snapshots available in browser storage.
Hold down the following modifier keys while clicking the button to select which Snapshot to restore:
Click - Snapshot #1
Shift-Click - Snapshot #2
Alt-Click - Snapshot #3
Shift-Alt-Click - Snapshot #4
Since this completely replaces the contents of the ABC editor, you will be asked to confirm the operation.
More Tools - Shows the More ABC Tools dialog with several additional ABC filtering and display controls.
Sharing - Shows the Sharing Controls dialog with options for sharing your tunes via a share URL or QR code.
Clear - Clears the ABC Editor so you can start over.
If you don't want to be asked to confirm the deletion every time, there is a setting in the Advanced Settings dialog where you can disable the confirmation.
To play a specific tune, click anywhere in the ABC for the tune and then click Play.
Holding down the Shift key on your keyboard while clicking the toolbar play button will open the current tune in the Tune Trainer.
The tool will find the tune you've clicked on and bring it up in the ABC Player for playback.
If you have selected some notes in the tune, only the selected notes will be played.

Using the playback controls at the bottom, you can enable looping, rewind to start, start/pause playback, click in the progress bar to seek, or change the tempo as a percentage.
If there is more than one tune in the tunebook, click ← or → to play the previous or next tune in the ABC tunebook.
Shift-click on ← to jump to the first tune, shift-click on → to jump to the last tune.
The text in the lower right corner shows you the tune number of the current tune in the tunebook and the total number of tunes.
You may also select a tune in the tunebook by title from the pop-up list and the player will switch to that tune.
In the Settings dialog there is an option to have the tunebook navigation controls on the left instead of the right.
Click Start Tune Trainer to bring up the Tune Trainer.
Full details below in the "Step-Up" Tempo Tune Trainer section.
Click Enable Metronome to switch to a version of the tune that has a metronome click sound when playing.
When playing a tune with the metronome enabled, click Disable Metronome to return to the original version.
If you save the tune to .WAV or .MP3 while the metronome is enabled, the resulting audio file will have the metronome sound.
While most common tune meters are supported by the metronome system, if the tune you are playing is in a meter that is not supported, you will be presented with a alert explaining the issue and will only be able to play the original version.
If you would prefer larger Player controls, for example for use on mobile devices, open the Advanced Settings dialog and set the check on: Player uses large controls (easier to touch on mobile and tablet)
If a wider view of the notation is available for the current tune based on the aspect ratio of the staves, the Wide View button will appear. (Desktop browsers only)
Clicking this button toggles between wide and normal views of the Player. (Desktop browsers only)
Click Export Audio or Image to bring up a dialog where you can export your tune in various audio, MIDI, and image formats.
Click Settings to bring up a dialog where you can select your default abcjs soundfont, instruments, and instrument volumes.
![]()
The default abcjs soundfont, MIDI instruments, and MIDI volumes are used when a tune doesn't already have those values present in the ABC.
If you want to force the player to override any abcjs soundfont, MIDI instruments, or MIDI volumes present in the ABC for tunes and always play tunes with the values entered in the Player Settings dialog, check the box labeled:
Override all MIDI programs and volumes in the ABC with the defaults when playing tunes
If you do this, the tune will be reloaded and will play with the new settings.
If you want to no longer override the abcjs soundfont, MIDI instrument, and MIDI volume values already in the ABC for tunes, open this dialog and uncheck the box.
The Player Settings dialog is also available from the main Settings dialog.
See Select Default Player Instruments and Volumes below for full details on the values in this dialog.
Notes on Playing Selected Notes
The selected playback works with most tunes but there are a few exceptions:
If any ABC : style headers, for example but not limited to P:, K:, or Q: are found in the notation below the header, the entire tune will be loaded into the player.
Selected note playback only works for single voice tunes.
If a V: tag is present anywhere in the tune, the entire tune will always be loaded into the player.
If you prefer to always have the entire tune played even if notes are selected, you can disable the selected note playback feature in the Advanced Settings dialog.
Click Close to return to the ABC editor.
Brings up a "step-up" tune player with the last clicked tune where you can practice playing along with the tune looped with increasing tempos:
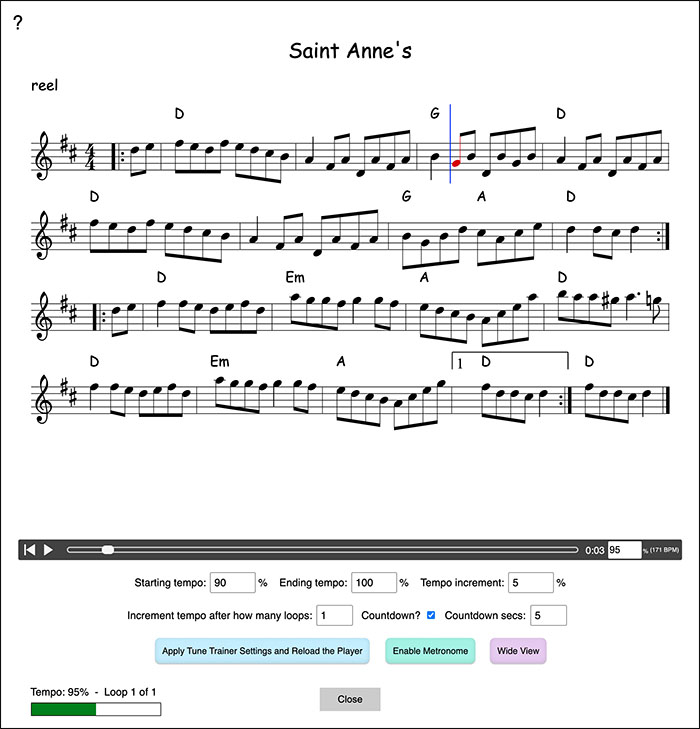
Enter your starting tempo percentage in the box labeled Starting tempo %.
Enter your ending tempo percentage in the box labeled Ending tempo %.
The actual playback tempo in beat-per-minute will depend on the tempo of the original tune, either set with a Q: tag or using the default tempo if no Q: tag is present.
Enter how much you want to speed up the play each time the speed is increased in the box labeled Tempo increment %.
Enter zero if you just want to loop at the starting tempo.
Enter how many times the tune should loop before incrementing the speed in the box labeled Increment tempo after how many loops.
If Player/Tune Trainer uses label L/R side click to decrement/increment values (for touch devices) is checked in the tool settings, you can decrement or increment the value of any number input field by clicking on the left or right side of the label to the left of the field.
If you click the % the the right of any of the tempo percentage input fields, the touch increment for the tempo percentages toggles between 1 and 5.
Clicking on the loop count label decrements or increments by 1.
If you want a countdown delay before playback, for example to give you time to pick up your instrument, check Countdown? and set the number of seconds for the countdown in Countdown secs. Values are saved for the next time you use the Tune Trainer.
Click Apply Trainer Settings and Reload the Player to apply your values.
Click the play button to start the training session.
While playing, the progress through your training session is shown as a bar graph at the bottom-left of the Tune Trainer.
Click Enable Metronome to enable the metronome.
When playing a tune with the metronome enabled, click Disable Metronome to return to the original version.
Toggling the metronome resets the Tune Trainer to its initial tempos.
If a wider view of the notation is available for the current tune based on the aspect ratio of the staves, the Wide View button will appear. (Desktop browsers only)
Clicking this button toggles between wide and normal views of the Tune Trainer.
To exit the Tune Trainer, click Close.
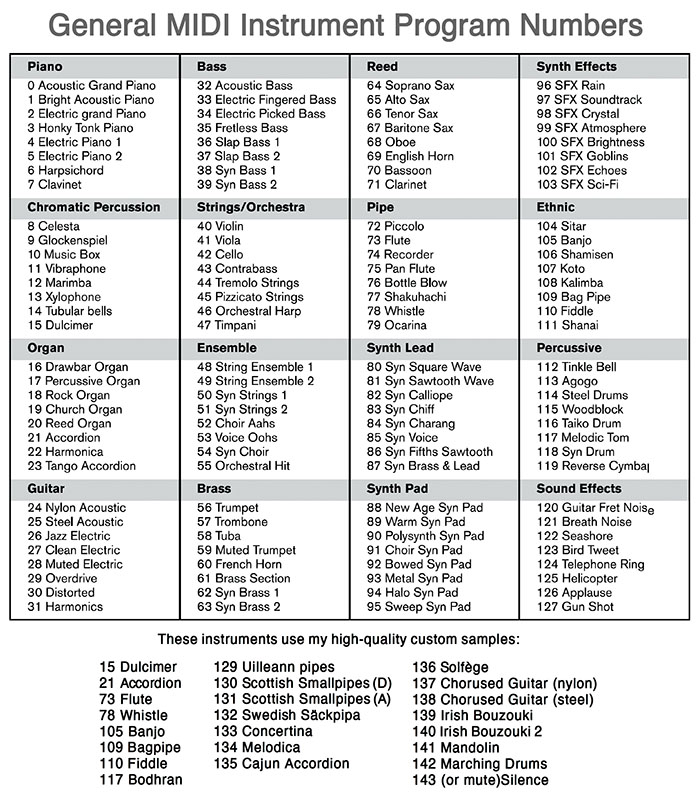
You may choose which instrument sounds are used for the melody and bass and chords when playing tunes.
By default, the melody, bass, and chords instrument used is a piano.
You can specify which abcjs General MIDI soundfont to use for a specific tune by adding any of these six comment-based annotations in the ABC header for the tune:
Each soundfont is a full General MIDI implementation, but has somewhat different sounds for each instrument.
If no %abcjs_soundfont soundfont is specified in a tune, the default soundfont chosen in the tool's Settings dialog is used.
It is not possible to change soundfonts within a tune.
If multiple instancs of %abcjs_soundfont are found in a tune, only the first one is used.
For more details on the soundfonts, visit: midi-js-soundfonts on GitHub
If Use custom sounds for Dulcimer, Accordion, Flute, Whistle, Banjo, Bagpipe, Fiddle, and Bodhran is enabled in the Settings (on by default), for all soundfonts, my custom sampled instruments for Dulcimer, Accordion, Flute, Whistle, Banjo, Bagpipe, Fiddle, and Bodhran (overrides Melodic Tom) will override the soundfont sounds.
If you wish to override the custom sound setting for a specific tune, add one of the following comment-based annotations anywhere in the tune:
% Force use of custom sounds for this tune:
%use_custom_gm_sounds true
% Disable use of custom sounds for this tune:
%use_custom_gm_sounds false
Choosing the Melody Instrument Sound
To choose the instrument used for the melody, add the following line to your ABC right after any headers and before the ABC notes, for example for an Accordion sound:
%%MIDI program 21
Example:
X: 1
T: The Kesh
R: Jig
M: 6/8
L: 1/8
K: Gmaj
%%MIDI program 21
D|: GAG GAB | ABA ABd | edd gdd | edB dBA |
GAG GAB | ABA ABd | edd gdB |1 AGF G2D :|2 AGF G2A||
|: B2B dBd | ege dBA | BAB dBG | ABA AGA |
B2 B dBd | ege dBd | gfg aga |1 bgg g2A :|2 bgg g2D |]
To change the instrument used for the melody, try changing the MIDI program # above to one of:
Piano: 0, Harpsichord: 6, Accordion: 21, Fingered Bass: 33, Harp: 46
By default, if you have chords in the ABC, the instrument used for the bass and chord playback is a piano.
Choosing the Bass and Chord Instrument Sounds
To choose the instrument for the bass and chords, add the following lines to your ABC right after any headers and before the ABC notes, for example for a Bass sound:
%%MIDI bassprog 34
%%MIDI chordprog 34
Here's the same example where I've added the bass and chords instrument program selection:
X: 1
T: The Kesh
R: Jig
M: 6/8
L: 1/8
K: Gmaj
%%MIDI program 21
%%MIDI bassprog 34
%%MIDI chordprog 34
D|: GAG GAB | ABA ABd | edd gdd | edB dBA |
GAG GAB | ABA ABd | edd gdB |1 AGF G2D :|2 AGF G2A||
|: B2B dBd | ege dBA | BAB dBG | ABA AGA |
B2 B dBd | ege dBd | gfg aga |1 bgg g2A :|2 bgg g2D |]
To change the instrument used for the bass and chords, try changing the MIDI bassprog or chordprog # above to one of:
Piano: 0, Electric Piano: 5, Guitar: 25, Bass: 34, Synth Bass: 38
You can shift the bass and chords up one, two, or three octaves by adding octave=1, octave=2, octave=3 to the bassprog or chordprog commands:
You can shift the bass and chords down one octave by adding octave=-1 to the bassprog or chordprog commands:
%%MIDI bassprog 34 octave=1
%%MIDI chordprog 0 octave=2
%%MIDI chordprog 0 octave=3
The octave shift values for the bass and chords are maintained until changed.
To restore the octave to normal use octave=0:
%%MIDI bassprog 34 octave=0
%%MIDI chordprog 0 octave=0
Changing the Playback Volume of the Melody, Bass, and Chords
To change the volume of the melody, add a dynamics indication in the ABC itself before all the notes.
For example, to make the melody very soft, you can inject a !ppp! pianissimo annotation:
!ppp! |:"Em"EBBA B2 EB|"Em"B2 AB dBAG|"D"F/E/D AD BDAD|"D"F/E/D AD BAGF|
Most standard dynamics indications are supported, for example: !pppp!, !ppp!, !pp!, !p!, !mf!, !f!, !ff!, !fff!, or !ffff!
To mute just a section of a tune use the following annotation in the ABC (specific to this tool):
To completely mute the melody, change the MIDI Program to 144 (or mute):
%%MIDI program mute
To change the volume of the bass and chords, add the following two chordvol and bassvol %%MIDI directives immediately before any %%MIDI program and %%MIDI chordprog directives:
% Set the chord and bass volume (0-127)
%%MIDI chordvol 16
%%MIDI bassvol 16
%
% Use an Accordion sound when playing the melody:
%%MIDI program 21
%
% Use an Accordion sound when playing the bass:
%%MIDI bassprog 21
%
% Use an Accordion sound when playing the chords:
%%MIDI chordprog 21
%
The volume range is from 0 to 127.
To completely mute the bass or chords, change their MIDI Program to 144 (or mute):
%%MIDI bassprog mute
%%MIDI chordprog mute
The following MIDI instruments now use the same samples as my iOS "Celtic Sounds" and other apps:
Hammered Dulcimer: 15, Accordion: 21, Flute: 73, Whistle: 78, Banjo: 105, Bagpipe: 109, Fiddle: 110, Bodhran: 117, Uilleann Pipes: 129, Scottish Smallpipes (D): 130, Scottish Smallpipes (A): 131, Säckpipa: 132, Concertina: 133, Melodica: 134, Cajun Accordion: 135, Solfège: 136, Chorused Guitar (nylon): 137, Chorused Guitar (steel): 138, Irish Bouzouki: 139, Irish Bouzouki 2: 140, Mandolin: 141, Marching Drums: 142, Border Pipes: 143, Silence: 144 (or mute)
The Scottish Smallpipes (A) samples are from an instrument tuned in A, but the note numbers mapped to D so that they have the same transposed MIDI note range as the flute or whistle.
The Flute, Whistle (if Use custom sounds for Dulcimer, Accordion, Flute, Whistle, Banjo, Bagpipe, Fiddle, and Bodhran in the Settings is enabled), and Uilleann pipes sounds will automatically "fold" notes below first octave D up an octave.
The Säckpipa and Scottish Smallpipes (A) and (D) sounds will automatically "fold" notes above second octave D down an octave.
Any General MIDI instrument program number can be selected for the melody and chord sounds.
Setting the Release Decay Time for Notes
You can manually set the release decay time for notes using:
This can be useful for lengthening the decay time on note releases for plucked and other instruments.
For example to set the release decay time for a specific tune to 500 milliseconds, add this anywhere in the tune ABC:
The default release decay time for abcjs is 200 milliseconds.
When using my custom Hammered Dulcimer samples, the release decay time, unless overridden by this annotation, is 4000 milliseconds.
Use program #144 Silence (or mute) to mute MIDI voices.
This can be used, for example, to create "Music Minus One" recordings consisting only of backing bass and chord tracks.
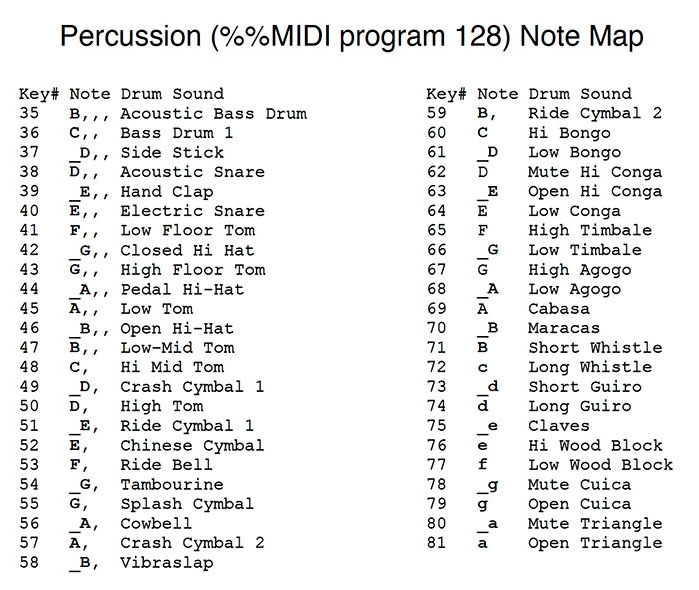
Use program #128 (Percussion) on its own voice for MIDI click tracks.
If %%MIDI program 105 (Banjo) is used in a tune, you may choose between one of five different custom Tenor Banjo sounds using one of the following comment-based annotations anywhere in the tune's ABC:
% Use the default banjo sound from the current soundfont
%banjo_style 0
% Dark tone
%banjo_style 1
% Medium bright tone
%banjo_style 2
% Bright tone
%banjo_style 3
% Medium bright tone, slightly rough
%banjo_style 4
Only the first instance of a %banjo_style annotation found in a tune will be used for that tune.
If no banjo style is specified in a tune, the default is style 2.
If banjo style 0 is selected, the default banjo sound from the current soundfont selected for the tune (or the tool default if not specified in the tune) will be used.
If you wish to override all custom sound setting for a specific tune, add one of the following comment-based annotations anywhere in the tune:
% Force use of custom sounds for this tune:
%use_custom_gm_sounds true
% Disable use of custom sounds for this tune:
%use_custom_gm_sounds false
If you have Use custom sounds for Dulcimer, Accordion, Flute, Whistle, Banjo, Bagpipe, Fiddle, and Bodhran checked in the tool's Settings, MIDI instrument #117 (Melodic Tom) is remapped to bodhran sounds with the following note map:
%
% Basic low pitch strikes start at C.
%
C. - Strike velocity low
^C. - Strike velocity low
D. - Strike velocity medium low
^D. - Strike velocity medium low
E. - Strike velocity medium high
F. - Strike velocity high
^F. - Strike velocity high
G. - Strike velocity medium low - Scale Root ^G. - Strike velocity medium low - Major 2nd A. - Strike velocity medium low - Major 3rd ^A. - Strike velocity medium low - Major 4th B. - Strike velocity medium low - Major 5th %
% Low pitch pitched strike versions at multiple velocities and pitches start at C,,
%
C,, - Strike velocity low - Scale Root ^C,, - Strike velocity low - Major 2nd D,, - Strike velocity low - Major 3rd ^D,, - Strike velocity low - Major 4th E,, - Strike velocity low - Major 5th F,, - Strike velocity medium low - Scale Root ^F,, - Strike velocity medium low - Major 2nd G,, - Strike velocity medium low - Major 3rd ^G,, - Strike velocity medium low - Major 4th A,, - Strike velocity medium low - Major 5th ^A,, - Strike velocity medium high - Scale Root B,, - Strike velocity medium high - Major 2nd C, - Strike velocity medium high - Major 3rd ^C, - Strike velocity medium high - Major 4th D, - Strike velocity medium high - Major 5th ^D, - Strike velocity high - Scale Root E, - Strike velocity high - Major 2nd F, - Strike velocity high - Major 3rd ^F, - Strike velocity high - Major 4th G, - Strike velocity high - Major 5th %
% Scrapes and taps start at ^G,
%
^G, - Scrape
A, - Edge tap velocity low
^A, - Edge tap velocity medium
B, - Edge tap velocity high
%
% High pitch strikes start at C
%
C - Strike velocity low
^C - Strike velocity low
D - Strike velocity medium low
^D - Strike velocity medium low
E - Strike velocity medium high
F - Strike velocity high
^F - Strike velocity high
G - Strike velocity medium low - Scale Root ^G - Strike velocity medium low - Major 2nd A - Strike velocity medium low - Major 3rd ^A - Strike velocity medium low - Major 4th B - Strike velocity medium low - Major 5th %
% High pitch pitched strike versions at multiple velocities and pitches start at c
%
c - Strike velocity low - Scale Root ^c - Strike velocity low - Major 2nd d - Strike velocity low - Major 3rd ^d - Strike velocity low - Major 4th e - Strike velocity low - Major 5th f - Strike velocity medium low - Scale Root ^f - Strike velocity medium low - Major 2nd g - Strike velocity medium low - Major 3rd ^g - Strike velocity medium low - Major 4th a - Strike velocity medium low - Major 5th ^a - Strike velocity medium high - Scale Root b - Strike velocity medium high - Major 2nd c' - Strike velocity medium high - Major 3rd ^c' - Strike velocity medium high - Major 4th d' - Strike velocity medium high - Major 5th ^d' - Strike velocity high - Scale Root e' - Strike velocity high - Major 2nd f' - Strike velocity high - Major 3rd ^f' - Strike velocity high - Major 4th g' - Strike velocity high - Major 5th
The tuning of the bodhran for a tune can be set using either of the following comment-based annotations anywhere in the tune's ABC:
%bodhran_tuning (drum pitch)
%bodhran_pitch (drum pitch)
Where the drum fundamental pitch can be:
C, C#, Db, D, D#, Eb, E, F, F#, Gb, G, G#, Ab, A, A#, Bb, or B.
If no pitch is specified the default fundamental pitch is A.
Demo of the complete bodhran instrument note map:
To use the bodhran sound for a percussion backing track, create a two-voice tune with the bodhran on its own voice:
X: 1
T: The Kesh - Bodhran Demo
R: Jig
M: 6/8
L: 1/8
Q: 3/8=120
K: Gmaj
V:1 name="Melody"
% Use MIDI program 78 for the melody Tin Whistle sound
%%MIDI program 78
V:2 name="Bodhran"
% Use MIDI program 117 for the Bodhran sound
%%MIDI program 117
% Set the Bodhran tuning to A
%bodhran_tuning A
% Melody voice
V:1
z6|z6|z6|z6|
|:GAG GAB|ABA ABd|edd gdd|edB dBA|
GAG GAB|ABA ABd|edd gdB|AGF G3:|
|:BAB dBd|ege dBA|BAB dBG|ABA AGA|
BAB dBd|ege dBd|gfg aga|bgf g3:|
% Bodhran voice
V:2
FzD FCC | FzD FCC | FzD FCC | FCC !>!F3 |
|:FzD FCC | FzD FCC | FzD FCC | FzD FCC |
FzD FCC | FzD FCC | FzD FCC | FCC !>!F3 :|
|:FzD FCC | FzD FCC | FzD FCC | FzD FCC |
FzD FCC | FzD FCC | FzD FCC | FzD !>!F3 :|
X: 1
T: Cooley's - Bodhran Demo
C: Traditional
R: Reel
M: 4/4
L: 1/8
Q: 1/2=90
K: Edor
%%staffsep 50
% Set a specific amount of swing:
%swing 0.15
%
V:1 name="Melody"
%%MIDI program 78
V:2 name="Bodhran"
% Use MIDI program 117 for the Bodhran sound
%%MIDI program 117
% Set the Bodhran tuning to A
%bodhran_tuning A
% Melody voice
V:1
z8|z8|z8|z8|
|:EBBA B2 EB|B2 AB dBAG|F/E/D AD BDAD|F/E/D AD BAGF|
EBBA B2 EB|B2 AB defg|afge dBAF|1 DEFD E3D:|2 DEFD E2gf||
|:eB (3BBB eBgf|eBB2 gedB|A/A/A FA DAFA|A/A/A FA defg|
eB (3BBB eBgf|eBBB defg|afge dBAF|1 DEFD E2gf:|2 DEFD E4|]
% Bodhran voice
V:2
CCFC CCFC | CCFC CCFC| CCFC CCFC | CC!>!F/E/D !>!F4 |
|:CCFC CCFC |CCFC CCFC |CCFC CCFC |CCFC CCFC |
CCFC CCFC |CCFC CCFC |CCFC CCFC |1 CC!>!F/E/D !>!F4 :|2 CC!>!F/E/D !>!F4 ||
|:CCFC CCFC |CCFC CCFC |CCFC CCFC |CCFC CCFC |
CCFC CCFC |CCFC CCFC |CCFC CCFC |1 CC!>!F/E/D !>!F4 :|2 CC!>!F/E/D !>!F4 |]
To strongly emphasize a hit, preceed the note with a !>! accent indication as shown in the above examples.
If the bodhran sound is too loud, try adding an !mp! or other ABC dynamic indication before the first note of the bodhran voice ABC.
When using the higher pitched sounds starting on C5, if you want to avoid excessive ledger lines, you can set an octave up transpose in the voice declaration:
V:2 name="Bodhran" transpose=12
% Use MIDI program 117 for the Bodhran sound
%%MIDI program 117
When using the lower pitched sounds starting on C1, if you want to avoid excessive ledger lines, you can set an octave down transpose in the voice declaration:
V:2 name="Bodhran" transpose=-36
% Use MIDI program 117 for the Bodhran sound
%%MIDI program 117
The Uilleann pipes instrument, %%MIDI program 129, has chanter sounds over the range of ABC notes G, to D''.
The notes from G, to ^C are a copy of G to ^c for automatic octave folding when playing tunes that would be on the G string on a fiddle.
Two styles of drones and all available regulator pitches found on a full set are available on the following ABC notes:
%
% Drones:
%
D, Crowley-style drones
E, Lynch-style drones
%
% Regulator notes:
%
G.
A. B. C,, D,, ^F,, G,, A,, B,, C,
The custom bagpipe instruments have automatically looping drones when playing specific notes used for the drones.
On these specific bagpipe instruments and notes, using the ABC "-" tie indicator after the note, you can create notes as long as you want and the tool will take care of extending the drone sound instrument sample as required to the full length of the note when playing.
Great Highland Bagpipe
%%MIDI program 109
Border Pipes
%%MIDI program 143
Bass drone low volume:
A.
Tenor drone low volume:
A.
Bass drone normal volume:
A,,
Tenor drone normal volume:
A,
Uilleann Pipes
%%MIDI program 129
Scottish Smallpipes in D
%%MIDI program 130
Scottish Smallpipes in A
%%MIDI program 131
Swedish Säckpipa in D
%%MIDI program 132
ABC Drone Voice Examples
A useful pattern is to create a dedicated second ABC voice just for the drones.
Here are a few examples assuming a 4/4 tune with four measures per staff:
Example 1 - Scottish Smallpipes in D
%
% Setup a second voice for the drones
V:2
%
% Select the Scottish Smallpipes in D
%%MIDI program 130
%
D,,8- | D,,8- | D,,8- | D,,8- |
D,,8- | D,,8- | D,,8- | D,,8- |
D,,8- | D,,8- | D,,8- | D,,8- |
D,,8- | D,,8- | D,,8- | D,,8- |
Example 2 - Uilleann Pipes - Crowley-style Drones
%
% Setup a second voice for the drones
V:2
%
% Select the Uilleann Pipes
%%MIDI program 129
%
D,8- | D,8- | D,8- | D,8- |
D,8- | D,8- | D,8- | D,8- |
D,8- | D,8- | D,8- | D,8- |
D,8- | D,8- | D,8- | D,8- |
Example 3 - Great Highland Bagpipe
%
% Setup a second voice for the drones
V:2
%
% Select the Great Highland Bagpipe
%MIDI program 109
%
[A. A. ]8- | [A. A. ]8- | [A. A. ]8- | [A. A. ]8- |
[A. A. ]8- | [A. A. ]8- | [A. A. ]8- | [A. A. ]8- |
[A. A. ]8- | [A. A. ]8- | [A. A. ]8- | [A. A. ]8- |
[A. A. ]8- | [A. A. ]8- | [A. A. ]8- | [A. A. ]8- |
The Great Highland Bagpipe and Border Pipe drones loop seamlessly.
All others re-articulate automatically approximately every 30 seconds with minimal disruption to the flow of the sound.
Use the Border Pipes instrument (%%MIDI program 143) for extended range tunes.
The Border Pipes instrument (%%MIDI program 143) is a custom "folded" version of the Bagpipe (%%MIDI program 109) instrument that will automatically folds notes outside the range of the chanter into the range, emulating how one might actually play an extended range tune on the real instrument.
This instrument is used by the "Inject Bagpipe Sounds" feature when injecting tunes that were not previously imported from BWW files.
Nothing you need to do, you'll just notice that these extended range tunes sound more realistic when used with the Great Highland Bagpipe and Border Pipes sound injection.
The Marching Drums instrument, %%MIDI program 142, has a wide variety of percussion sounds useful for creating marching band drum backing tracks.
Here is the map of MIDI note names to drum sounds:
C. - ^D, Bass Drum 1 at various pitches
E, - B, Bass Drum 2 at various pitches
C - G Bass Drum 3 at various pitches
^G - c Bass Drum 4 at various pitches
^c5 Bass Drum 5
d Snare Drum 1
^d Snare Drum 2
e Snare Drum Stick Click
f Snare Drum Rim Tap
^f Snare Drum Gak
g Snare Drum Ping
^g and up Tenor Drum at various pitches
You may set the playback tuning offset in cents for each voice in the ABC using the following comment-based annotation:
%voice_tuning_cents voice_1_cents_offset (voice_2_cents_offset voice_3_cents_offset.
Where the cents offsets can be either positive or negative floating point numbers.
One semitone = 100 cents
This feature can be used to create chorusing effects, wet Accordion sounds, or massed Bagpipes band effects on multi-voice tunes.
Example: Wet-tuned LMM Accordion Simulation
On an Accordion tune with three identical voices, create an LMM wet sounding instrument using the basic Accordion sound:
% Set the tuning of each voice in cents
%voice_tuning_cents -15 15 0
%
% Voice 1 gets a negative tuning of 15 cents
V:1
%%MIDI program 21
%
% Voice 2 gets a positive tuning of 15 cents
V:2
%%MIDI program 21
%
% Voice 3 has no tuning offset but is transposed down an octave
V:3 transpose=-12
%%MIDI program 21
%
% Followed by three identical voices with the same ABC
% Added !p! dynamics to reduce the volume of the total mix
V:1
!p! GAG GAB | ABA ABd |
V:2
!p! GAG GAB | ABA ABd |
V:3
!p! GAG GAB | ABA ABd |
When layering multiple identical but de-tuned voices, you may want to add !p! style dynamics to the start of each voice's ABC to reduce the overall mixed instrument volume.
If there are also bass/chords specified in the ABC using "G" style annotation, the backup track will have a voice number one higher than the total number of melody voices.
You may add reverb when playing a tune by adding the following annotation anywhere in the tune's ABC:
%reverb reverb_style dry_mix_fraction wet_mix_fraction
Where reverb_style is one of:
off
room1
room2
room3
chamber1
chamber2
chamber3
hall1
hall2
hall3
church1
room (same as room3)
chamber (same as chamber2)
hall (same as hall2)
church (same as church1)
custom (load the reverb impulse .wav file from the Advanced Settings dialog)
dry_mix_fraction and wet_mix_fraction are fractional values that indicate how much of the original "dry" sound and reverb "wet" sound should be in the final playback mix.
Generally dry_mix_fraction and wet_mix_fraction should add up to 1.0, but any values are allowed.
For example, here's how to select the hall2 style reverb with .7 of the original sound and .3 of the reverb in the final mix:
%reverb hall2 0.7 0.3
For example, here's how to select the chamber1 style reverb with .8 of the original sound and .2 of the reverb in the final mix:
%reverb chamber1 0.8 0.2
To disable the reverb for a tune, include:
When the tool is first run, the default reverb is set to:
chamber 0.95 0.05
If you wish to change the default reverb there is a setting on the Advanced Settings dialog where you can enter your preferred set of default %reverb parameters to apply when playing tunes.
Additionally, if you want to experiment with custom convolution reverb acoustic impulses, you can load a custom reverb impulse .wav file from the Advanced Settings dialog to use during a single session.
Once loaded, the custom reverb impulse file is saved in browser storage and will be used the next time the custom reverb style is requested.
To save the audio with the reverb effect included, use the Save WAV File With Reverb option on the player Export Audio or Image dialog as described in the next section.
If you click Export Audio or Image in the Player, a dialog will appear where you can save out the audio of your tune in either .WAV or .MP3 format, the note playback events as a MIDI file, or the tune image in .JPG, .PNG, or .SVG formats.
The exported audio files will include any speed changes you have entered in the Player speed percentage control on the far right of the control bar.

Save as WAV File: Saves the audio for the current tune to your system in .WAV format (no reverb):
Save as MP3 File: Saves the audio for the current tune to your system in MP3 format (no reverb)
The bitrate for the MP3 file is set in the Advanced Settings dialog.
Default is: 192 kbit/sec.
This operation may take some time. The button label changes to Encoding .MP3 while the audio is being encoded.
To download all the tunes at once in .MP3 format with repeats and optional two-bar click intros, use the Export all Tunes as .MP3 feature in the More ABC Tools dialog.
Save as WAV File With Reverb: Saves the audio for the current tune to your system in .WAV format including any applied reverb effects.
This operation may take some time. The button label changes to Saving WAV File With Reverb while the audio is being encoded.
Save as MP3 File With Reverb: Saves the audio for the current tune to your system in .MP3 format including any applied reverb effects.
The bitrate for the MP3 file is set in the Advanced Settings dialog.
Default is: 192 kbit/sec.
This operation may take some time. The button label changes to Saving MP3 File With Reverb while the audio is being encoded.
Save as MIDI File: Saves a MIDI file for the current tune to your system:
Limits on Use of my Custom MIDI Instruments
The General MIDI specification only supports MIDI program numbers as high as 128.
My custom MIDI instruments start at MIDI program 129 and go up from there.
These custom instruments and program numbers can only be used by my ABC tool and are not interoperable with other ABC software.
In the exported MIDI file, any of my custom MIDI instrument program numbers will be remapped as follows:
129: Uilleann -> 109: Bagpipe
130: Smallpipes D -> 109: Bagpipe
131: Smallpipes A -> 109: Bagpipe
132: Säckpipa -> 109: Bagpipe
133: Concertina -> 22: Harmonica
134: Melodica -> 22: Harmonica
135: Cajun Accordion -> 21: Accordion
136: Solfège -> 52: Choir Aahs
137: Chorused Guitar (nylon) -> 24: Acoustic Guitar (nylon)
138: Chorused Guitar (steel) -> 25: Acoustic Guitar (steel)
139: Irish Bouzouki -> 25: Acoustic Guitar (steel)
140: Irish Bouzouki 2 -> 25: Acoustic Guitar (steel)
141: Mandolin -> 25: Acoustic Guitar (steel)
142: Marching Drums -> 117: Melodic Tom
143: Border Pipes -> 109: Bagpipe
Muted voices using MIDI instrument 144 or "mute" will be changed to program 0 (Acoustic Grand Piano) and the volume set to zero.
Save as JPEG File: Saves the image for the current tune to your system as a bitmap in JPEG format.
Image width is set from the Image width to export: value.
Save as PNG File: Saves the image for the current tune to your system as a bitmap in PNG format.
Image width is set from the Image width to export: value.
Save as SVG File: Saves the image for the current tune to your system as a vector representation in SVG format.
Image width is set from the Image width to export: value.
Limitations on Image Export
At this time Tin Whistle tab cannot be exported as an image.
Exported Note Name tablature images include the staff lines along with the note names.
By default, unless disabled in the Settings dialog, any tune with a:
detected in the ABC will automatically have swing added during playback.
The auto-swing factor may be set in the Settings dialog.
Note: Since this video was made, you no longer have to specify a swing offset, the tool now automatically offsets the swing for you if required.
Manually Adding Swing to Tunes
Note: Since this video was made, you no longer have to specify a swing offset, the tool now automatically offsets the swing for you if required.
If the tune is not marked as a Hornpipe, you can manually add swing to any tune in 2/4, 3/4, 4/4, 6/8, 9/8, and 12/8 meter by including the following comment-based annotation anywhere in the tune ABC:
%swing swing_factor (optional: Range is -0.9 to 0.9)
The swing factor lengthens the primary beats by the swing factor and shorten subsequent beats accordingly.
If no swing factor is provided, it will default to the Hornpipe swing factor set in the Settings dialog.
Example 1: To swing a reel with the default Hornpipe swing factor:
Example 2: To swing a reel with a 0.15 swing factor:
Example 3: To swing a jig with a 0.25 swing factor:
Example 4:
To get a typical Scottish snap feel in a Hornpipe with a -0.5 swing factor resulting in a shortened first beat, lengthened second beat:
Any manually added %swing value always overrides the automatic injected swing factor for Hornpipes.
To disable swing for a Hornpipe, you may add %noswing anywhere in the tune ABC:
% This will result in the swing being disabled
%noswing takes precedence over any default Hornpipe swing or manually added %swing
MIDI command to add swing
You may also use a MIDI command to add swing, swing_percentages is an integer percentage instead of a fractional value as used for the %swing directive
%%MIDI abctt:swing swing_percentage (Range is -100 to 100)
Example 1: To swing a reel with a 15% swing factor:
%%MIDI abctt:swing 15
Example 2: To swing a jig with a 25% swing factor:
%%MIDI abctt:swing 25
Example 3:
To get a typical Scottish snap feel in a Hornpipe with a -50% swing factor resulting in a shortened first beat, lengthened second beat:
%%%MIDI abctt:swing -50
You can also disable the swing with a MIDI command:
%%MIDI abctt:swing 0
The native abcjs %%MIDI swing command is also supported
The tool also now supports the native abcjs:
%%MIDI swing swing_value
swing_value is interpreted as follows:
50 (or less) is no swing
66 is triplet swing 2:1
60 is swing with a ratio of 3:2
75 is the maximum swing where the first eighth is played as a dotted eighth and the second as a sixteenth
Only one swing value is supported for a tune
Since swing is applied after all the tune notes are generated, there can only be one swing value for a tune.
The swing value used is set by the last %swing, %%MIDI abctt:swing, or %%MIDI swing command found in the ABC.
%%MIDI swing takes precedence over %swing or %%MIDI abctt:swing
If both the native abcjs %%MIDI swing and the tool-specific %swing or %%MIDI abctt:swing commands are found in the same tune, the abcjs native %%MIDI swing command will take precedence.
In ABC, grace notes, often used to indicate cuts and taps for traditional Irish music, are added using <>.
For example to indicate cutting a G with a preceding A, you would put the following in the ABC:
Grace notes play with a fixed (very short) duration and steal time from the following target note.
Playing some tunes on specific instruments may sound more authentic with minor adjustments to the default 45 milliseconds grace note duration.
To set the duration of grace notes used in ABC style ornamentation, add the following comment-based annotation anywhere in the tune ABC:
Unit is milliseconds, range is 1 to 150, default is 45.
For example to set the grace note duration to 60 milliseconds add the following anywhere in the tune's ABC:
Setting the %grace_duration_ms value to 0 will disable my custom grace duration solution and for the tune revert back to the original abcjs solution for grace note timing: Graces use half the duration of the following note and the following note duration is reduced by half.
% Disables custom grace timing solution
%grace_duration_ms 0
In abcjs, a ~ preceding a note draws the roll indication above the note, but does not inject a roll into the playback.
In this tool, playable rolls (also shows a roll indication drawn above the note) are are added using R or !roll! preceding the note.
For example, to indicate a quarter note roll on G in ABC:
To indicate a dotted quarter note roll on A in ABC:
To set the timing and volume parameters for a quarter-note roll, add the following comment-based annotation anywhere in the tune ABC:
%roll_2_params timeslot1 timeslot2 fraction1 fraction2 fraction3 volume1 volume2 volume3
To set the timing and volume parameters for a dotted quarter-note roll, add the following comment-based annotation anywhere in the tune ABC:
%roll_3_params timeslot1 timeslot2 fraction1 fraction2 fraction3 volume1 volume2 volume3
All parameters must be positive floating point values.
The duration values are based on dividing the note time into three time slots for the whole roll and indicate the relative time slots for the first and second notes of the roll.
The third note in the roll will have a time slot of (3 - (duration1 + duration2))
The fraction values indicate what fraction of the time slot the roll note should be played.
The volume values have a range from 0.0 to 1.0 and scale the playback volume of each note in the roll relative to the normal note volume.
Here are the default parameters used for a quarter note roll:
%roll_2_params 0.95 0.8 1.0 0.75 0.9 1.0 0.75 1.0
Here are the default parameters for a dotted quarter note roll:
%roll_3_params 1.45 0.6 1.0 0.75 0.9 1.0 0.75 1.0
If (timeslot1 + timeslot2) >= 3, since there would be no time left for the third note, the roll definition will be ignored.
To disable the custom roll parameter system and use the original abcjs "rapid-fire" roll timing solution, add the following comment-based annotation anywhere in the tune ABC:
Using the custom roll playback solution for rolls indicated with ~ before the note in the ABC
If you want to use the custom roll parameter playback solution for rolls indicated before the note with ~ as well those that use an R or !roll!, open the Settings dialog and check Rolls indicated in the ABC with ~ use the custom abcjs roll playback solution.
Enabling/Disabling ~ Roll Playback in a Tune
To override the default settings and force playback to use the custom roll playback solution for a specific tune you can include the following comment-based annotation anywhere in the tune's ABC:
To override the default settings and disable playback of the custom roll playback solution for a specific tune you can include the following comment-based annotation anywhere in the tune's ABC:
In this tool, you may customize the boom-chick backup rhythm used for any meter in a tune with chords by adding the following %%MIDI directive anywhere in the tune's ABC:
%%MIDI abctt:boomchick meter rhythm_pattern_string partial_measure_threshold
This is particularly useful for meters that may have multiple commomly played subdivision groupings like 7/8 and 10/8.
Valid rhythm_pattern_string characters are:
B - Boom, b - Alternate Boom, c - Chick, and x - Silence.
%%MIDI abctt:boomchick 4/4 Bcbc 2
%%MIDI abctt:boomchick 5/4 Bxcbc 2
%%MIDI abctt:boomchick 5/8 Bxxbx 2
%%MIDI abctt:boomchick 7/8 Bccbxbx 3
%%MIDI abctt:boomchick 10/8 Bccbccbxbx 5
The number of characters in the pattern_string must match the meter numerator.
partial_measure_threshold sets how many beats must be present in a partial measure in the ABC to use the custom pattern.
partial_measure_threshold is optional and if not included, defaults to half of the meter numerator rounded down to the next lowest integer (minimum is 1).
If you have an incorrectly formatted %%MIDI abctt:boomchick directive in a tune, it will have no effect when playing the tune.
You may have multiple custom rhythm directives for different or the same meters in a single tune and the pattern will change as the tune is played.
The first %%MIDI abctt:boomchick directive found in the tune will be used for the start of the tune.
If you want to use this feature with multiple rhythm patterns in the tune, it is best to have an initial %%MIDI abctt:boomchick before the tunes ABC that defines the initial rhythm.
Rhythm patterns may be changed mid-staff using an inline MIDI directive:
[I:MIDI=abctt:boomchick 4/4 Bcbc]
Here is a demonstration of custom backup patterns, live in the tool:
This directive is private to this tool and will not work with other ABC players.
Note: The custom boomchick feature is not available if using:
%%MIDI gchord optional_gchord_string
as a custom backup pattern specification for a tune.
If you want to change the duration of the backup boom and chick notes length as a percentage of the beat to the same value, you can include the following annotation anywhere in the tune's ABC:
%%MIDI abctt:boomchick_fraction beat_fraction
Where beat_fraction is the percentage of the beat to use for the duration of the backup boom and chick notes.
For example, to have the boom and chick note duration both be 75% of the beat instead of the default of 50%, add the following to the tune:
%%MIDI abctt:boomchick_fraction 75
If you want to change the duration of the boom and chick of the backup independently, you can include either or both of the following annotations anywhere in the tune's ABC:
%%MIDI abctt:boom_fraction beat_fraction
%%MIDI abctt:chick_fraction beat_fraction
Where beat_fraction is the percentage of the beat to use for the duration of the backup boom and chick notes.
For example, to have the boom duration set to 75% and the chick duration set to 25% of the beat, add the following to the tune:
%%MIDI abctt:boom_fraction 75
%%MIDI abctt:chick_fraction 25
Boom and chick fractions may be changed mid-staff using an inline MIDI directive:
[I:MIDI=abctt:boomchick_fraction 50]
[I:MIDI=abctt:boom_fraction 75]
[I:MIDI=abctt:chick_fraction 25]
Fractional values over 100 are supported to lengthen a note over a gap in a custom boomchick pattern created using an x in the pattern string.
The default value for 6/8, 9/8, and 12/8 meters are 125 for the boom and 40 for the chick.
The default value for 4/4 is 80 for the boom and 40 for the chick.
The default value for 3/4 is 75 for the boom and 50 for the chick.
The default value for 2/4 is 60 for the boom and 60 for the chick.
For all other meters, the defaults are 50 for the boom and 50 for the chick.
These directives are private to this tool and will not work with other ABC players.
Note: The boomchick_fraction, boom_fraction, and chick_fraction features are not available if using:
%%MIDI gchord optional_gchord_string
as a custom backup pattern specification for a tune.
Instead, if using %%MIDI gchord for backup, use the
By default, chords are played as a block chord.
If you want to have the backup chords played in a strummed style, you can include the following annotation anywhere in the tune's ABC:
%%MIDI abctt:strum_chords on
or
%%MIDI abctt:strum_chords true
This can be very effective when using a plucked string instrument as the chord MIDI program.
To turn strummed chords off, you can include the following annotation anywhere in the tune's ABC:
%%MIDI abctt:strum_chords off
or
%%MIDI abctt:strum_chords false
To set the timing between the notes in the strum as a division of a eighth note, you can include the following annotation anywhere in the tune's ABC:
%%MIDI abctt:strum_chords_divider divider_value
For example, to have the timing between the notes in the strum set to 1/10 of an eighth note, add the following to the tune:
%%MIDI abctt:strum_chords_divider 10
The default divider_value is 8.
Strumming enable and divider can also be changed mid-staff using inline MIDI directives:
[I:MIDI=abctt:strum_chords on]
[I:MIDI=abctt:strum_chords_divider 10]
To have the bass and strummed chords ring longer when not using gchord-based backup, you can experiment with different values for the backup boom and chick timing fractions, for example
%%MIDI abctt:boom_fraction 100
%%MIDI abctt:chick_fraction 100
Full details on the boom and chick beat timing fractions can be found in the Custom Backup Beat Timing Section above.
These directives are private to this tool and will not work with other ABC players.
Note: The strummed chord features are not available if using:
%%MIDI gchord optional_gchord_string
as a custom backup pattern specification for a tune.
When playing, if any of the following discrete or inline %%MIDI gchord annotations:
%%MIDI gchord optional_gchord_backup_pattern
[I:MIDI gchord optional_gchord_backup_pattern]
[I:MIDI=gchord optional_gchord_backup_pattern]
are detected in the ABC for a tune, the native abcjs gchord-based backup system will be used instead of the tool-specific
%%MIDI abctt:boomchick based custom backup pattern directives.
You can also force the gchord system to switch on by including:
with no pattern string on its own line anywhere in the ABC.
Here are some examples of gchord patterns for a 4/4 meter tune:
%%MIDI gchord fzczfzcz
%%MIDI gchord GHIJghij
Use %%MIDI gchordbars for Multi-Measure Backup Patterns
Additionally, multiple measure gchord backup patterns are supported via the %%MIDI gchordbars command:
Here is an example of how to create a two-bar gchord backup pattern:
%%MIDI gchordbars 2
%%MIDI gchord bzczbzczbzzzbzzz
Note: Use of gchord is currently limited to */4 and */8 meters. It does not work with */2 or C| cut time meters.
For the unsupported gchord meters, non-gchord based backup is still supported.
For full details on the %%MIDI gchord system, please visit:
Determining the Beat Resolution for gchord Patterns
Based on the meter of the tune and number of timeslots in the gchord control string, the tool will determine a default beat resolution to use for the gchord control string entries.
The timeslot count will be scaled by any previously set %%MIDI gchordbars value in place at the time the gchord command is issued.
For an x/8 meter the 1/8th note resolution will be the numerator of the meter.
For an x/4 meter, the 1/8th note resolution will be twice the numerator of the meter.
Case 1: 4/4 meter
Number of timeslots in the control string:
1-8: 1/8th note resolution
9-16: 1/16th note resolution
>16: 1/32nd note resolution
8 timeslots, will use 1/8th note resolution:
%%MIDI gchord fzczfzcz
8 timeslots, will use 1/8th note resolution:
%%MIDI gchord f2c2f2c2
16 timeslots, will use 1/16th note resolution:
%%MIDI gchord f3zc3zf3zc3z
32 timeslots, will use 1/32th note resolution:
%%MIDI gchord f6z2c6z2f6z2c6z2
12 timeslots, will use 1/16th note resolution and pad with silence:
%%MIDI gchord f3zc3zf3z
Case 2: 6/8 meter
Number of timeslots in the control string:
1-6: 1/8th note resolution
7-12: 1/16th note resolution
>12: 1/32nd note resolution
6 timeslots, will use 1/8th note resolution:
%%MIDI gchord fzcfzc
6 timeslots, will use 1/8th note resolution:
%%MIDI gchord f2cf2c
12 timeslots, will use 1/16th note resolution:
%%MIDI gchord f2z2c2f2z2c2
24 timeslots, will use 1/32th note resolution:
%%MIDI gchord f4z4c4f4z4c4
8 timeslots, will use 1/16th note resolution and pad with silence:
%%MIDI gchord f2z2c2f2
If using %%MIDI gchordstress and %%MIDI gchordduration (described below) along with automatic beat divider resolution, you will need to make sure your scaling parameter list lengths match the expected beat resolution.
Forcing a Specific gchord Divider
If you want to force the tools to interpret your gchord patterns at a 1/16th or 1/32nd note resolution instead of the default 1/8th, you can append a optional divider value to the %%MIDI gchord command.
Valid divider values are 1 (1/8th note resolution - default), 2 (1/16th note resolution), and 4 (1/32nd note resolution)
For example, here are two gchord patterns forced to use 1/16th note resolution even though they only have 8 timeslot entries:
%%MIDI gchord fz5cz 2
%%MIDI gchord GHIJghij 2
When specifying a gchord resolution divider, the %%MIDI gchordstress and %%MIDI gchordduration patterns (described below) can also be longer to match the gchord pattern length.
Controlling %%MIDI gchord-based Backup Dynamics
Note: Since this video was produced, the commands for volume and duration scaling dynamics have promoted to first class ABC commands and changed from:
%%MIDI abctt:gchordurationscale duration_scale_pattern
%%MIDI gchordduration duration_scale_pattern
%%MIDI abctt:gchordstress stress_pattern
%%MIDI gchordstress stress_pattern
%%MIDI gchord Volume Dynamics Scaling
The volume dynamics of the gchord backup pattern may be set using the following private %%MIDI command:
%%MIDI gchordstress stress_pattern
Where stress_pattern is a sequence of floating point numbers that have a 1-to-1 correspondence to the %%MIDI gchord control string entries.
Each value in the sequence multiplies the %%MIDI bassvol or %%MIDI chordvol playing volume of each corresponding gchord entry by the specified value.
The scaled values are limited to a range of 0 - 127.
If the number of values in the stress_pattern is less than the gchord pattern length, it will automatically be filled out copying values from the start of the stress pattern as required to match the gchord pattern length.
For example, here is a pair of gchord and gchordstress commands for a reel where the second half of the pattern is played quieter:
%%MIDI gchord fzczfzcz
%%MIDI gchordstress 1.0 1.0 1.0 1.0 0.5 0.5 0.5 0.5
%%MIDI gchordstress can also be used as an inline MIDI command:
[I: MIDI=gchordstress 1.0 1.0 1.0 1.0 0.5 0.5 0.5 0.5]
Stress scaling if the gchord command string contains numbers
If your gchord string contains numbers, then you need to account for the number of beat slots that each entry in the gchord actually takes and create stress scale entries assuming the first slot is the note itself and additional rest entries have been added to fill out the note time.
For example, the following gchord string with only 4 entries with duration scaling numbers:
%%MIDI gchord f2c2f2c2
For the purposes of stress scaling needs to be considered as this expanded string with 8 entries that has additional injected z rests to fill out the time for each scaled entries:
%%MIDI gchord fzczfzcz
With the stress scale values only applied to the non-expanded entries and not the injected z rests:
%%MIDI gchordstress 2.0 1.0 2.0 1.0 2.0 1.0 2.0 1.0
Applying stress scaling to the rest entries will not break anything (they are silent), but using this format for the entries may make it easier to match them up to the original gchord string.
%%MIDI gchord Duration Scaling
When a gchord command is found in the ABC, a default duration map is generated for each entry in the gchord pattern, assuming one beat unit, either 1/8th, 1/16th, or 1/32nd note depending on the gchord divider (described below) for each entry, unless the entry is followed by a number, in which its duration will be the number of beat units specified by the number.
If you wish to override the default duration map, the duration of each of the notes in the gchord pattern can be changed using the following private %%MIDI command:
%%MIDI gchordduration duration_scale_pattern
Where duration_scale_pattern is a sequence of floating point numbers that have a 1-to-1 correspondence to the total beat length of the %%MIDI gchord control string entries.
Each value in the sequence multiplies the default duration, by default an 1/8th note unless specifying a gchord divider (described below), of each corresponding gchord entry by the specified value.
If the number of values in the duration_scale_pattern is less than the gchord pattern length, it will automatically be filled out copying values from the start of the duration scale pattern as required to match the gchord pattern length.
For example, here is a pair of gchord and gchordduration commands for a reel where the second half of the pattern is played with longer notes:
%%MIDI gchord fzczfzcz
%%MIDI gchordduration 1.0 1.0 1.0 1.0 2.0 2.0 2.0 2.0
%%MIDI gchordduration can also be used as an inline MIDI command:
[I: MIDI=gchordduration 1.0 1.0 1.0 1.0 2.0 2.0 2.0 2.0]
Duration scaling if the gchord command string contains numbers
If your gchord string contains numbers, then you need to account for the number of beat slots that each entry in the gchord actually takes and create duration scale entries assuming the first slot is the note itself and additional rest entries have been added to fill out the note time.
For example, the following gchord string with only 4 entries with duration scaling number:
%%MIDI gchord f2c2f2c2
For the purposes of duration scaling needs to be considered as this expanded string with 8 entries that has additional injected z rests to fill out the time for each scaled entry:
%%MIDI gchord fzczfzcz
With the duration scale values ideally only applied to the non-expanded entries and not the injected z rests:
%%MIDI gchordduration 2.0 1.0 2.0 1.0 2.0 1.0 2.0 1.0
Applying duration scaling to the rest entries will not break anything (they are silent), but using this format for the entries may make it easier to match them up to the original gchord string.
The %%MIDI gchordstress and %%MIDI gchordduration commands are private to this tool and will have no effect in other ABC tools.
Automatic filling out of gchordstress and gchordduration patterns
Here are some fully specified gchordstress and gchordduration patterns for 4/4 meter:
%%MIDI gchordstress 2 1 1 1 2 1 1 1
%%MIDI gchordduration 2 2 2 2 2 2 2 2
As described above, if the gchordstress or gchordduration patterns are shorter than the gchord pattern, they will be filled out by copying values from the beginning of the pattern as required to match the gchord pattern length.
Here are some shorter gchordstress and gchordduration patterns that are simpler than the above, but will achieve the same result.
%%MIDI gchordstress 2 1 1 1
%%MIDI gchordduration 2
Implementation Differences from abc2MIDI
This implementation differs from the abc2MIDI document in that it doesn't scale the pattern to fit the measure, there are fixed allocations of 1/8th, 1/16th, or 1/32nd note slots depending on the gchord pattern length and meter.
If you have multiple meter changes within a single measure and want to use %%MIDI gchord, best to separate them with bar lines.
Custom Boomchick Backup is not Available When Using %%MIDI gchord
When the abcjs gchord-based backup system is being used, the following custom backup annotations will be ignored if present in the ABC:
%%MIDI abctt:boomchick
%%MIDI abctt:boomchick_fraction
%%MIDI abctt:boom_fraction
%%MIDI abctt:chick_fraction
If you want to specify that a chord in the ABC play with an inversion, you can append a : and then the numbers 0-14 to the root chord name
0 = no inversion
1 = 1st inversion
2 = 2nd inversion
3 = 3nd inversion (octave up for simple 3-note chords)
Example 1: E Minor chord, first inversion:
Example 2: G chord, second inversion:
Example 3: D Minor 7 chord, one octave higher (four notes in the chord):
The inversion values allow up to a full octave transform of the original chord, and then will wrap around to the original chord and subsequent inversions.
The inversions also include any octave shifts you might have specified on the %%MIDI chordprog octave=1 style commands for the chord instrument.
Note: The inversion numbers are not drawn in the notation, they are only present in the ABC and used to convey inversion information for playback.
This style of indicating inversions was inspired by a system described at this Wikipedia page:
Chord inversions work both with standard and %%MIDI gchord based backup.
This extended chord syntax for the inversions may not be compatible with other ABC tools.
To sing the note names, you can select the Solfège instrument (136) for a voice:
% Select the Solfège instrument:
%%MIDI program 136
If you have injected Fixed (Do=C) Solfège under the notes using the Inject Shape Note/Solfège dialog, the sung notes will match the displayed note names.
If you have injected either Do-based minor or La-based minor Movable Do Solfège under the notes using the Inject Shape Note/Solfège dialog, you can transpose the sound to match without changing the displayed notation by adding the following voice directive to your ABC:
% Set the voice transpose:
V:1 transpose=5
% Select the Solfège instrument for this voice:
%%MIDI program 136
Change the 5 to whatever is required to get the displayed solfège to match the sung note names.
There if the result sounds too high, you can also shift the required offset down by 12, this would be equivalent as far as the sung note names:
% Set the voice transpose:
V:1 transpose=-7
% Select the Solfège instrument for this voice:
%%MIDI program 136
Note: When transposed the absolute pitch of the sound when transposed will not be correct as compared with the notation, but this is the best possible at this time. At least the visual display and the sung notes will match.
For details on injecting solfège under the notes, see Inject Shape Note/Solfège.
Here is an end-to-end walkthrough of the process of voice combining, transposition, and hiding on a three-voice version of Greensleeves for Cello and Harpsichord:
Live version in the tool of the original transcription shown in the video:
Live version in the tool of the final transcription shown in the video:
Here is an end-to-end walkthrough of the process of voice combining, transposition, and hiding on "The Green Fields of Rossbeigh" with Mandolin and Tenor Banjo:
Live version in the tool of the full transcription shown in the video:
"Music Minus One" Example Using Voice Combining and Hiding
Here is an example of a "Music Minus One" style PDF tunebook of a Telemann trio for Flute and Continuo created using voice combining and hiding:
The first tune in the PDF tunebook, when played, has the full arrangement.
The second tune in the PDF tunebook, when played, mutes the Flute part and plays only the Continuo part.
Live version in the tool of the transcription shown in the video:
PDF of the transcription shown in the video:
If the stem directions are not correct after combining voices you can add the following annotation to one or all of the voices to force the stems to properly reformat, for example:
For certain kinds of scores, for example two-part Bagpipe scores that have the melody and drone on the same staff using:
% This directive combines the two voices on one stave:
%%score (1 2)
%
% Set both voices to use the Bagpipe sound:
V:1
%%MIDI program 109
V:2
%%MIDI program 109
%
% This directive hides the drone voice ABC
%%voicecolor transparent
When playing the tune, you may only want the voice 1 melody line to be highlighted.
This may be useful for other multi-voice, single-staff tunes where you want to hide all voices except the melody during playback.
To accomplish this, you can add the following comment-based annotation anywhere in the tune ABC:
If you want to disable all highlighting of notes during playback, you can add the following comment-based annotation anywhere in the tune ABC:
Clicking the More Tools button brings up the More ABC Tools dialog:

If you would like to only show the buttons for the features you commonly use and hide the others, click the controls icon at the top-right of the dialog to choose features of the dialog you would like to show/hide:

The most commonly used buttons are always shown.
Your preferences are saved and restored the next time you use the tool.
The ABC filtering buttons are enabled if Annotations, Text, Chords, Injected Tab, or Ornaments are detected in the ABC.
These commands are non-destructive and only hide the elements chosen in the rendered notation.
This is primarily for filtering displayed elements before doing a PDF export.
Hide/Show Annotations - Hides/Shows most ABC annotations like Composer, Discography, History, Tempo, etc. in the displayed notation.
Hide/Show Text - Hides/Shows any %%center or %%text based text annotations in the ABC in the displayed notation.
Hide/Show Chords- Hides/Shows any chords present in the ABC in the displayed notation.
Hide/Show Injected Tab - Hides/Shows any text-annotation based injected tablature present in the ABC in the displayed notation.
Hide/Show Ornaments - Hides/Shows any ~ or <> style ornaments present in the ABC in the displayed notation.
The ABC stripping buttons are enabled if Annotations, Text, Chords, Injected Tab, or Ornaments are detected in the ABC.
These commands are destructive in that they remove text from the current ABC.
It may be a good idea to save the current ABC or do a Copy All or Snapshot before using one of these commands if you want to quickly undo the operation.
Strip Annotations - Removes most ABC annotations like Composer, Discography, History, Tempo, etc. from the ABC.
Strip Text - Removes any %%center or %%text based text annotations from the ABC.
Strip Chords - Removes any chords present in the ABC.
Strip Injected Tab - Removes any text-annotation based injected tablature present in the ABC.
Strip Ornaments - Removes any ~ or <> style ornaments present in the ABC.
These commands are destructive in that they inject additional text into the current ABC.
It may be a good idea to save the current ABC or do a Copy All or Snapshot before using one of these commands if you want to quickly undo the operation.
Inject Tune Title Numbers - Brings up a dialog where you can inject or remove incrementing numbers to the tune titles:
The tune numbers are injected before the tune name with incrementing values starting at 1, followed by a period, followed by a space:
1. First Tune Name
2. Second Tune Name
3. Third Tune Name
This can be very useful for numbering tunes in tunebooks before PDF generation.
When adding tune title numbers, any existing numbers that were previously injected are removed first.
This makes it very easy to generate new incrementing tune title numbers after adding, deleting, or re-ordering tunes.
Title numbers are not added to PDF section headers.
When using numbered titles, it is best to select generating unsorted Table of Contents and Index pages in exported PDF files.
Inject PDF Section Header - Prompts for a PDF section header to inject at the text cursor insertion point.
Click on any section header in the Table of Contents or Index to jump to that section of the tunebook.
The * at the start of the injected tune title will be automatically hidden in the rendered ABC notation and only used to signal the PDF generator to add the section header.
In the unsorted Table of Contents and Index, section headers will be displayed with space above and below the section header.
In the sorted Table of Contents and Index, section headers will be displayed at the top without the extra space.
When rendering full tunes, section headers are automatically pushed to the top of a new page in the tunebook.
When rendering note or text incipits, section headers are not automatically pushed to the top of a new page.
Inject Font Settings - Injects specific tool font settings (set in the Font Settings dialog) at the top of the ABC for when you want to make absolutely sure that the rendered ABC on a shared ABC file exactly matches what you see on your system independent of the user's default font settings.
Inject MIDI Programs and Volumes - Injects MIDI Soundfont, Melody program, Bass program, Chord program and volume annotations into one or all tunes:
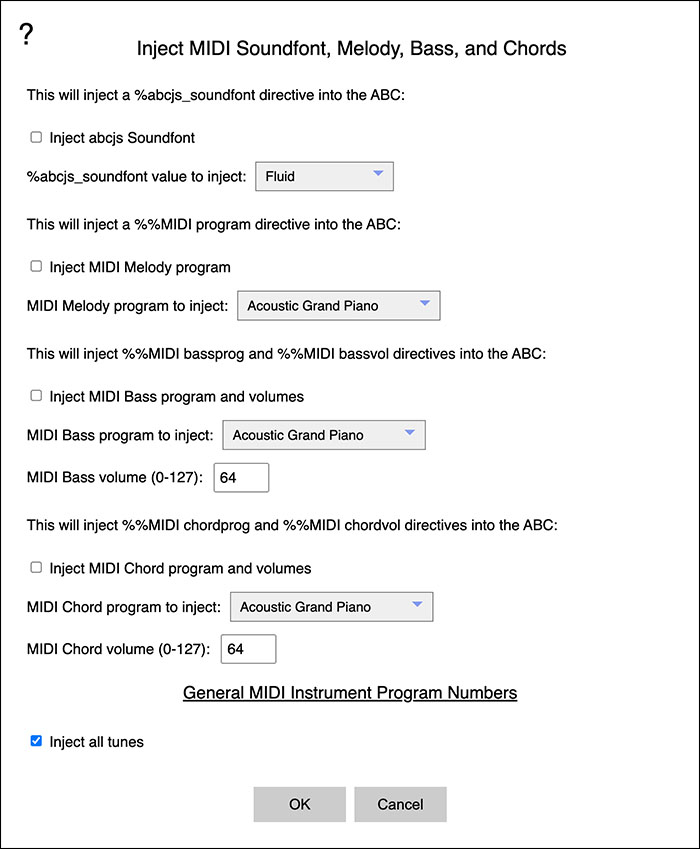
Select your MIDI soundfont from the soundfont selection menu.
Select your MIDI instrument for the Melody, Bass, and Chords from the instrument program selection menus.
To mute the Melody, Bass, or Chords, select "Mute" from the instrument program selection menus.
You may select which of the MIDI parameters you want injected by clicking the checkboxes.
Select "Inject all tunes" to add the selected MIDI annotations to all tunes.
If "Inject all tunes" is not checked, the MIDI annotation is added at the current text insertion point.
Inject Metronome - Injects a playable metronome into one or all tunes based on the meter of the tune as specified in the M: tag.
Inject Repeats + Intros - Allows you to increase the number of times through each tune by duplicating the ABC for the tune.
Additionally, you may optionally inject two bars of silence or a two-bar style-appropriate click intro at the top of each tune.
For clean repeats, your tunes must not have extraneous pickup notes and must have proper and complete timing.
Important Requirement for 1st Part Repeats
If the 1st part of a tune has a :| repeat symbol at the end of it (or on a first ending), but not at the very start of the part, you will need to add the starting |: repeat bar symbol for the ABC to play correctly if there is more than one repetition through the tune.
The lack of a first repeat bar symbol in the ABC will make the first part of the tune on the second and repetitions appear to not repeat.
To Fix:
Add a |: repeat bar at the start of the tune.
Inject ABC Header Text - Prompts for text to inject at the top or bottom of the current tune or all tunes ABC header.
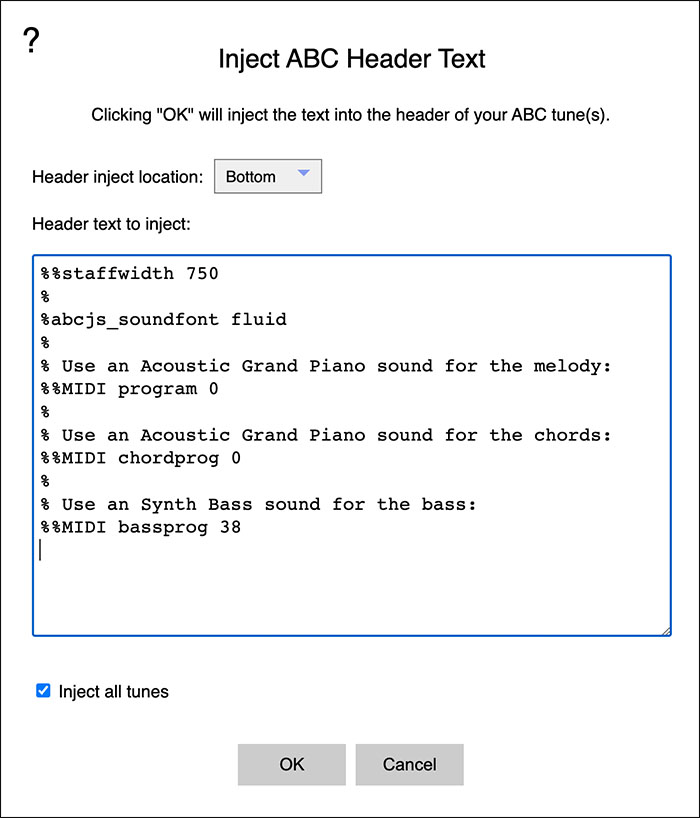
This can be useful, for example to add a Q: tempo tag or %swing value to all the tunes at once.
Inject %%staffwidth - Prompts for a %%staffwidth value to inject at the text insertion point or into all tunes.
This can be used to change the scale of every tune both for display and PDF generation.
Generally values above 556 will make the tunes less tall.
If "Inject all tunes" is not checked, the annotation is added at the current text insertion point.
The tablature/solfège injection features add additional text into your ABC to create tablature for the selected instrument or notation style.
Consider saving or grabbing a Snapshot your work before injecting tab!
Since the tab injectors modify your original ABC, you may want to grab a Snapshot of the entire ABC (simply click Snapshot) before doing the tab injection operation.
If you grab a Snapshot, after the tab injection operation, if there was an issue, you can click Restore to get back your original ABC.
Inject B/C Box Tab - Injects B/C Box tablature into the ABC.
See the Configuring Tablature/Solfège Fonts and Settings section below for full details on the B/C box tablature style, font, and spacing options.
Inject C#/D Box Tab - Injects C#/D Box tablature into the ABC.
See the Configuring Tablature/Solfège Fonts and Settings section below for full details on the C#/D box tablature style, font, and spacing options.
Reading the Box Tablature
B/C Box - Shows standard notation and tablature for a standard 21-button B/C tuned box.
The button numbers and pitches used for the tablature match those on this chart:
Notes on the C-row are indicated by numbers: 1, 2, 3, .
Notes on the B-row are indicated by numbers in circles: ①, ②, ③, .
Push is indicated with a "↓" arrow by default (configurable in the Box and Anglo Concertina Tablature Settings dialog).
Draw is indicated with an "↑" arrow (configurable in the Box and Anglo Concertina Tablature Settings dialog).
C#/D Box - Shows standard notation and tablature for a standard 21-button C#/D tuned box.
The button numbers and pitches used for the tablature match those on this chart:
Notes on the D-row are indicated by numbers: 1, 2, 3.
Notes on the C#-row are indicated by numbers in circles: ①, ②, ③, .
Push is indicated with a "↓" arrow (configurable in the Box and Anglo Concertina Tablature Settings Dialog).
Draw is indicated with an "↑" arrow (configurable in the Box and Anglo Concertina Tablature Settings Dialog).
Assumptions about the B/C and C#/D Box tablature solutions:
The tablature solution assumes that the "magic" notes (E and B on a B/C, F# and C# on a C#/D) that are available on both rows, will be played on the C-row on a B/C box and on the D-row on a C#/D box.
Use of the B/C and C#/D Box tablatures on a 23-button instrument:
If you are playing a 23-button instrument, you will need to shift your start position one button higher when playing.
Consider your first button as "button zero".
Inject Anglo Concertina Tab - Injects Anglo Concertina tablature into the ABC.
See the Configuring Tablature/Solfège Fonts and Settings section below for full details on the Anglo Concertina tablature style, font, and spacing options.
This includes selection of your instrument's button-to-note mapping (Jeffries or Wheatstone) as well as preferred fingering style (On-Row or Cross-Row).
Reading the Anglo Concertina Tablature
Wheatstone Layout
Jeffries Layout
Tablature Button Names
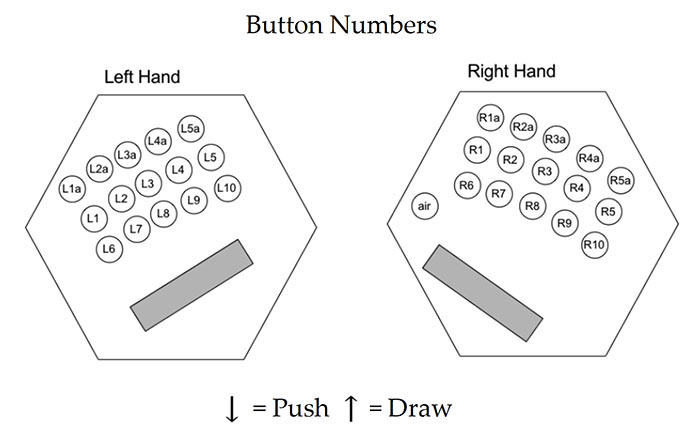
Push is indicated with a "↓" arrow by default (configurable in the Box and Anglo Concertina Tablature Settings dialog).
Draw is indicated with an "↑" arrow by default (configurable in the Box and Anglo Concertina Tablature Settings dialog).
Inject Fiddle Fingerings - Injects Fiddle/Mandolin fingerings (which finger to use for the note) into the ABC.
Finger Number Only - Injects only the finger to use (0-Open, 1, 2, 3, 4)
String Name + Finger Number (Inline) - Injects the string name (G, D, A, E) and finger to use (0-Open, 1, 2, 3, 4), both on the same line.
String Name + Finger Number (Name over Number) - Injects both the string name (G, D, A, E) and finger to use (0-Open, 1, 2, 3, 4), string name above finger number.
String Name + Finger Number (Number over Name) - Injects both the string name (G, D, A, E) and finger to use (0-Open, 1, 2, 3, 4), finger number above string name.
Note for Mandolin players:
This is distinct from the fret number displayed when showing the Mandolin tablature along with the notation.
The Mandolin tablature shows which fret to use on the Mandolin. This shows which finger to use on the fret.
See the Configuring Tablature/Solfège Fonts and Settings section below for full details on the tablature font and spacing options.
Inject Dulcimer Tab - Injects Mountain Dulcimer tablature into the ABC.
The tablature generation solution supports both DAD, DGD, or DAA-tuned instruments with a 6-1/2 fret.
Select between "Along High-D String" and "Cross-String" style tablature for the DAD and DGD tunings. (DAA is only available as "Along A String").
You may optionally exclude any tunes from the output that don't have complete tablature solutions.
This can be very useful when converting large numbers of tunes where you only want to end up with tunes that have complete fret tab solutions.
When excluding tunes, a report will be presented after the tab injection with the list of tunes that were excluded from the output.
Select "Blank Tablature" if you want to fill in your own tab. This will inject open string tablature for every note.
Choose between blank open strings and open strings represented by a -.
Editing of the tab is possible after the injection.
The "Highlighting" mode can be very useful in identifying the ABC for each note in the tune for manually adding chords.
Click on any note in the notation and the ABC will be highlighted that created that note along with the dulcimer tab that was injected.
When generating the tab, the following ABC text is added just before every note:
The "_ tells the ABC renderer to put the tab under the next note.
The fret numbers (1, , and 3 in this example) are then entered, separated by ; which causes the ABC renderer to stack the numbers vertically under the note.
Finally, there is a closing " added to complete the tablature entry.
If you want to modify the automatically generated tablature, just change the fret numbers to whatever you like. I use a space to indicate an open string
See the Configuring Tablature/Solfège Fonts and Settings section below for full details on the tablature font and spacing options.
Inject Bamboo Flute Tab - After requesting the bamboo flute key, injects numeric notation tab for the selected key into the ABC.
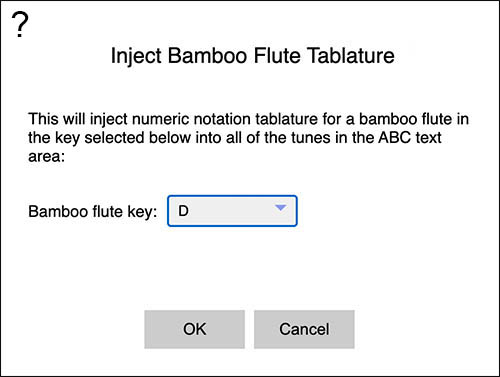
See the Configuring Tablature/Solfège Fonts and Settings section below for full details on the tablature font and spacing options.
Comhaltas Transform - Brings up a dialog where you can choose between transforming the entire ABC from the standard ABC d e f octave note style to the Comhaltas-preferred "Blackboard ABC" D' E' F' octave note style, or from the Comhaltas-preferred "Blackboard ABC" D' E' F' octave note style to standard ABC d e f octave note style.
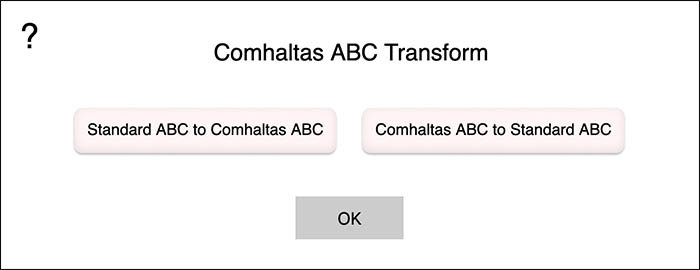
Important: While the note Names display will show the Comhaltas-preferred note names, the ABC standard requires that the second octave C in the ABC itself either be represented by c or C' so that may requires some minor changes when pasting in your Comhaltas-formatted tunes.
Regarding Comhaltas ABC and instrument tab injection: The various instrument-specific tab injectors detailed below are not able to work with the Comhaltas-preferred "Blackboard ABC" D' E' F' octave note style note names.
To inject instrument tab into ABC in this format, you will first need to convert the Comhaltas-preferred ABC to standard ABC the Comhaltas ABC Transform dialog's Comhaltas ABC to Standard ABC button first, then do the tablature injection.
After doing the tab injection, you can then transform the ABC back into the Comhaltas-preferred format using the the Comhaltas ABC Transform dialog's Standard ABC to Comhaltas ABC button
Inject Shape Note/Solfège - Injects "4-shape" or "7-shape" style shape note shapes into the ABC along with optional "fa/sol/la/ti" (4-shape) or "do/re/me/fa/sol/la/ti" (7-shape) solfège note names.
There are also additional options for injecting pitch names, fixed solfège at Do=C with or without chromatic note names, movable solfège based on key/mode, or movable solfège based on key/mode with shift for minor La.
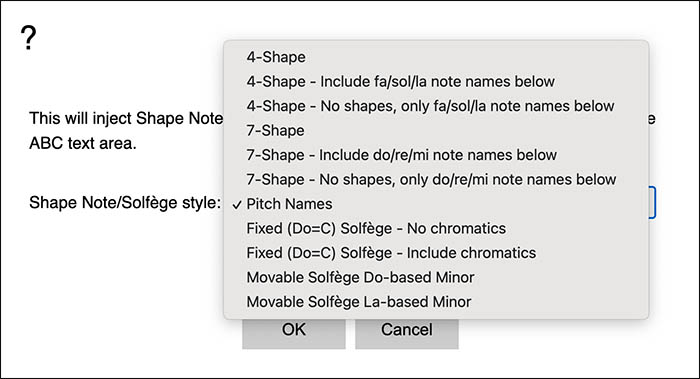
For shape notes, the ABC injected before each note name to select the note head style is one of the following:
!style=sn_do! C2
!style=sn_re! D2
!style=sn_mi! E2
!style=sn_fa! F2
!style=sn_so! G2
!style=sn_la! A2
!style=sn_ti! B2
!style=sn_do! c2
!style=sn_re! d2
!style=sn_mi! e2
!style=sn_fa! f2
!style=sn_so! g2
!style=sn_la! a2
!style=sn_ti! b2
See the Configuring Tablature/Solfège Fonts and Settings section below for full details on the tablature font and spacing options.
To configure the tablature/solfège fonts and other settings, first click the tool's Settings button, then click Tablature Injection Settings at the bottom of the dialog to bring up the tablature/solfège injection settings dialog:
Common tablature settings for all instruments:
Font family - Font used for all text injected into the tablature.
Tablature/Solfège font size - Font size used for the injected tablature text, solfège, and symbols.
%%staffsep value - Sets spacing between the staves.
%%musicspace value - Sets spacing between the title and the staves.
Common tablature settings for Box and Anglo Concertina:
Character(s) for Push indication - Sets the character used in the Box and Anglo Concertina tablature to indicate a bellows push.
Character(s) for Draw indication - Sets the character used in the Box and Anglo Concertina tablature to indicate a bellows draw.
Note: Setting either value blank restores the original default "↓" for Push and "↑" for Draw character values.
Use a bar over button name to indicate Draw (overrides Push and Draw characters) - If checked, draws a bar over the button name for a bellows Draw and no bar for bellows Push.
If checked, overrides the use of the Push or Draw characters entered above.
Select your preferred tablature position relative to the notation (Above or Below) from the selection menu.
When injecting tablature below the notation, you have the option to strip all existing chords and tablature from the ABC before injecting the new tab.
Injecting tablature above the notation always strips existing chords and tablature from the ABC before injecting the new tab.
Anglo Concertina-specific settings:
Select your instrument style: (Jeffries or Wheatstone) from the Concertina style selection menu.
Select your preferred fingering solution from the Preferred fingerings selection menu:
On-Row:
Jim Van Donsel's original fingering solution, favors center row:
Favors playing D5 and E5 on the right-side C-row.
For Jeffries-style instruments:
Favors right-side top-row 2nd button for C#5 and D#5.
Cross-Row:
A more cross-row friendly fingering solution:
Favors playing the D5 and E5 on the left-side G-row.
Favors playing C5 on the left-side G-row draw.
Favors playing B4 on the right-side C-row draw.
For Jeffries-style instruments:
Favors right-side top-row 2nd button for C#5 and D#5.
Gary Coover style tab (single notes only, overrides button name and direction settings) - Check this box if you want Anglo Concertina tab to be generated using the Gary Coover style standard:
Left Right 1a 2a 3a 4a 5a 1a 2a 3a 4a 5a 1 2 3 4 5 1 2 3 4 5 6 7 8 9 10 6 7 8 9 10
Left hand note tab is drawn below the staff.
Right hand note tab is drawn above the staff.
Notes on the push are represented by the button number.
Notes on the draw are represented by the button number with a line above it.
Only single melody lines are supported (no chords possible)
When selecting the Gary Coover style tab, any custom button names or direction settings will be ignored.
Configure Anglo Concertina Tablature Button Names - Brings up a dialog where you can set the names of the buttons used for Anglo Concertina tab generation:
Click Reset to Default to reset the button names to the original tool values (L1, L2, L3, . ).
Values are saved in browser storage and restored the next time the tool is run.
Since the tablature is injected using the ABC chord system, you can easily clear all tab and get back to the original ABC by clicking the Strip Chords + Injected Tab button on the More ABC Tools dialog.
(Anglo Concertina-only) Button direction missing for some less-often used accidentals:
After fingering generation, some less-often used accidentals like _E in certain keys may show the correct button, but are missing their direction in the ABC.
If you see missing directions on any notes, review the ABC in the ABC editor and correct the direction manually by copying and pasting either a push "↓" or draw "↑" arrow (or other desired symbol) for the missing direction.
Tunes with key changes mid-tune may not generate correct tablature after the key change:
The tablature solutions only use the original key of the tune.
If the key changes mid-tune, the tablature solution after that point may not be correct.
Tunes with [GBd] style chords in square brackets do not generate the correct tablature:
You'll need to reduce these down to a single note for the tool to work.
Brings up a dialog where you can experiment with spacing values for the notation and then optionally inject the values into one or all of the tunes:
Staff Separation: Sets the spacing between the staves. Default depends on the default spacing set in the tool's Settings dialog.
Left Margin: Sets the spacing to the left of the staves. Default value is 15.
Right Margin: Sets the spacing to the right of the staves. Default value is 15
Staff Width: Sets the width of the staves. Default value is 556.
Values greater than 556 will make the staves less tall to allow more staves per page in a PDF.
Values less than 556 combined with checking Add %%noexpandtowidest will make the staves taller and more horizontally compressed for "large print" format tunes.
Add %%noexpandtowidest: When checked, disables the abcjs automatic expand to widest staff feature to allow for staves less wide than the default. Default is unchecked.
More details on %%noexpandtowidest in this section of the User Guide: "Large Print" Edition Tune Notation.
Test Values: Applies the current values to the displayed notation in the dialog.
Inject all tunes: When checked, all tunes in the ABC will be injected with the new spacing values if Inject Spacing into the ABC is clicked.
Inject Spacing into the ABC Injects the spacing values into either the currently selected tune or all the tunes in the ABC depending on if Inject all tunes: is checked.
Once the spacing values are injected into the ABC, they can be modified in place if additional adjustments are desired.
Brings up a player where you can experiment with playing the currently selected tune using all of the available MIDI soundfonts, melody, bass, and chord programs/volumes:
This makes it quick and easy to find the right MIDI soundfont, instruments, and volumes for any tune:
The player controls works the same way as the standard player.
To test playing the tune with a new soundfont, melody instrument, bass instrument, bass volume, chord instrument, and chord volumes, make your changes and then click Reload Tune with Changed Instruments and Volumes.
The tune will be reloaded into the player with the new MIDI instrument and volume settings applied.
Click the play button to play the tune to check the new settings.
If you are happy with your new MIDI settings and want to apply them to the tune, click Inject Instruments and Volumes into the ABC to inject your new MIDI values into the tune's ABC, replacing any previous MIDI instrument and volume settings.
If "Inject all tunes" is checked, the MIDI instruments and volumes will be injected into all the tunes in the ABC editor.
To exit the MIDI Instrument Explorer, click Close.
Note: This feature is primarily for use with single-voice tunes. Unpredictable results may occur with multi-voice tunes.
Brings up a player where you can experiment with playing the currently selected tune using different swing factors and then optionally inject them into the tune:

This makes it quick and easy to find the right swing settings for any tune:
Note: Since this video was made, you no longer have to specify a swing offset, the tool now automatically offsets the swing for you if required.
The player controls works the same way as the standard player.
To test playing the tune with a new swing factor, enter a swing factor (Range is -0.9 to 0.9) and then click Reload Tune with Changed Swing Setting.
The tune will be reloaded into the player with the new swing setting applied.
Click the play button to play the tune to check the new swing setting.
If you are happy with your new swing setting and want to apply them to the tune, click Inject Swing into the ABC to inject your new swing value into the tune's ABC, replacing any previous swing factor value.
To exit the Swing Explorer, click Close.
For more details on swing factor, see this section:
Brings up a player where you can experiment with playing the currently selected tune using grace durations and then optionally inject them into the tune:
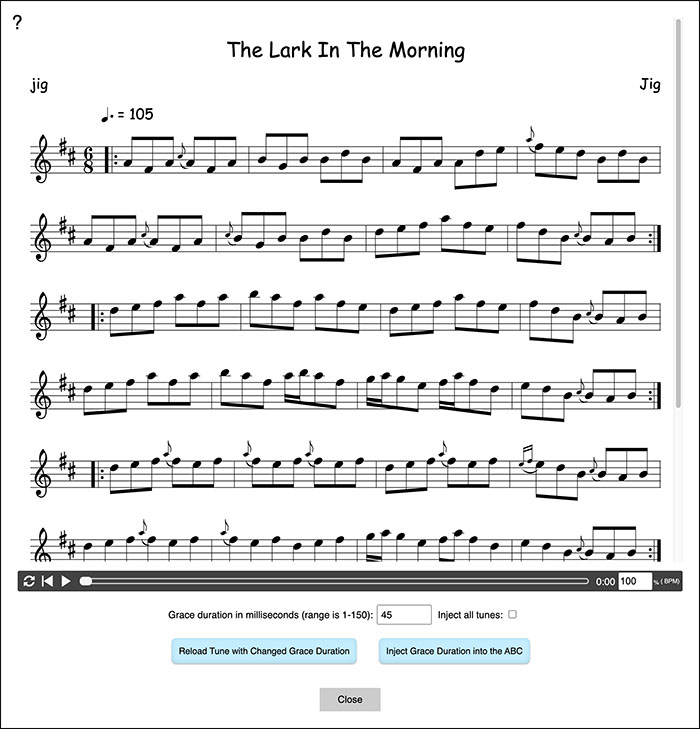
This makes it quick and easy to find the right grace duration settings for any tune:
The player controls works the same way as the standard player.
To test playing the tune with a new grace duration, enter a grace duration in milliseconds (Range is 0 to 150) and then click Reload Tune with Changed Grace Duration.
The tune will be reloaded into the player with the new grace duration settings applied.
Click the play button to play the tune to check the new grace duration settings.
If you are happy with your new grace duration and want to apply them to the tune, click Inject Grace Duration into the ABC to inject your new grace duration value into the tune's ABC, replacing any previous grace duration value.
If "Inject all tunes" is checked, the grace duration will be added to all the tunes in the ABC editor.
Entering a value of 0 will disable the custom grace timings and play the tune using the abcjs default behavior: Graces use half the duration of the following note and the following note duration is reduced by half.
To exit the Grace Duration Explorer, click Close.
For more details on grace duration, see this section:
Brings up a dialog where you can experiment playing the tune with different roll playback parameters and then optionally inject the values into the tune.
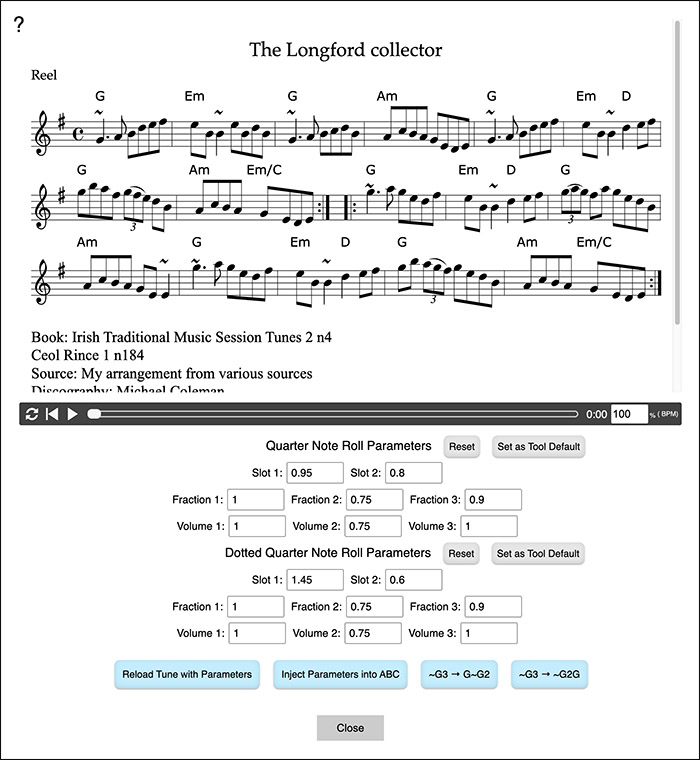
The timing and volume parameters for the two available custom roll patterns (Quarter Note and Dotted Quarter Note) are described in detail in this section:
The Reset buttons reset and reload the tune with the current tool default roll parameters.
The Set as Tool Default buttons set the roll timing parameters for the quarter note or the dotted quarter note as the tool defaults.
The default roll parameters for the tool can be viewed and edited in the Advanced Settings dialog.
Click Reload Tune with Parameters to reload the player with the roll parameters applied.
If any of the values are invalid, you will be presented with an alert explaining the issue.
Click the play button to play the tune to check the new settings.
If you are happy with your new roll parameters and want to apply them to the tune, click Inject Parameters into ABC to inject your new roll parameters into the tune's ABC, replacing any previous roll parameters.
Dotted quarter note rolls in the ABC can be transformed from ~G3 to either G~G2 or ~G2G by clicking either the ~G3 → G~G2 or ~G3 → ~G2G transform buttons.
This can provide a better feel for the rolls in reels than the default dotted quarter note roll playback solution which is better suited for jigs.
The modified ABC with the replaced rolls will be injected along with the custom timing information when you click Inject Parameters into ABC.
To exit the Roll Explorer, click Close.
Once the roll parameters are injected into the ABC, they can be modified in place if additional adjustments are desired.
Brings up a dialog where you can experiment playing the tune with different reverb styles and settings and then optionally inject the values into the tune.
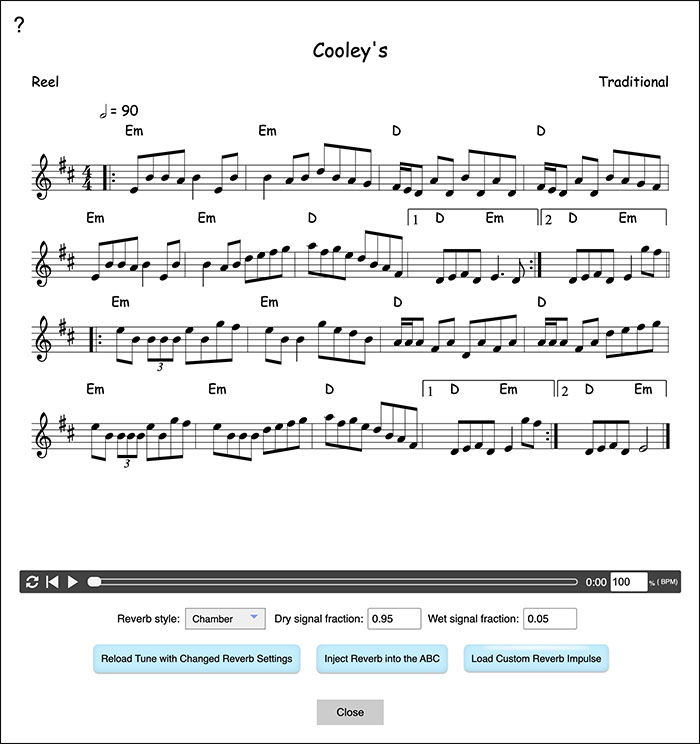
Select your reverb style from the Reverb style dropdown.
Enter the dry, and wet mix fractional values (must be >= 0) into the Dry signal fraction and Wet signal fraction fields.
Ideally Dry + Wet should equal 1.0, but that is not a requirement, the tool will allow you to experiment with any values.
If the Dry + Wet > 1.0, the mixed sound will be louder than normal.
Click Reload Tune with Changed Reverb Settings to reload the player with the reverb parameters applied.
Click the play button to play the tune to check the new settings.
If you are happy with your new reverb settings and want to apply them to the tune, click Inject Reverb into the ABC to inject your new reverb settings into the tune's ABC, replacing any previous reverb settings.
If you want to load a custom reverb impulse file to simulate a specific acoustic space, click Load Custom Reverb Impulse.
More details on custom reverb impulses here: Load Custom Reverb Impulse.
If you load a new custom reverb impulse file and have selected Custom as your reverb in the Explorer, you will need to click Reload Tune with Changed Reverb Settings to hear the new reverb effect.
To exit the Reverb Explorer, click Close.
These features are only available on desktop browsers.
This dialog contains options to export all the tunes in the ABC area in multiple formats:
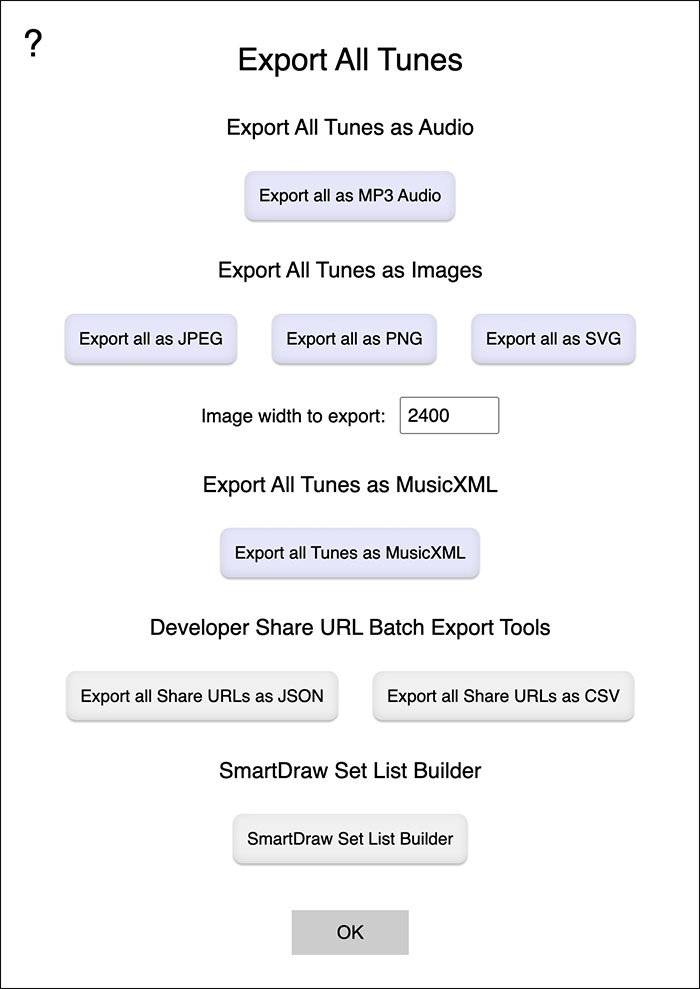
Export all as MP3 Audio: Exports all the tunes in the ABC area as individual .mp3 files at the bitrate set in the Advanced Settings dialog:

This can be very useful for creating longer "play-along" recordings of tunes.
You may optionally set the playback speed as a percentage of the original.
You may optionally include reverb effects specified in the tune (or injected by default using the Advanced Settings default reverb parameters) in the .MP3.
You may optionally inject either two bars of silence or a two-bar style-appropriate click intro before each tune.
For clean repeats, your tunes must not have extraneous pickup notes and must have proper and complete timing.
Important Requirement for 1st Part Repeats
If the 1st part of a tune has a :| repeat symbol at the end of it (or on a first ending), but not at the very start of the part, you will need to add the starting |: repeat bar symbol for this feature to work when generating a .MP3 file with more than one repetition through the tune.
The lack of a first repeat bar symbol in the ABC will make the first part of the tune on the second and repetitions appear to not repeat.
To Fix:
Add a |: repeat bar at the start of the tune and regenerate the .MP3 file.
If you have tunes with chords, you can quickly create a backing track playing continously multiple times through the tune:
1: Mute the melody for all the tunes by clicking the Inject MIDI Melody button in the More ABC Tools dialog and select the Mute program.
2: Export all the tunes in the tunebook to .MP3 by clicking Export all as .MP3 Audio in the More ABC Tools Export All Audio or Images dialog, and when prompted enter the number of times through each tune.
Export all as JPEG: Exports all the tunes in the ABC area as individual JPEG bitmap images.
Image width is set from the Image width to export: value.
Export all as PNG: Exports all the tunes in the ABC area as individual PNG bitmap images.
Image width is set from the Image width to export: value.
Export all as SVG: Exports all the tunes in the ABC area as individual SVG vector images.
Image width is set from the Image width to export: value.
Your browser may request permission to download multiple files.
During the batch export operation, click the export status dialog's Cancel button to stop the export.
Limitations on Image Export
At this time Tin Whistle tab cannot be exported as an image.
Exported Note Name tablature images include the staff lines along with the note names.
Export All Tunes as MusicXML
Converts each tune in the ABC to MusicXML and saves it in its own file.
Developer Share URL Batch Export Tools
These tools are useful for developers who want to have Share URLs to go with each of the exported tune images.
The names of the tunes in the exported files match the exported image names.
Each JSON or CSV record has two fields:
Name - Contains the tune name matching the image name (minus extension) that is created by the batch image exporters.
URL - Contains the Share URL for the tune.
The Share URL is the same as would be generated for each tune using the Sharing dialog and includes the &play=1 parameter so that tunes open in the Player.
Export all Share URLs as JSON: Exports tune names and Share URLs for all of the tunes in a JSON file.
Export all Share URLs as CSV: Exports tune names and Share URLs for all of the tunes in a CSV file.
Brings up a dialog where you can build tune sets and then export them in SmartDraw format.
Each tune in the SmartDraw diagram has a hyperlink that when clicked, plays the tune.
If you export the SmartDraw diagram as a PDF, the play hyperlink will also work in the PDF.

Drag and drop the tunes to order them into sets.
Click Add Set Name to add a set name marker above the currently selected tune.
Click Delete Set Name to delete a selected set name marker.
Choose your tune export format (Notation, ABC Full Text, or ABC Incipits) from the export format dropdown.
Both vertical and horizontal tune shape flow versions, indicated by the arrow direction after the format name, are available for all formats.
Vertical shape flow builds the tune shapes down the page.
Horizontal shape flow builds the tune shapes across the page.
If exporting Notation, you can set the image width (in 1/100" increments) in the SmartDraw diagram using Notation width to export.
When you are ready to create the diagram, click Export SmartDraw Set List
You will be prompted for a SmartDraw file name and a name for your set list.
Once the SmartDraw file is created and saved to your system, you can import it into SmartDraw from the SmartDraw file and template explorer.
For more information on SmartDraw and to get a free trial, please visit SmartDraw.
Brings up a dialog where you can sort the tunes based on a specified ABC tag:
All tag sorts other than by name and X: tag renumbering first sort the tunes by name before sorting by the specific tag.
Sort by Name (T:) - Sorts all the tunes by name alphabetically based on the value found in the first T: tag, ignoring an initial "The ", "Da ", "A ", "An ", "Le ", or "La "
Sort by Key (K:) - This sorts all the tunes by the key value found in the first K: tag in the tune.
Sort by Meter (M:) - This sorts all the tunes by the meter value found in the first M: tag in the tune.
Sort order is: C|, C, 4/4, 6/8, 9/8, 12/8, 2/4, 3/4, 6/4, followed by any other meters found, grouped by meter.
Sort by Rhythm (R:) - This sorts all the tunes by the rhythm value (case insensitive) found in the first R: tag in the tune.
Sort by ID (X:) - This sorts all the tunes by the value found in X: tag in the tune.
Renumber all X: Tags - This renumbers all the X: tags in the tunebook starting at 1.
Brings up a dialog where you can easily format the ABC specifically for notation incipits PDF export with only a couple of bars per tune:

Since this modifies the ABC, you may want to grab a Snapshot or save the ABC before running this command.
Bars per staff - Sets the number of measures shown in the incipit. Default is 3.
Staff width - Compresses the horizontal size of the incipit notation compared to the standard of 556. Default is 400.
Add tune title numbers - When checked, prepends the tune titles with incrementing numbers.
Left justify titles - When checked, will enable the "Left-justify all titles and subtitles" in the tool's Settings.
When Left justify titles is checked, you will need to manually uncheck the "Left justify all titles and subtitles" setting in the tool's settings after exporting the incipits as a PDF or just reload the tool to restore the title default center justification.
Here is an example of a two-column notation incipits PDF exported using the default settings:
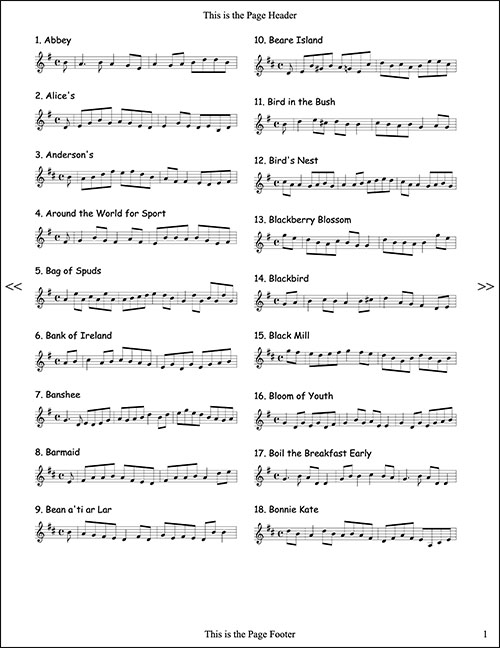
Brings up a dialog where you can specify a root key to which you want to transpose the current tune or all the tunes.
![]()
Any modes in the tune keys, for example Major, Minor, Dorian, or Mixolydian, are preserved in the transpose operation.
The direction of the transpose will be the shortest distance to the new key from the tune's existing key.
Check Transpose all tunes if you want to transpose all the tunes in the ABC work area.
If this is not checked, only the current tune you are working on will be transposed.
If the Transpose to Key results are too high or too low:
Click in a single tune or select across one or more tunes in the ABC editor then Alt-Click the lower toolbar Transpose Up or Transpose Down buttons to transpose the tune(s) down or up an octave.
Using "Transpose to Key" for "Inject Bagpipe Sounds" Pre-Processing
This feature can be particularly useful for pre-processing tunebooks for the Inject Bagpipe Sounds feature.
For, example, transposing all tune to a root key of A before doing Great Highland Bagpipe injection will result in tunes that are all consonant with the drones.
For bagpipe sound injection with chanter range folding, having the tunes in a lower octave will often favor lower notes in the folding results.
If the Transpose to Key results seem too high or two low, before doing the bagpipe sound injection (it has to be done before, not after) you can transpose individual tunes down or up an octave by first clicking in the ABC for the tune and then holding down the Alt key while clicking the Transpose Down or Transpose Up buttons on the toolbar below the editor.
Brings up a dialog where you can change the melody sound to various bagpipes and optionally inject bagpipe drones as a second voice for the current tune or all tunes in the ABC work area.

You may choose between the following Chanter/Drone configurations:
Great Highland Bagpipe - A=480 Hz (Pipe band high pitch)
Great Highland Bagpipe - A=466 Hz (Standard B-flat)
Great Highland Bagpipe - A=454 Hz (Practice chanter)
Border Pipes in A - A=440 Hz
Border Pipes in D
Smallpipes in A
Smallpipes in D
Swedish Säckpipa in D
Uilleann Pipes in D (Crowley-style drones)
Uilleann Pipes in D (Lynch-style drones)
Uilleann Pipes Flat Set in D (Crowley-style drones)
Uilleann Pipes Flat Set in D (Lynch-style drones)
Uilleann Pipes Flat Set in C# (Crowley-style drones)
Uilleann Pipes Flat Set in C# (Lynch-style drones)
Uilleann Pipes Flat Set in C (Crowley-style drones)
Uilleann Pipes Flat Set in C (Lynch-style drones)
Uilleann Pipes Flat Set in B (Crowley-style drones)
Uilleann Pipes Flat Set in B (Lynch-style drones)
Uilleann Pipes Flat Set in Bb (Crowley-style drones)
Uilleann Pipes Flat Set in Bb (Lynch-style drones)
Uilleann Pipes Flat Set in A (Crowley-style drones)
Uilleann Pipes Flat Set in A (Lynch-style drones)
Check the Fold the displayed and played notes into the chanter range checkbox if you want to "fold" the notes of the melody outside the range of the chanter to the range of the chanter:
Great Highland Bagpipe, Border Pipes, and Smallpipes:
ABC notes G to a
Swedish Säckpipa:
ABC notes C to d
If you want to automatically shift the drone pitch to match the key of the melody, check the Shift drone pitch to match tune key (non-BWW imported tunes only) checkbox.
While not necessarily representative of the real instrument, this option can be used for interesting results.
Note: This feature may not provide a workable solution if the tune is in a key where there is an Ab or Db in the key signature.
For these cases you may need to manually adjust the second value for the drone tuning on the %voice_tuning_cents annotation to fix the drone pitch.
Generally adding 100 (one semitone in cents) to the value will fix the problem.
If you want to only change the melody to the selected bagpipe chanter sound and not inject drones, uncheck the Inject drones checkbox.
If you want to hide the injected drone voice in the notation, check the Hide drone voice checkbox.
If you want to add bagpipe sounds injection to all the tunes in the tunebook, check the Inject all tunes checkbox. If this box is not checked, only the current tune will be modified.
Click OK to perform the operation or Cancel to exit without applying any changes.
Tunes previously injected with drones will be skipped.
Consider transposing tunes to the key of A (Major, Minor, Dorian, Mixolydian) before injecting bagpipe sounds:
Bagpipe tunes imported from a BWW files assume the drones are consonant with the note A in the ABC notation for all styles of injected bagpipes.
For all other tunes, the Great Highland Bagpipe, Border Pipes, and Smallpipes drones are consonant with the note A in the ABC notation and the Säckpipa, and Uilleann Pipes drones are consonant with the note D in the ABC notation.
In these cases, you may need to transpose your tunes before using this feature to sound best with the drones, for example transposing a D Mixolydian tune to A Mixolydian or the inverse.
Manually transposing the tunes and drones to different keys:
Note: This feature is now built into the tool, but the information may be useful for working with other pitched bagpipes.
These instructions assume your instrument is at standard concert-pitch A=440 Hz tuning.
Border Pipes in A
After injecting drones into an imported BWW file, make the following changes to the ABC:
% Change the following two lines near the top from:
%
K:Hp exp ^f ^c transpose=1
%voice_tuning_cents 48 148
%
% to:
%
K:Hp exp ^f ^c transpose=0
%voice_tuning_cents 0 0
Border Pipes in D
After injecting drones into an imported BWW file, make the following changes to the ABC:
% Change the following two lines near the top from:
%
K:Hp exp ^f ^c transpose=1
%voice_tuning_cents 48 148
%
% to:
%
K:Hp exp ^f ^c transpose=0
%voice_tuning_cents -700 500
Technical details on drone injection:
The drones are injected by analyzing the original melody and creating a second voice with same number of lines as the original tune.
Each line in the drone voice contains a long drone note using ABC ties (via the "-" character) that has the same duration as each line of the tune.
The melody is shifted up one semitone in the melody voice declaration.
% Transpose the melody up one semitone
K:Hp exp ^f ^c transpose=1
The tuning of the melody and drones is done using the following ABC command:
% Adjust the tuning from A=440 Hz to A=480 Hz
%voice_tuning_cents 48 148
For more information on the %voice_tuning_cents directive, see the Setting the Tuning Offset for Individual Voices section above.
The drone hiding is done using the following ABC commands to put both voices on one staff:
% Combine the two voices on one staff
%%score (1 2)
In the voice declarations for the drones, the voice is set to be transparent:
% Hide the drone notes
%%voicecolor transparent
The drones are shifted and transposed as required to have them play at the correct pitch and display in the same visual space as the melody as to not increase the staff height:
% Transpose the drones as required to overlay the melody
V:2 stems=down octave=4 transpose=-48
%%MIDI transpose -48
Additionally, when playing, this command will limit the note highlighting to only the melody voice:
% Only highlight the melody voice when playing
%play_highlight_v1_only
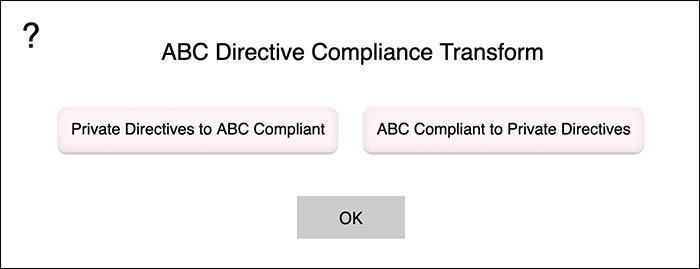
Brings up a dialog where you can transform all the private tool-specific directives in the ABC to an ABC 2.1 standard-compliant format for cleaner interchange with other ABC tools.
I wrote this tool before I was aware that there was a preferred ABC standard for adding additional tool-specific directives.
All the private tool-specific directives use the ABC comment syntax and should be transparent to other ABC applications.
However, some users may prefer that the private tool-specific directives use the ABC standard tool-specific syntax instead.
% Private tool-specific comment-based directive:
%irish_rolls_on
% ABC Standard tool-specific directive syntax:
%%abctt:irish_rolls_on
% Private tool-specific comment-based directive:
%%abcjs_soundfont fatboy
% ABC Standard tool-specific directive syntax:
%%abctt:abcjs_soundfont fatboy
Transforms are provided for both private tool-specific to ABC standard syntax and ABC standard syntax to private tool-specific.
The tool can play back tunes with either the private tool-specific or ABC standard syntax directives.
The MIDI Instrument Explorer, Swing Explorer, Grace Exporer, and Roll Explorer work best with the private tool-specific directives.
You will need to manually transform the ABC from the ABC standard syntax to the private tool-specific directives if you wish to use these features.
Additionally, all ABC standard tool-specific directives in the ABC are transformed to private tool-specific format when exporting PDF files.
Custom Instrument MIDI Program Number Interoperability
My custom instruments use %%MIDI program numbers greater than 127 that only work in my tool.
Other ABC software may ignore these values, or may have issues with these values when attempting to play the tunes.
When importing any ABC created in my tool that use custom instruments with MIDI program numbers greater than 127, you will almost certainly need to change them to another program number in the range of 0-127 for the ABC to play in other software.
If you do a MIDI export from the Player, the custom MIDI program numbers in the resulting MIDI file are automatically remapped to values in the standard MIDI program range.
Clicking the Sharing button brings up the Sharing Controls dialog:

Share URLs and QR Codes are a quick and easy way to share your ABC tunes with friends or to post tunes on social media sites.
Anyone with the Share URL or QR Code can view, edit, save, and share their own copy of the tunes.
Share URLs and QR Codes also include the instrument selected, whether or not to show the top bar and links, display size, line spacing, PDF tunes/page setting, page number position, and page number on first page settings.
For stringed instrument tablatures, the link also includes the capo setting and whether or not to show the tablature name.
Share URL: Copying and pasting this link in a browser address bar will open the ABC Tools website and copy in the tune set ABC and tablature settings.
If the Share URL link is too long to work in most browsers, the Share URL buttons will be disabled and you will see a message suggesting sharing fewer tunes.
Test Share URL - Opens the Share URL in a new browser tab.
Copy Share URL - Copies the Share URL to the system clipboard so you can easily paste it into social media posts, emails, or other tools.
Save Share URL - Saves the Share URL to a text file.
The saved file will be in your browser's Downloads directory.
On iOS the downloaded files will be found in the "Downloads" directory in the iOS "Files" app.
Shorten URL - Shortens the Share URL using TinyURL automatically if possible, or if not, assists with the URL shortening process.
If you hold down the Shift and Alt keys while clicking this button, a %hyperlink annotation will be added to each of the tunes with the shortened URL.
When exporting a PDF, the %hyperlink annotation on any tune, when the tune title is clicked, overrides all other injected hyperlinks requested at the PDF tunebook level, for example, play links.
If you want to have the shortened URL play when clicked using the %hyperlink injection, be sure to click Add Auto-Play in the Share dialog before shortening the URL.
This can be useful when you have ShareURLs that are longer than the Adobe Acrobat recommended limit.
I get a limited number of free TinyURL shortenings each month, so if you want to shorten a lot of share links, please consider signing up for a free or paid TinyURL account, obtaining your own TinyURL API token, and entering it on the Advanced Settings dialog.
Generate QR Code - Once an Share URL is generated, if it is short enough to fit in a QR code (less than 2600 characters), this button is activated.
The QR Code is a visual representation of an Share URL that you can scan with the Camera app on your iOS or Android device.
Clicking the button will generate a QR code in .PNG format for the Share URL and open it in a new browser tab.
Even if the button is greyed out, Shift-click of the Generate QR Code button will attempt to generate a QR code for whatever text is present in the Share URL box.
This can be useful for generating QR codes from TinyURL shortened Share URL links or for other arbitrary website URLs.
If the arbitrary text in the Share URL box is too long to generate a QR code, the tool will display an alert.
In the newly opened tab, you can click the link below the image to save the QR code to your system.
Add Auto-Play - Adds &play=1 to the URL.
Link will open in the player.
Add Open in Editor - Adds &editor=1 to the URL.
Share links will load in the editor. This setting overrides Add Auto-Play.
Add Disable Editing - Adds &dx=1 to the URL.
Entering the editor from the full screen view of the tune shown when the share link is visited will be disabled. Also overrides Add Open in Editor.
Automatic URL shortening using TinyURL:
Assisted TinyURL URL shortening if automatic shortening fails:
Share URLs can get pretty long, particularly for large sets of tunes.
A third-party service like TinyURL can be used to shorten Share URLs.
To get a shortened URL for the Share URL, click Shorten URL.
The tool will attempt to call TinyURL directly first to get a shortened Share URL.
If it succeeds, it will copy the shortened Share URL to the system clipboard and also show the result in a dialog.
If it fails (most likely the tool has used up all available free URL shortening sessions for the month), the tool will help you manually get a shortened URL by automatically copying the full Share URL to the system clipboard and then launching TinyURL in another browser tab.
Paste the already copied full Share URL into the TinyURL "Enter long link" box and click Shorten URL.
You may have to agree to the TinyURL terms-of-service before you can shorten the URL.
Copy the shortened URL from TinyURL and paste it into emails or share it on social media.
For example, here is a set of polks from "Sliabh Notes" as a shortened Share URL:
TinyURL also allows you to create and save a simple QR code for the shortened URL.
If you are planning on using a lot of TinyURL shortened URLs:
I get a limited number of free TinyURL shortenings each month, so if you want to shorten a lot of share links, please consider signing up for a free or paid TinyURL account, obtaining your own TinyURL API token, and entering it on the Advanced Settings dialog.
Shared tunes, when opened from a Share URL or QR code, are initially displayed with the ABC Editor and controls hidden so you can see the music full-screen.
Click the Maximize/Minimize arrow to show the ABC Editor and controls.
To append a QR code representing the Share URL for tune set or a specific URL as a final page on your PDF, add the following comment-based annotation anywhere in the ABC:
The URL field is optional.
If a URL is present, it will be used for the creation of the QR code, otherwise the computed Share URL for the PDF tunebook (as would be shown in the sharing controls) will be used by default.
One application for this would be the use of a shortened Share URL from TinyURL for the QR code instead of the longer one generated by the tool itself.
Note that the QR code page itself includes the PDF page header and footer but does not include a page number.
Here is an example of a tune set QR code included in the exported PDF:
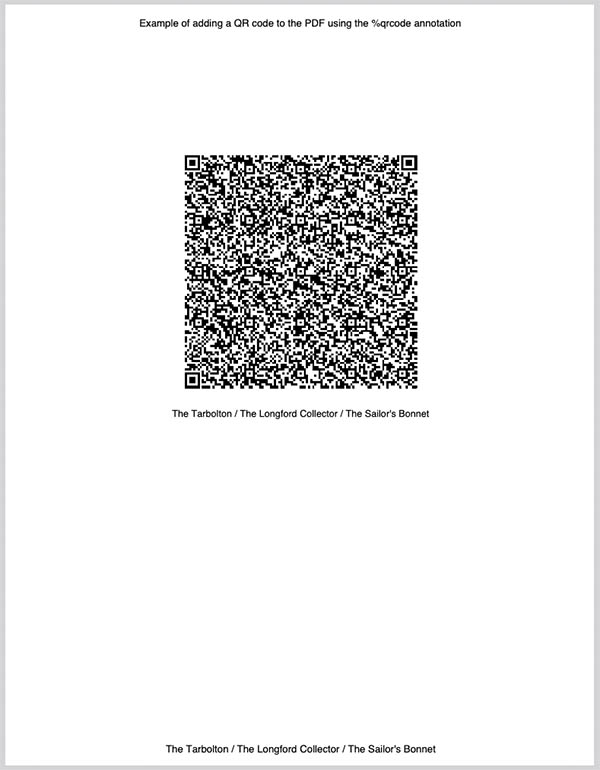
Note: If a QR code has been requested, and the Share URL is too long to generate a QR code (more than 2600 characters), you will see an informative message at the end of the PDF export suggesting sharing fewer tunes.
If you are able to generate a QR code in the Sharing Controls, then the Share URL is short enough to embed a QR code in a PDF.
To override the default generated caption that is shown under the QR code added to a PDF file, add the following comment-based annotation anywhere in the ABC:
The QR code image and caption in the PDF file now have clickable hyperlinks to the same URL used to generate the QR code.
All devices should easily be able to read the simpler QR codes generated for sets of one to three tunes.
Most iOS devices are able to read even the most complex QR codes generated by this tool using the built-in Camera app.
Some Android devices may have trouble reading the most complex codes with their built-in Camera app.
I suggest trying the free Google Lens app, available on the Google Play Store:
Michael Coleman set ("The Tarbolton" - "The Longford Collector" - "The Sailor's Bonnet"):

Try scanning this code with the Camera app on your iOS or Android phone.
I have several example QR codes for tune sets on my Flickr account at:
If you have an existing website written using Javascript and would like to add a feature to allow users to create share links for ABC tunes and open them in my ABC Transcription Tools, I have sample code for a share link generator and tester tool at:
Source code is available on the GitHub site:
To run the demo, the source files you should download:
lz-string.min.js (for LZW compression of the ABC)
daypilot-modal.min-3.10.1.js (only required to run the demo tool, used for dialogs and alerts)
To run the demo locally, after downloading the source files, double-click generate_share_link.html to open it in your browser.
If you want to add share link encoding to your website or Javascript tool, all you need to include is:
function at the top of generate_share_link.js.
The tool has a powerful built-in PDF tunebook generator that provides more flexibility than the browser's print feature, particularly in the area of adding custom page headers and footers, title page, table of contents, tune index, or adding a custom QR code.
It can format PDF tunebooks with one or multiple tunes per page, something the native browser's Print command cannot accomplish.
When you click Export PDF, the following dialog will appear where you select your PDF formatting preferences:

When exporting a PDF from the button on the bottom-left of the full-screen view, the Inject PDF Tunebook Features and Notation Spacing Explorer buttons are not shown on the dialog.
Since they possibly modify the ABC itself, they are only available when exporting a PDF from the ABC Editor.
Inject PDF Tunebook Features - Brings up a dialog that you can use to inject commands at the top of the ABC that will add an optional Title Page, Table of Contents, Index, Page Header, Page Footer, playback links, required fonts for ABC in playback links, and/or QR code to an exported PDF tunebook:

Leave any text fields blank for features you don't want in your PDF tunebook.
The PDF features are added using the tool's ABC comment-based annotations to the top of the ABC.
Once added, you can modify the features values directly in the ABC if you wish.
Since the PDF features are part of the ABC, they will be saved along with the tunes if you save or share the ABC.
The PDF features are separated by two marker lines:
% Start of PDF Tunebook Features
% End of PDF Tunebook Features
These two lines are used by the tool to locate the tunebook feature settings in the ABC.
If you click Inject PDF Tunebook Features again, everything in that block of ABC will be replaced with the newly injected PDF tunebook feature commands.
Note: If you add features to your tunebook using the dialog and then manually delete:
% End of PDF Tunebook Features
from the ABC and click Inject PDF Tunebook Features, the tool will not be able to find the original set of feature commands in the ABC to overwrite.
If this occurs, the new set of requested PDF tunebook features will just be added to the top of the ABC.
Note on use of "Playback links contain entire tunebook"
Normally when play links are added to tunes in a tunebook, they just are for the indvidual tunes.
If adding playback links to all the tunes by checking "Add playback links to each tune to allow playing the tune by clicking the tune title" and this item is also checked, the tool will add annotation to the ABC to add the Share URL for the entire ABC tunebook to each tune.
If the entire tunebook playback Share URL is too large to be a valid URL link for opening in the tool (about 8100 characters), you will be presented with a warning when the PDF export is complete, and no playback links will be added to the tunes.
Additionally, if the complete tunebook playback Share URL is larger than the maximum allowed by Adobe Acrobat (2076 characters), after the PDF export is complete you will be presented with a warning that the links may not work in Adobe Acrobat but will work with browser-native and many other PDF readers.
This will probably happen quite frequently for tunebooks with 5 or more tunes.
Notation Spacing Explorer: Brings up a dialog where you can experiment with spacing values for the notation and then optionally inject the values into one or all of the tunes.
Paper Size:
Choose between Letter or A4 paper size:

Orientation:
Choose between Portrait or Landscape orientation:

Tune Layout:
Choose the format of the tunes in the PDF tunebook:

One Tune per Page
The notation for each tune is placed on a new page in the PDF.
Multiple Tunes per Page
The notation for each tune is added one after another down each page in the PDF.
When exporting multiple tunes per page to PDF the tool will do its best to layout the output to not split tunes between pages, unless the tune itself is longer than one page.
When exporting multiple tunes per page, if you want to manually force a tune to a new page in the PDF, add:
on a new line immediately at the end of tunes after which you want to force a page break.
This will allow you to easily format a tune book where you want to override the automatic tune layout.
Notes Incipits
The notation for the first line of each tune is added one after another down each page in the PDF.
Exporting a PDF tunebook with notes incipits allow you create a "cheat sheet" for the tunebook that includes just the notation for first line of each tune.
The tune notes incipits can be in standard notation or any of the available tablatures.
Tune notes incipits are generated stripping all ABC annotation and for tablature, hiding the tablature name to try and fit as many tunes on one page as possible.
Additionally, manually inserted %%newpage requests are ignored for incipit generation.
ABC Text Incipits
The first few bars of the ABC text for each tune's notes are added one after another down each page in the PDF.
Exporting a PDF tunebook with ABC incipits allow you create a "cheat sheet" for the tunebook that includes just the first few measures of the ABC for each tune.
ABC Text Incipits Sorted
The first few bars of the ABC text for each tune's notes are added one after another down each page in the PDF in tune name sorted order.
ABC Text Complete Tunes
The full ABC text for each tune's notes are added one after another down each page in the PDF.
ABC Text Complete Tunes - Comhaltas ABC
The full ABC text for each tune's notes are first translated from standard ABC to the Comhaltas "blackboard" ABC format and then added one after another down each page in the PDF.
The Comhaltas "blackboard" style of ABC uses only upper case letters to represent the notes and is commonly used for teaching.
In this system, middle C is represented by C, instead of C as would be in standard ABC.
The C above middle C that would be represented as c in standard ABC is represented by C in the Comhaltas "blackboard" style.
QR Code for Each Tune
A QR code for each tune containing the tune's Share URL is generated and put on its own page.
If play links are being added to the tunes in the PDF tunebook, clicking or scanning the QR code will open the tune in the Player.
The QR code can be clicked to open the tune or scanned and openend by a mobile device camera.
If the tune is too long for a valid QR Code, you can still click the image to open the tune.
Notation+QR Code for Each Tune
Each tune is rendered starting on its own page and then is followed by a QR code for the tune on its own page containing the tune's Share URL.
If play links are being added to the tunes in the PDF tunebook, clicking or scanning the QR code will open the tune in the Player.
The QR code can be clicked to open the tune or scanned and openend by a mobile device camera.
If the tune is too long for a valid QR Code, you can still click the image to open the tune.
Individual PDF File for Each Tune (Desktop browsers only)
Each tune is saved in its own PDF file, named the same as the tune.
If play links have been requested for the PDF tunebook using:
annotation in the ABC, then the individual tune PDFs will also play when the titles are clicked.
Default is: One Tune per Page
Notes Incipits Columns:
When exporting notes incipits, choose whether you want one or two column layout:
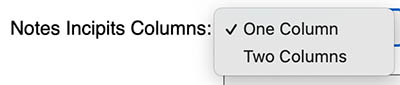
Page Number Location:
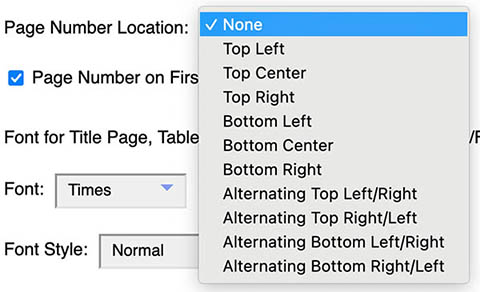
Choose between: None, Top Left, Top Center, Top Right, Bottom Left, Bottom Center, Bottom Right, Alternating Top Left/Right, Alternating Top Right/Left, Alternating Bottom Left/Right, or Alternating Bottom Right/Left.
The Alternating Left/Right and Alternating Right/Left settings alternate the location between the left/right or right/left sides of the page for printing on both sides of the paper.
Default is: None
Page Number on First Page:

Check this if you want the page number to be shown on the first page with tunes in the PDF.
Page numbers are not added to title pages, table of contents, index, or QR code pages.
PDF Tunebook Additions Font Settings
The following two settings control the font and font style for the PDF tunebook Title Page, Table of Contents, Index, Page Headers/Footers, Page Numbers, Text Incipits, and QR Code label.
These settings do not change the fonts in the ABC notation itself, those are configured in the Settings dialog Configure ABC Fonts sub-dialog.
Font:
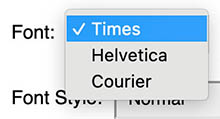
Choose between: Times, Helvetica, or Courier.
Default is: Times
Font Style:
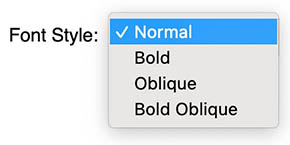
Choose between: Normal, Bold, Oblique, or Bold Oblique.
Default is: Normal
You may override the font and font style set in the PDF Tunebook Export dialog to be used for the PDF title page, page headers/footers, table of contents, index pages, page numbers, text incipits, and QR code label by adding the following ABC comment-based annotation anywhere in the ABC:
%pdffont fontname fontstyle
Valid fontname values are: Times, Helvetica, and Courier.
Valid fontstyle values are: Normal, Bold, Oblique, and BoldOblique.
You can leave the style value blank for the Normal style.
This allows you to make sure a tunebook PDF always gets generated with a specific font and style.
You may set the quality of the PDF output by adding the following ABC comment-based annotation anywhere in the ABC:
Where quality_value is a floating point value.
The default value is 0.75 (high quality)
Lower values will create lower resolution PDF notation output and smaller PDF file size.
A value of 1.0 will produce the maximum quality.
A value of 0.5 will still produce good-quality PDF notation at about half the PDF file size of the maximum quality.
A pdfquality value of 0.25 can be used to produce draft quality output with even smaller PDF file size.
You can also make individual tunes render smaller (or larger) both on screen and in exported PDF tunebooks by adding:
Immediately after the X: tag for a tune.
The default value is 556
To make the tunes less tall, a good value to start out with is setting desired_width to 730
Play with changing that 730 value until you get the output result you want.
This can be used to layout more tunes per PDF page.
You may also control the spacing between tunes in the PDF output by adding the following ABC comment-based annotation anywhere in the ABC:
Where spacing_value is an integer in 1/72" increments.
The default value is 20
Smaller values will reduce the space between the tunes in the PDF.
Larger values will increase the space between the tunes in the PDF.
This value is used in the layout of multiple tunes per page.
For the most compact PDF layout possible to maximize the number of tunes per page when generating a PDF, set the value to zero:
The Staff spacing value in the ABC Transcription Tools Settings dialog can be easily overridden by setting a %%staffsep value in the ABC just below the tune header.
This can be very useful particularly for getting as much tab notation on a single page as possible.
Any spacing overrides must be applied on a tune-by-tune basis.
For the absolute minimum spacing between staffs, turn off the tab names, hide the tune annotations, and add the following just below the tune header:
Try experimenting with different %%staffsep values until you get the result you want.
Setting the %%staffsep value manually too low may sometimes result in overlapping staff rendering.
To override the default space between the title and the first staff of music, you can add a custom %%musicspace value in the ABC just below the tune header, for example:
Try experimenting with different %%musicspace values until you get the result you want.
Here is the full list of ABC spacing-related parameters available in abcjs:
%%topspace
%%titlespace
%%subtitlespace
%%composerspace
%%musicspace
%%partsspace
%%vocalspace
%%wordsspace
%%textspace
%%staffsep
%%sysstaffsep
Please refer to the official ABC 2.1 specification for more details.
Another good reference is this handy ABC 2.1 Quick Reference Card put together by Stephen Merrony:
To add a title page to your PDF tunebook, simply add the following comment-based annotation anywhere in the ABC:
To add a smaller subtitle below the title on the title page, simply add the following comment-based annotation anywhere in the ABC:
Note: The subtitle only appears if a title page is requested.
For a title page with just a subtitle and no subtitle, just enter %addtitle with no text after it and then add %addsubtitle with your subtitle text.
To add a title page to your PDF tunebook as a hyperlink, simply add the following comment-based annotation anywhere in the ABC:
%urladdtitle URL title_text
To add a smaller subtitle as a hyperlink below the title on the title page, simply add the following comment-based annotation anywhere in the ABC:
%urladdsubtitle URL title_page_subtitle_text
%urladdtitle https://michaeleskin.com Tunebook Title with Hyperlink
%urladdsubtitle https://michaeleskin.com/abc Tunebook Subtitle with Hyperlink
Note: The URL must begin with either http:// or https:// to be recognized as a hyperlink.
Only the first instance of the %addtitle, %addsubtitle, %urladdtitle, and %urladdsubtitle annotations are processed, any additional instances are ignored.
To add a table of contents to the start of of your PDF tunebook listing each tune name and page number in the same order the tunes appear in the ABC along with hyperlinks to each tune, simply add the following comment-based annotation anywhere in the ABC:
To append an sorted tunebook table of contents to the start of your PDF tunebook listing each tune name and page number in alphabetical order by tune name along with hyperlinks to each tune, simply add the following comment-based annotation anywhere in the ABC:
Tune names that start with "The", "Da ", "A ", "An ", "Le ", or "La " will have the "The", "Da ", "A ", "An ", "Le ", or "La " moved to the end of the tune name before the sorting.
To add a hyperlink (displayed as >) on the right side of each page that links back to the tunebook index, simply add the following comment-based annotation anywhere in the ABC:
To add some text above the index pages as a page header, simply add the following comment-based annotation anywhere in the ABC:
Unlike standard page headers, the index page headers do not support macro expansion.
To suppress page number on the Table of Contents or Index, add either of the following comment-based annotation anywhere in the ABC:
These will cause the Table of Contents or Index to be rendered with the tune names in a column down the middle of the page.
This can be very effective in combination with setting larger Table of Contents and Index font size and line spacing parameters to make it easy to quickly jump to tunes from the larger text:
%toc_no_page_numbers
%tocfontsize 18
%toclinespacing 20
%index_no_page_numbers
%indexfontsize 18
%indexlinespacing 20
Adding a table of contents or index also adds bookmarks for the tunes to the PDF file.
To add a section header in the Table of Contents or Index, add a two line placeholder tune with only X: and T: tags, and with a tune title that starts with a * character:
The * at the start of the tune title will be automatically hidden in the rendered ABC notation and only used to signal the PDF generator to add the section header.
Click on any section header in the Table of Contents or Index to jump to that section in the tunebook.
In the unsorted Table of Contents and Index, section headers will be displayed with space above and below the section header.
In the sorted Table of Contents and Index, section headers will be displayed at the top without the extra space.
When rendering full tunes, section headers are automatically pushed to the top of a new page in the tunebook.
When rendering note or text incipits, section headers are not automatically pushed to the top of a new page.
If you want more information displayed under the section headers in the tunebook, just add more normal T: title tags (not starting with a *), they will show up as centered subtitles under the main section header.
X:1
T:*Reels
T:These are some tunes I'm working on
T:We can play them at the session next week
The additional text in the T: tags is added to the PDF tune pages, not the Table of Contents and Index.
Do not put more than one T:* section header tag in the placeholder tune, only the first T: tag should be marked with the *.
You may override various spacing offsets and font sizes for the Table of Contents and Index by adding the following comment-based annotations anywhere in your ABC:
Table of Contents offset and font overrides:
%toctopoffset top_offset - Vertical offset as a multiple of 1/30" from the page header to the top of the Table of Contents title. Default is: 30.
%toctitleoffset title_offset - Vertical offset as a multiple of 1/30" from the title to the first entry in the Table of Contents. Default is: 35.
%toctitlefontsize font_size - Font size for the Table of Contents title. Default is: 18.
%tocfontsize font_size - Font size for tune names in the Table of Contents. Default is: 13.
%tocleftoffset left_offset - Left offset as a multiple of 1/30" for the Table of Contents entries from their default position. Positive values move the entries left. Default offset is: 0.
%tocrightoffset right_offset - Right offset as a multiple of 1/30" for the Table of Contents numbers from their default position. Positive values move the numbers right. Default offset is: 0.
%toclinespacing line_spacing - Line spacing for tune names in the Table of Contents. Default is: 12.
Index offset and font overrides:
%indextopoffset top_offset - Vertical offset as a multiple of 1/30" from the page header to the top of the Index title. Default is: 30.
%indextitleoffset title_offset - Left offset as a multiple of 1/30" from the title to the first entry in the Index. Default is: 35.
%indextitlefontsize font_size - Font size for the Index title. Default is: 18.
%indexfontsize font_size - Font size for tune names in the Index. Default is: 13.
%indexleftoffset left_offset - Left offset as a multiple of 1/30" for the Index entries from their default position. Positive values move the entries left. Default offset is: 0.
%indexrightoffset right_offset - Right offset as a multiple of 1/30" for the Index numbers from their default position. Positive values move the numbers right. Default offset is: 0.
%indexlinespacing line_spacing - Line spacing for tune names in the Index. Default is: 12.
As with all previously described PDF annotations, only the first instance of these annotations are processed, any additional instances are ignored.
You may add custom page headers and footers to your exported PDF files by including the following ABC comment-based annotations anywhere in your ABC:
If you'd like to link to a specific URL when users click in the PDF page header or footer, include either the following ABC comment-based annotations anywhere in your ABC:
%urlpageheader URL header_text
%urlpagefooter URL footer_text
%urlpageheader https://michaeleskin.com/abc Click in this page header to visit my home page
%urlpagefooter https://michaeleskin.com/abc Click in this page footer to visit my home page
Note: The URL must begin with either http:// or https:// to be recognized as a hyperlink.
There are also several useful user macros you can include in your page header or footer text that will be expanded in the PDF:
$PDFNAME - Matches the saved PDF filename
$PAGENUMBER - Current page number
$DATEMDY - Current date in M-D-Y format
$DATEYMD - Current date in Y-M-D format
$TIME - Current time in HH:MM format
$TUNECOUNT - Number of tunes in the ABC
$TUNENAMES - All of the tune names in the ABC separated by /
The tune names width is limited to about 70 characters before it will append "+ (remaining number of tunes) more" to the first few tune names.
Example ABC with page header and page footer annotations that include user macros:
%pageheader "The Tarbolton" from the Michael Coleman set - Saved on $DATEMDY at $TIME
%pagefooter $PDFNAME - Page $PAGENUMBER
X:1
T:The Tarbolton
M:4/4
K:Edor
Beed e2BA|GBAF GFEF|Dddc d2AG|FAGE FEDF|
Eeed efge|fedf e2BA|GABG FGAF|BGAF GEE2:|
|:gfef gebe|gebe gfec|d2fd Adfd|cdAG FDEF|
GABG FGAF|E2ef gfed|BcdB A2FA|BGAF GEE2:|
Results in a PDF that looks like this:
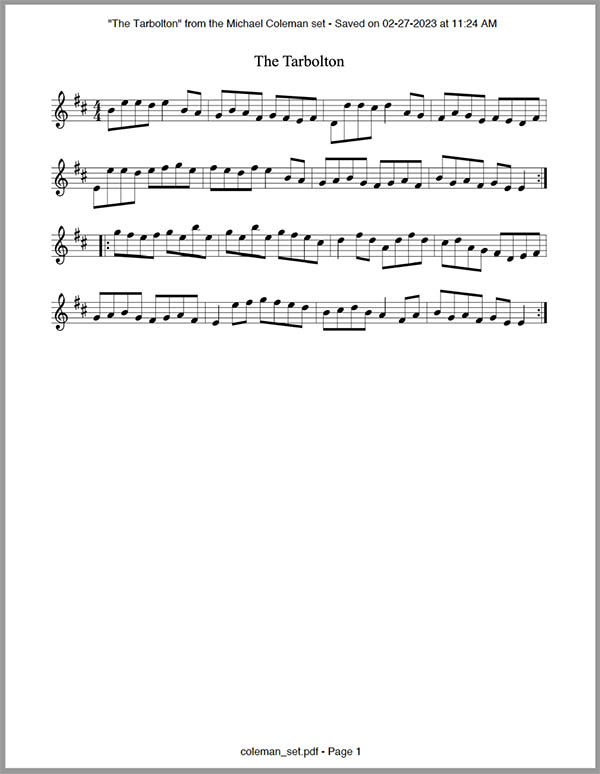
Note: Only the first instance of the %pageheader or %pagefooter annotation is processed, any additional instances are ignored.
Page numbers can be added along with page headers and footers.
If you add a page header and you have selected top-centered page numbers, the page number will be hidden.
If you add a page footer and you have selected bottom-centered page numbers, the page number will be hidden.
Since these annotations are ABC comment-based, they will just appear to be normal comments in other ABC software.
Forcing a Specific Filename for PDF Export
If you want to force a specific filename to be used by default every time you export the PDF file, add the following comment-based directive anywhere in the ABC:
Example of using the tune playback hyperlinks and other advanced features:
Adding an external website hyperlink to a specific tune:
The tool can add hyperlinks to external websites to the tune notation in a PDF tunebook.
When a hyperlink is present, touch the title of the tune and you will automatically launch the associated tune hyperlink.
To add a hyperlink to an external website in any tune, add the following comment-based annotation anywhere in the ABC for a specific tune:
Adding a playback hyperlink to a specific tune:
To add a hyperlink back to the ABC Transcription Tools for playing a specific tune with specific General MIDI instrument program number sounds for the melody, bass and chords, add the following comment-based annotation anywhere in the ABC for a specific tune:
%add_playback_link MELODY_PROGRAM BASS_PROGRAM CHORD_PROGRAM SOUND_FONT
The MELODY_PROGRAM, BASS_PROGRAM CHORD_PROGRAM, and SOUND_FONT are optional.
If only the MELODY_PROGRAM is specified, the BASS_PROGRAM, CHORD_PROGRAM, and SOUND_FONT values will be set to the current default soundfont and instrument program number settings for bass and chord playback in the Settings dialog.
If MELODY_PROGRAM, BASS_PROGRAM, CHORD_PROGRAM, and SOUND_FONT are not specified, the play link will be added, but no additional MIDI program, bassprog, or chordprog information will be injected into the tune at playback time.
Example: To have a specific tune played using the FatBoy soundfont with an Harpsichord sound on the melody and a Piano sound on the bass and chords
X:1
T:The Tarbolton
M:4/4
K:Edor
%add_playback_link 6 0 0 fatboy
Beed e2BA|GBAF GFEF|Dddc d2AG|FAGE FEDF|
Eeed efge|fedf e2BA|GABG FGAF|BGAF GEE2:|
|:gfef gebe|gebe gfec|d2fd Adfd|cdAG FDEF|
GABG FGAF|E2ef gfed|BcdB A2FA|BGAF GEE2:|
Adding playback hyperlinks to every tune in a PDF tunebook:
You may automatically add a hyperlink for every tune back to the ABC Transcription Tools for playing the tune with a specific General MIDI instrument program number sound for the melody, bass, and chords by adding the following comment-based annotation anywhere in the ABC file:
%add_all_playback_links MELODY_PROGRAM BASS_PROGRAM CHORD_PROGRAM SOUND_FONT
The MELODY_PROGRAM, BASS_PROGRAM, CHORD_PROGRAM, and SOUND_FONT are optional.
If only the MELODY_PROGRAM is specified, the BASS_PROGRAM, CHORD_PROGRAM, and SOUND_FONT values will be set to the current default soundfont and instrument program number settings for bass and chord playback in the Settings dialog.
If MELODY_PROGRAM, BASS_PROGRAM, CHORD_PROGRAM, and SOUND_FONT are not specified, the play link will be added, but no additional MIDI program or chordprog information will be injected into the tune at playback time.
This is useful for tunebooks for which you have manually specified all the MIDI soundfont, program, bassprog, and chordprog information already in the tunes and do not want them overridden when played from the play link.
Example: To have all tunes played using the FatBoy soundfont and a Harpsichord sound on the melody and a Piano sound on the bass and chords:
%add_all_playback_links 6 0 0 fatboy
To specify the volumes for the bass and chords to the playback links also add:
%add_all_playback_volumes BASS_VOLUME CHORD_VOLUME
Range for both BASS_VOLUME and CHORD_VOLUME is 0 to 127.
If %add_all_playback_volumes is not present, no volumes will be injected into each tune.
If no other tune-specific volume directives are in the tunes, the bass and chords will play at whatever default volumes the user has set in their tool's Settings.
For example, to set the bass volume to 48 and the chord volume to 64:
%add_all_playback_volumes 48 64
To have the playback links include the entire tunebook ABC, along with %add_all_playback_links also add:
If the entire tunebook playback Share URL is too large to be a valid URL link for opening in the tool (about 8100 characters), you will be presented with a warning when the PDF export is complete, and no playback links will be added to the tunes.
Additionally, if the complete tunebook playback Share URL is larger than the maximum allowed by Adobe Acrobat (2076 characters), after the PDF export is complete you will be presented with a warning that the links may not work in Adobe Acrobat but will work with browser-native and many other PDF readers.
This will probably happen quite frequently for tunebooks with 5 or more tunes.
Adding or disabling swing for all Hornpipes in PDF tunebooks with play links:
If you want to add swing to every Hornpipe when generating PDF tunebooks with play links, add the following comment-based annotation anywhere in the tunebook ABC:
%swing_all_hornpipes swing_factor (Optional: Range is -0.9 to 0.9)
If you omit the swing_factor value, it will use the current tool default from the settings dialog.
Tunes that have swing manually disabled using %noswing in their ABC will not have the %swing annotation injected and will play with no swing.
If you want to disable swing on every Hornpipe when generating PDF tunebooks with play links, add the following comment-based annotation anywhere in the tunebook ABC:
Tunes that have swing manually specified using %swing in their ABC will not have the %noswing annotation injected and will retain their swing setting.
%noswing_all_hornpipes takes precedence over %swing_all_hornpipes.
Adding a thesession.org hyperlink to a specific tune:
To add a hyperlink to a specific tune to the thesession.org search page for the tune title, add the following comment-based annotation anywhere in the ABC for a specific tune:
X:1
T:The Tarbolton
M:4/4
K:Edor
%add_link_to_thesession
Beed e2BA|GBAF GFEF|Dddc d2AG|FAGE FEDF|
Eeed efge|fedf e2BA|GABG FGAF|BGAF GEE2:|
|:gfef gebe|gebe gfec|d2fd Adfd|cdAG FDEF|
GABG FGAF|E2ef gfed|BcdB A2FA|BGAF GEE2:|
Adding thesession.org hyperlinks to every tune in a PDF tunebook:
You may automatically add a hyperlink for every tune to the thesession.org search page for the tune title by adding the following comment-based annotation anywhere in the ABC file:
Precedence order for hyperlinks:
On a single tune, manually added website hyperlinks take highest priority, then playback hyperlinks, then thesession.org hyperlinks.
Any manually added individual tune hyperlinks take precedence over automatically generated tunebook-wide playback or thesession.org hyperlinks.
For automatically generated tunebook-wide hyperlinks, %add_all_playback_links takes precedence over %add_all_links_to_thesession
Note: Adobe Acrobat has a maximum supported hyperlink URL length of 2076 characters.
During PDF generation, if a playback or other hyperlink is detected that exceeds the maximum Adobe Acrobat supported URL length, you will be presented with an alert at the completion of the PDF generation.
The alert lists the names of the tunes that have the long URLs, along with the URL length for each tune.
These play links will work with the built-in PDF reader on most web browsers and online PDF readers, many non-Adobe desktop and mobile PDF readers, but will not open correctly if the tune title is clicked when the PDF is viewed using Adobe Acrobat.
If Adobe Acrobat is your target PDF reader, your best option is to use the available per-tune %hyperlink directive in these tunes with a shortened play Share URL manually generated using the Sharing dialog:
Forcing the tune links in the PDF to open in the Editor instead of the Player.
To force the tune links in the PDF to open in the Editor instead of the full screen view or Player, add:
anywhere in the ABC file.
This works with the other PDF tunebook features like Title Page, Table of Contents, and Index pages, but will override any %add_all_playback_links annotation added to request that tunes in the PDF should open in the Player when you click their titles.
Disabling access to the tune editor from tunes linked from PDF tunebooks.
To disable access to the editor (hides the Zoom arrows in the full screen view) from a tune link created with one of the above directives, add:
anywhere in the ABC file.
Example: Creating a PDF tunebook with playback links and other advanced features
Here is a good starting template of annotations for creating a tunebook that includes:
Sets the PDF quality to the default (.75 = High quality). This can be reduced to create smaller, but lower quality PDF files.
Sets the spacing between tunes for multiple tunes/page to the default of 20/72". Change this to 0 for minimal space between PDF tunes.
Title page with sub-title
Table of contents linked to each tune
> Link back on each page to the index
Playback links on every tune title selecting the Fluid soundfont, Piano sound for the melody, and a Piano sound for the bass and chords
Injects all required fonts for each tune to match the current state of the tool.
QR code with hyperlink and caption at the end of the tunebook
%pdfquality .75
%pdf_between_tune_space 20
%addtitle Tunebook Title
%addsubtitle Tunebook Subtitle
%addtoc Table of Contents
%addlinkbacktotoc
%addsortedindex Index
%addlinkbacktoindex
%pageheader This is the Page Header
%pagefooter This is the Page Footer
%add_all_playback_links 0 0 0 fluid
%add_all_playback_volumes 64 48
%add_all_fonts
%qrcode https://michaeleskin.com
%caption_for_qrcode Click or Scan to Visit my Home Page
You can instantly inject this useful starter set of PDF annotations at the top of your ABC by clicking the Add PDF Tunebook Annotations button in the Add dialog.
As per the ABC 2.1 specification, custom font overrides are possible, giving you maximum control over the appearance of your notation.
Available ABC Inline Font Annotations:
%%titlefont font-style size (used for the first title of the tune)
%%subtitlefont font-style size (used any additional titles for the tune)
%%infofont font-style size (used for rhythm string at the left side of the staff)
%%composerfont font-style size (used for the composer string at the right side of the staff)
%%tempofont font-style size (used for the tempo indication)
%%gchordfont font-style size (used for "G", "Em", etc., style chords symbols)
%%tablabelfont font-style size (used for tablature label)
%%tabnumberfont font-style size (used for tablature numbers)
%%tabgracefont font-style size (used for tablature grace numbers)
%%historyfont font-style size (used for for Z:, H:, and other descriptive metadata tags)
%%textfont font-style size (used for any %%text or %%center text)
%%annotationfont font-style size (used for "^*" and "_*" chord-like tablature annotations)
%%voicefont font-style size (multiple voice staff labels)
%%partsfont font-style size (used for P:)
%%vocalfont font-style size (used for for w:)
%%wordsfont font-style size (used for W:)
Generally, these will use the PostScript font-style naming convention, for example:
Times, Helvetica, Courier, Verdana, Times-Bold, Helvetica-Italic, etc.
The size parameter should be an integer, but is optional.
Place your font override annotations just below the X: and above the T: ABC tune headers.
Inline font annotations will override the default font settings configured in the tool's Settings dialog.
For example:
X: 1
%%titlefont Palatino 30
%%infofont Palatino 18
%%gchordfont Palatino Bold 14
T: The Road to Lisdoonvarna
R: slide
M: 12/8
L: 1/8
K:Edor
D|:"Em"E2B B2A B2c d3|"D"F2A ABA D2E FED|
"Em"E2B B2A B2c d3|"D"cdc B2A "Em"B2E E3:|
|:"Em"e2f gfe "Bm"d2B Bcd|"A"c2A ABc "Bm"d2B B3|
"Em"e2f gfe "Bm"d2B Bcd|"A"cdc B2A "Em"B2E E3:|
Result:
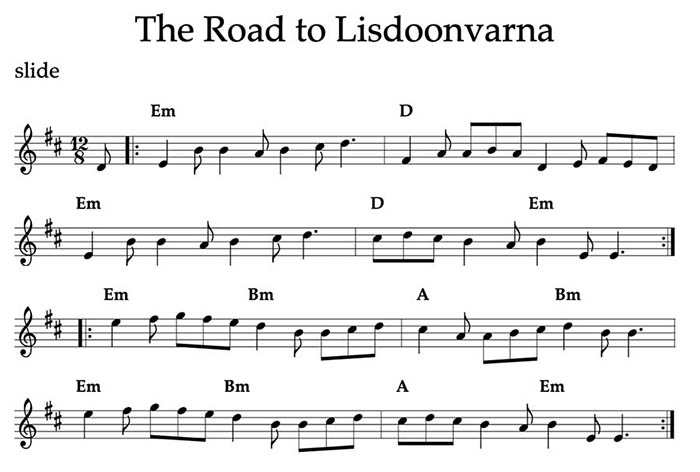
Note: If a font change doesn't appear to happen immediately, force a full refresh by opening the controls, changing the display format, for example from notation to one of the tab options and then back to notation.
That will force a full page refresh and the new fonts will be used.
Web Safe Fonts
The following "web safe" fonts at a minimum should be supported by all browsers:
Trebuchet MS (sans-serif)
Gill Sans (sans-serif)
Times New Roman (serif)
Bradley Hand (cursive)
Font availability varies with browser and platform. Many other fonts may be available on your system.
More information is available here:
When creating share links, you can force injection of the required fonts for each tune from the tool's default fonts (set in the Settings/Font Settings dialog) by adding the following comment-based annotation anywhere in the ABC:
This forces the tune opened by a share link to use the same fonts as when it was exported originally to the PDF file by injecting any required ABC font annotations at the top of the ABC for the tune.
Any fonts specified in the ABC will override the user's default fonts when they open the share link.
Here are examples of all the possible PDF comment-based annotations in the tool:
%pdfquality .75
%pdf_between_tune_space 20
%pdfname your_pdf_filename
%pdffont fontname style
%addtitle Title Page Title
%addsubtitle Title Page Subtitle
%urladdtitle https://michaeleskin.com Title Page Title as Hyperlink
%urladdsubtitle https://michaeleskin.com Title Page Subtitle as Hyperlink
%addtoc Table of Contents
%addsortedtoc Table of Contents Sorted by Tune Name
%addlinkbacktotoc
%tocheader Page Header Text for Table of Contents Pages
%toctopoffset 30
%toctitleoffset 35
%toctitlefontsize 18
%tocfontsize 13
%toclinespacing 12
%addindex Unsorted Index
%addsortedindex Index Sorted by Tune Name
%addlinkbacktoindex
%indexheader Page Header Text for Index Pages
%indextopoffset 30
%indextitleoffset 35
%indextitlefontsize 18
%indexfontsize 13
%indexlinespacing 12
%no_toc_or_index_links
%toc_no_page_numbers
%index_no_page_numbers
%pageheader Page Header
%pagefooter Page Footer
%urlpageheader https://michaeleskin.com Page Header as Hyperlink
%urlpagefooter https://michaeleskin.com Page Footer as Hyperlink
%add_all_links_to_thesession
%add_all_playback_links 0 0 0 fluid
%add_all_playback_volumes 64 64
%playback_links_are_complete_tunebook
%add_all_fonts
%swing_all_hornpipes 0.25
%noswing_all_hornpipes
%no_edit_allowed
%links_open_in_editor
%qrcode
%qrcode https://michaeleskin.com
%caption_for_qrcode Caption for the QR code
%abcjs_soundfont fluid
%
% These directives can be added to each tune:
%hyperlink https://michaeleskin.com
%add_link_to_thesession
%add_playback_link 0 0 0 fluid
%swing 0.25
%noswing
%bodhran_tuning A
%bodhran_pitch A
%banjo_style 2
%grace_duration_ms 30
%roll_2_params 0.95 0.8 1.0 0.75 0.9 1.0 0.75 1.0
%roll_3_params 1.45 0.6 1.0 0.75 0.9 1.0 0.75 1.0
%use_original_abcjs_roll_solution
%abcjs_release_decay_time 200
%use_custom_gm_sounds true
%disable_play_highlight
%play_highlight_v1_only
%irish_rolls_on
%irish_rolls_off
%voice_tuning_cents
%tab_first_voice_only
%tab_first_voice_exclude
%reverb chamber 0.8 0.2
%abcjs_render_params
The PDF tunebooks created by this tool can be editing using Adobe Acrobat Pro or other PDF editing tools.
On Mac systems, you can use the built-in Preview program to insert additional pages and other PDF editing operations.
One free online PDF editing/organization tool website I recommend is ILovePDF.com:
On this site you will find free tools to merge multiple PDF files, reorder pages in a PDF, extract pages from a PDF, and as well as many other useful operations.
Clicking the Settings button at the top of the tool brings up a dialog where you can set tool-wide settings:
![]()
Show instrument tablature button bar below ABC editor
If checked shows the instrument tablature button bar below the editor.
When the bar is visible, click on any button in the button bar and the notation will be redrawn with the new instrument tablature.
The new instrument tablature chosen will become the new default for the tool.
Default is: Enabled.
Save an Auto-Snapshot on browser tab close or reload? (Restore it from the Add dialog)
(Desktop browsers only) When enabled, saves an Auto-Snapshot when closing or reloading the browser tab the tool is running in.
ABC Editor Font Size (default is 13)
(Desktop browsers only) Allows you to set the font size (in points) used in the ABC editor area.
Default is 13. Minimum is 6, maximum is 36.
Space between the staves (default is 10, minimum is -40)
Allows you to set a wider or narrower gap between the staffs.
A value of 0 corresponds to an ABC %%staffsep of 40
Minimum value is -40 (corresponds to an ABC %%staffsep of 0)
Final rendered staff separation depends on the contents of ABC itself, for example the use of chords and other annotations may increase the staff spacing.
Experiment with this value until you get the result you want.
Left-justify all titles and subtitles
When checked, draws all titles and subtitles left-justified instead of centered above the notation.
Note name tablature uses Comhaltas style ABC (D' E' F' instead of d e f for octave notes)
Check this if you want to use the Comhaltas "Blackboard ABC" standard for ABC note names (D' E' F' instead of d e f for octave notes) when in note names tab display mode.
Important: While the note Names display will show the Comhaltas-preferred note names, the ABC standard requires that the second octave C in the ABC itself either be represented by c or C' so that may requires some minor changes when pasting in your Comhaltas-formatted tunes.
Note name font and size in the tab is set by the Tab number font setting in the Configure ABC Fonts dialog.
Show CGDA as a 4-string tab option (default is GDAD)
When checked replaces the GDAD tab button with a CDGA tab button for CGDA-tuned Mandola.
Show DGDAE as a 5-string tab option (default is CGDAE)
When checked replaces the CGDAE tab button with a DGDAE tab button for 5-string DGDAE-tuned bouzouki.
Stringed instrument capo fret postion
Allows you to set a capo setting from 0 to 12 frets for any of the stringed instruments tabs.
Show stringed instrument names on tablature (single-voice tunes only, not shown in the Player)
Hides/Shows the instrument names and capo settings on the tablature.
At this time, instrument names below the tablature will only be displayed for single-voice tunes.
Select Default Player Instruments and Volumes
Brings up a dialog where you can select default MIDI soundfont, programs, and volumes to use for the Melody, Bass, and Chords:
![]()
Default abcjs soundfont
Choose between the General MIDI soundfonts available to use by default when playing tunes:
Fluid (fastest to load, but samples are limited to 3 seconds in length)
Musyng Kite
FatBoy
Canvas (Based on a Roland JV-1010)
MScore (Based on the MuseScore General MIT licensed soundfont)
Arachno
FluidHQ (higher quality, longer samples than the default Fluid soundfont)
On first run, the default is set to Fluid.
Each soundfont is a full General MIDI implementation, but has somewhat different sounds for each instrument.
If no %abcjs_soundfont soundfont is specified in a tune, the default soundfont chosen in the tool's Settings dialog is used.
For more details on the soundfonts, visit: midi-js-soundfonts on GitHub
Your default soundfont choice is saved in browser storage and restored the next time the tool is run.
Default Melody MIDI program
Select your default MIDI instrument for the Melody from the instrument selection menu.
Default Bass MIDI program
Select your default MIDI instrument for the Bass from the instrument selection menu.
Default Chords MIDI program
Select your default MIDI instrument for the Chords from the instrument selection menu.
Default Bass MIDI volume (0-127)
Select your default MIDI volume for the Bass when playing backup patterns.
Default Chords MIDI volume (0-127)
Select your default MIDI volume for the Chords when playing backup patterns.
Override all MIDI programs and volumes in the ABC when playing tunes
When checked, this will override any existing %%MIDI program, %%MIDI chordprog, %MIDI bassvol, and %MIDI chordvol values found in the ABC with your defaults when you play a tune.
This can be useful with my Interactive PDF tunebooks with built-in playback features if you want to use your preferred instrument sounds and volumes instead of the instruments and volumes set by the Interactive tunebook play link ABC.
For example, if you want to always use a Whistle sound for the Melody and a Piano sound for the Bass and Chords, set your default Melody instrument to Whistle and your default Bass and Chords instruments to Acoustic Grand Piano. Then enable Override all MIDI programs and volumes in the ABC when playing tunes.
To mute the melody, select the Mute program.
To mute the bass and chords, select the Mute program.
Use custom sounds for Dulcimer, Accordion, Flute, Whistle, Banjo, Bagpipe, Fiddle, and Bodhran
If this is enabled (on by default), for all soundfonts, my custom sampled instruments for Dulcimer, Accordion, Flute, Whistle, Banjo, Bagpipe, Fiddle, and Bodhran (remapped from Melodic Tom) will override the soundfont sounds.
Use Default Melody and Bass/Chord programs when playing tunes
If enabled, will play tunes that don't have Melody or Bass/Chord programs already in the ABC with your preferred instrument sounds.
If a %%MIDI program, %%MIDI bassprog, or %%MIDI chordprog directive is already present in the tune when playing, it will take precedence over the default program values.
Use Default Bass/Chord volumes when playing tunes
If enabled, will play tunes that don't have Melody or Bass/Chord volumes already in the ABC with your preferred instrument volumes.
If a %%MIDI bassvol, or %%MIDI chordvol directive is already present in the tune when playing, it will take precedence over the default volume values.
Changing the Melody Volume
To change the Melody volume, add a dynamics indication such as !pppp!, !ppp!, !pp!, !p!, !mf!, !f!, !ff!, !fff!, or !ffff! immediately before the first note in the ABC.
To mute just a section of a tune use the following annotation in the ABC (specific to this tool):
Special Note on the Dulcimer (15) Instrument
Selecting the Dulcimer (15) program for either the melody or chords automatically sets all note release times to 4 seconds to allow the notes to ring.
This can be useful for tunes using solo melody instruments with long release times like Orchestral Harp (46) or Koto (107).
For those instruments played solo, set the melody instrument program as desired and the chord instrument program to Dulcimer (15).
In this case, you may not want to include any chords in the ABC, as they will be played using the Dulcimer (15) instrument.
This only applies if Use custom sounds for Dulcimer, Accordion, Flute, Whistle, Banjo, Bagpipe, Fiddle, and Bodhran is enabled (see below).
Automatically swing Hornpipes when playing (enabled if R:Hornpipe is found in the tune)
If checked, automatically swings Hornpipes if
is found in the tune.
Auto-swing scale factor (range is -0.9 to 0.9, default for Hornpipes is 0.25)
Sets the level of swing used by the Hornpipe play auto-swing feature.
The swing factor lengthens the primary beats by the swing factor and shorten subsequent beats accordingly.
For full details on swing factor, see this section:
Rolls indicated in the ABC with ~ use the custom abcjs roll playback solution
By default, abcjs doesn't attempt to play rolls that are indicated using a ~ before the note, it just plays the note without any modification.
The abcjs custom roll playback system is normally only enabled for rolls that are indicated using an R or !roll! before the note.
When this item is checked, rolls indicated using a ~ before a note in the ABC will use the abcjs custom roll playback system as well as those indicated with R or !roll!
Any custom roll parameters you have the ABC will also work with the ~ style rolls when this is turned on.
Use this at your own risk, it may not work for all tunes.
Uncheck this item to return to the default abcjs behavior (no rendering of ~ style rolls).
Enabling/Disabling ~ Roll Playback in a Tune
To override the settings and force playback to use the custom roll playback solution for a specific tune you can include the following comment-based annotation anywhere in the tune's ABC:
To override the settings and disable playback of the custom roll playback solution for a specific tune you can include the following comment-based annotation anywhere in the tune's ABC:
If your browser supports MIDI input, you will find these two additional options in the settings dialog:
Allow MIDI input for ABC text entry
For full details on MIDI input, see this section:
MIDI input is key and mode aware (if unchecked, enters note names with no accidentals)
For full details on MIDI input, see this section:
Font Settings
Brings up a dialog where you can configure all fonts used for rendering the ABC.
Tablature Injection Settings
Brings up a dialog where you can configure all parameters for tablature/solfège injection.
MusicXML/MIDI Settings
Brings up a dialog where you can configure all parameters for MusicXML/MIDI import.
Details on MusicXML/MIDI import settings below in the MusicXML/MIDI Import Settings section.
Advanced Settings
Brings up a dialog where you can configure low level tool features and settings.
Details on the advanced settings below in the Advanced Settings section.

These settings are available by clicking the Advanced Settings button at the bottom of the main Settings dialog.
On mobile browsers, the dialog will only show the settings that are available on mobile platforms.
Note: Do not change these values unless you know what you are doing!
iPad Two-Column View (experimental) (iPad only)
When checked, when the tool is run on an iPad, it will use a two column display like a desktop browser.
This feature is best used using an external keyboard on the iPad.
After changing this setting, the tool will reload itself.
iPad Two-Column Landscape Player Width (percentage) (default is 60) (iPad only)
When the iPad Two-Column View is enabled, sets the width in percentage of screen width for the Player when the iPad is in Landscape orientation. Default is: 60.
Always confirm before deletion when clicking Clear
When checked, if you click the "Clear" button, you will be asked to confirm before the ABC is cleared. (Default is on)
Always replace curly single and double quotes with standard versions on Open or Paste
When checked, replaces curly single and double quotes with standard single or double quotes on file open or paste of ABC into the editor.
Show ABC syntax validation panel
When checked, shows any ABC syntax errors detected by abcjs for the tune currently being edited in a panel below the ABC editor.
Show tune rendering progess in the Javascript console
When checked, puts out a message before and after each tune render in the browser's Javascript console.
The tool will put up an alert if a specfic tune crashes the renderer, but this option can be useful to show that rendering is progressing on a large tunebook or help track down a specific tune that is crashing abcjs, as indicated by the progress spinner never going away.
Generally, if a tune crashes abcjs, you will see a "Before render" message for the tune, but no "After render" message.
This setting is turned off every time the tool is run.
Disable abcjs notation rendering
Check this if you want to completely disable the rendering of the notation.
This can be very useful with very large tunebooks to speed up the process of generating text incipits or full ABC text PDF exports, where the rendered notation isn't required to generate the PDF.
If you want any of the built-in tablatures shown when a user clicks on the title of one of your text incipits or full ABC text export play links with rendering disabled, click the desired tablature button (i.e. Mandolin, Guitar, Whistle, etc.) before doing the text incipits or full text export.
The current tablature selection is always injected into the share links for the tunes when the PDF is generated even if rendering is disabled.
This setting is turned off every time the tool is run.
Autoscroll player when playing
Check this if you want have the player autoscroll the notes into view while playing.
Player/Tune Trainer always plays full tune even if there is a selection region
Check this if you want have the Player and Tune Trainer always play the full tune even if you have selected some notes in the tune. (default is to play/train only the selected notes if there is a selection region)
Player uses large controls (easier to touch on mobile and tablet)
Check this if you want to have larger controls in the Player view.
Player tunebook navigation controls on left side
When checked, puts the player tunebook navigation controls on the left side of the player. (default is right)
Player/Tune Trainer uses label L/R side click to decrement/increment values
Check this if you want to decrement or increment values in the Tune Trainer number entry fields by clicking on the left or right side of their labels.
Touching to the left or right of the tempo field in any of the Players (Player, MIDI Instrument Explorer, Swing Explorer, Grace Explorer, Roll Explorer, Tune Trainer) decrements or increments the tempo by 5%.
This makes it easier to set tempos and increments on touch screen devices.
Defaults to enabled for Android and iPhone devices.
Full screen tune display scaling (percentage) (default is 50)
Sets the width in percentage of window width for the tune notation on the screen when viewing full screen. Default is: 50%.
If the resulting scaled width is less than 850 pixels (820 pixels for iOS/Android) the width will be set to 850 pixels (820 pixels for iOS/Android).
Highlighting color (HTML format) (default is #F00000):
(Desktop browsers only) Sets the color of the notation highlights when Highlighting is on.
Value must be an HTML RGB hex color value or HTML named color for example #0000FF or blue.
Default %reverb annotation (blank = no reverb)
If you wish to have reverb enabled by default if there is no other %reverb already present in a tune, enter the parameters for the %reverb annotation here.
For example, if you want to have the chamber reverb turned on by default, with a 0.8 dry and 0.2 wet mix, enter the following value:
At tune play time, if this setting is not blank, and no other %reverb annotation is found in the tune, a %reverb annotation with the settings will be automatically injected at the top of the tune before playback.
To completely disable the reverb, simply clear this field.
When the tool is first run, the default reverb is set to:
chamber 0.95 0.05
For more details on the reverb parameters, please see the Adding Reverb When Playing Tunes section.
Metronome volume (default is 48):
Sets the volume of the metronome drum sounds. Range is 0 - 127.
MP3 audio export bitrate (kbit/sec) (default is 224):
Sets the bitrate for MP3 stereo audio downloaded from the Player.
Default value is 224. Minimum value allowed is 96. Maximum value allowed is 384. Higher values result in higher quality audio.
Image Batch Export Delay in milliseconds (default is 200):
(Desktop browsers only) Sets the delay between file saves when doing batch image export.
Many faster systems can handle setting this to 100ms or lower.
You can try a lower value. If you see any issues or are missing images on batch export, set it back to a higher value.
MP3 Batch Export Delay in milliseconds (default is 250):
(Desktop browsers only) Sets the delay between file saves when doing batch .MP3 export.
Tune search fetch retry delay in milliseconds (default is 3000):
Sets the delay between failed fetch retries when reading in a tune collection for the Search and Add dialog.
Tune search fetch retry maximum count (default is 10):
Maximum number of failed fetch retries when reading in a tune collection for the Search and Add dialog.
Default roll_2_params
Sets the default quarter note roll parameter string.
Default roll_3_params
Sets the default dotted quarter note roll parameter string.
Enter the roll parameter strings in the same format as the %roll_2_params and %roll_3_params ABC annotation strings described here:
Reset Roll Parameter Strings to Defaults
Resets the roll_2_params and roll_3_params roll default parameter strings to their original known good default values.
Private TinyURL API Token
If you have your own TinyURL API Token for shortening URLs, enter it here on the Advanced Settings dialog.
I get a limited number of free TinyURL shortenings each month, so if you want to shorten a lot of share links, please sign up for your own free (or paid tier) TinyURL account at:
and obtain your own private TinyURL API token with "Create TinyURL" permission at:
and paste the API token in this field.
Once entered, it will be saved and used for all future URL shortening operations.
To return to using my default API token, clear this field.
Load Custom Reverb Impulse
This button on the Advanced Settings dialog allows you to load a custom convolution reverb impulse .wav file to use when specifying "custom" as the reverb type for the current tool session.
You will find many reverb impulse files for free download at: Open Air Acoustic Impulse Responses
Once loaded, the custom reverb impulse file is saved in browser storage and will be used the next time the custom reverb style is requested.
Reset Settings - Click this button on the Advanced Settings dialog to bring up a subdialog where you can reset the tool settings and/or clear the instrument note, reverb settings, and search engine tune search collection databases.

This can be useful to get back to a clean slate if there is any chance that any tool settings or the databases used to speed the operation of the tool have been corrupted or you just want to clear out storage space in your browser.
When offline, only Reset all tool settings to default will be available as clearing the database while offline would break offline play.
Checking Reset all tool settings to default will restore the tool settings to the original first-run state.
Checking Clear all databases will clear and delete the instrument notes, reverb settings, and tune search collections databases.
If you enable either of these options, the tool will be restarted after the operation is complete.
The tool settings and databases will be recreated fresh after the tool restart and repopulated as you continue to use the tool.
Clicking the Font Settings button in the tool settings dialog shows a subdialog where you can configure all the fonts used for rendering the ABC.
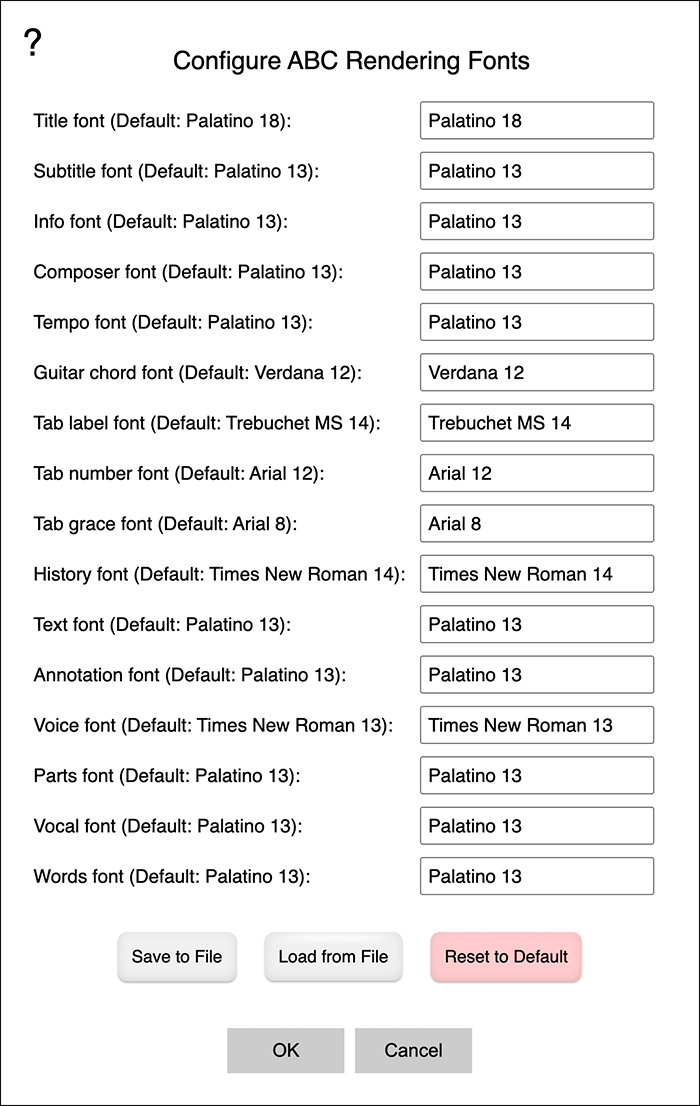
Values are saved in browser storage and restored the next time the tool is run.
For details on the use of each font, refer to the Custom Font Overrides information below.
Click Save to File to save the ABC rendering font settings to a file.
Click Load from File to load the ABC rendering font settings from a previously saved file.
Click Reset to Default to reset the ABC rendering font settings to their original defaults.

These settings are also used for MIDI import since MIDI is first converted to MusicXML and then imported.
Bars-per-line: Sets the number of bars per line. Every line of ABC will have the specified bars (measures). When both Character-per-line and Bars-per-line options are given, Bars-per-line is ignored. Default is: 4
Characters-per-line: Sets the maximum line length for ABC output to CPL characters. An integer number of bars, at least one, is always output. How many bars fit into the maximum line length is calculated from the note line, not from the lyric lines. Line- and page breaks in MusicXML are translated to '$' after the previous barline [or volta number]. Default is: 0
Measure numbers: -1: No measure numbers, 1..n: Number every n-th measure, 0: Number every system. Default is: -1
Include measure numbers at end of staves: If checked, will add the total measure count as an ABC comment at the end of each stave. Default is: Unchecked
Note: If "No score line breaks:" is unchecked, measure numbers will not be appended to the end of the lines since the lines are post-processed for line breaks.
Unfold repeats: Turns off repeat translation and unfolds simple repeats instead. Default is: Unchecked
Credit text filter (level 0-6): Sets the filter level of the credit filter. This filter tries to eliminate redundant T: fields. The level C goes from 0 (default) to 6 (no filtering). A higher level does less filtering. The default filters as much as possible and only includes the XML credit elements if no title of movement-title is found. Level 6 does no filtering and includes all XML credit elements as T: fields. Default is: 0
Denominator unit length for L: tags: Sets the unit length for the ABC output to L:1/value. This overrides the computation of the optimal unit length per voice. Default is: 4
%%MIDI options: 0: No MIDI, 1: Only program, 2: All MIDI. Default is: 1
No score line breaks: Disables translation of XML line breaks. No abc score line breaks will be output and processed. Default is: Unchecked
When this is unchecked, the tool will automatically detect that there are line break markers in the ABC generated by the MusicXML transcoder, process the ABC to find the lines delimited by injected line break characters, and then combine the lines properly to create the final result.
The line break markers themselves are removed in the process, giving a very clean result.
No pedal directions: Disables translation of XML pedal elements. Default is: Unchecked
All directions to first voice: Allocates all XML staff directions to the first voice of the staff. Normally a staff direction is allocated to the voice of the next note after the direction (if any). Default is: Unchecked
Translate stem directions: Translates stem directions present in the XML. Default is: Unchecked
Inject Q: tag if not present: If checked, will inject a Q: temp tag if not present in the imported ABC. Default is: Checked
Q: tag value to inject: If Inject Q: tag if not present: is checked, this is the Q: tempo tag value to inject. Default is: 100
Click Reset to Default to reset the MusicXML/MIDI import settings to their original defaults.
Values are saved in browser storage and restored the next time the tool is run.
These are the only two microtonal accidentals that abcjs can display and play and that the MusicXML transcoder can deal with, the quarter-flat and quarter-sharp.
When importing MusicXML, for the rest of the microtonal accidentals supported by MusicXML that can't be rendered or played by abcjs, the MusicXML transcoder will now put the accidental symbol under the note using ABC annotations strings.
Here are all the native MusicXML accidentals that the MusicXML transcoder can now handle:
Additionally, some software like MuseScore have their own SMUFL font-based private method for specifying microntonal accidentals and don't exclusively use the MusicXML standard accidentals.
In this case, the tool will detect many of the more common SMUFL font glyph directives and transcode them to a ABC version, but if it does not have a mapping, the ABC will show with a ♭? or ♯? based on parsing the glyph name requested and trying to come up with something at least showing it should be "flat-ish" or "sharp-ish".
Here's a screenshot showing a mix of abcjs supported microtonal accidentals and injected annotations for those unsupported in abcjs from a MuseScore MusicXML export:

Here are all the MuseScore exported MusicXML supported accidentals:

Overview of printing from the browser:
You may quickly print your tunes or generate a PDF using your browser's built-in print and export PDF features.
Tunes printed or exported from the browser are limited to one tune per page.
You may choose portrait or landscape orientation from your browser's print settings.
Additional advanced settings such as printing multiple-pages per page and setting custom margins may be available in your browser's print settings dialog.
Experiment with both the browser's print settings page orientation and "multiple page on one page" options to see what is possible.
Note:If you want to print a tunebook automatically formated with multiple tunes per page, you must use the tool's Export PDF feature.
The abcjs notation renderer has many additional optional parameters that can be specified at tune render time.
Full details on the available options are here:
To add custom abcjs rendering parameters to a tune, you can add the following annotation anywhere in the tune:
%abcjs_render_params (JSON parameter string)
Where the parameter string is an Javascript object in stringified JSON format.
Example #1: Render all the notation in green:
Example #2: Enabling Jazz Chord formatting:
Example #3: Transpose the written notation up one full step for Bb Clarinet, but plays one note lower:
Example #4: Forcing 8 bars per staff (requires staffwidth parameter):
Example #5: Generating custom Open-G (G-D-G-B) 4-string Mandolin tablature:
Example #6: Generating custom Open-G (D-G-D-G-B) 5-string Cittern tablature:
Example #7: Generating custom Open-G (D-G-D-G-B-D) 6-string Guitar tablature:
Note: This feature allows very low level control of the abcjs renderer. Improper parameters may cause unpredictable results or crash the tool.
Additional, use of some low-level abcjs rendering parameters such as "staffwidth" and "wrap" may cause issues with "Highlighting" mode in the tool.
The original abcjs version 6.2.2 I used for the early versions of the tool would sometimes leave ragged right edges on staves, particulary for staves with many or changing numbers of measures per staff or on complex tunes brought into the tool through MusicXML import.
As of 20 November 2023, with the release of abcjs version 6.2.3, a significant update to the library, I defaulted to expanding all staves to the widest in the tune, which produces very clean and aligned right staff edges in nearly all cases.
If you wish to opt-out of the "expand to widest" layout for a specific tune, I've added a new first-class (starts with %%) ABC directive that can be put into any tune to force abcjs to use the original abcjs 6.2.2 layout calculation system:
Put this anywhere in a tune to use the original staff width calculation and layout solution for that tune.
Most of the time, people have asked how to cram as many tunes on a page as possible, but sometimes you want to go the other way, make the notation larger.
Maybe you need reading glasses and are using the sheet music for a gig in low light and want the notation large.
To do this with the new layout system, you'll need to override the expandtowidest feature in abcjs 6.2.3 by adding:
to your ABC, and then play around with the values of:
%%leftmargin
%%rightmargin
%%staffwidth
%%noexpandtowidest
%%leftmargin 0
%%rightmargin 0
%%staffwidth 400
Once you add %%noexpandtowidest, you may in some cases have to adjust your ABC to get a consistent right edge to the staves.
For some tablatures like CGDAE where instruments maybe in either standard pitch or one octave lower, if you transpose the notes down an octave to get the tab on the lower strings, but want the notation displayed an octave up, you can add the following voice annotation to the ABC:
% This shifts the displayed notation up one octave but not the playback pitch:
V:1 octave=1
You can also transpose the pitch of the played music independently from the displayed notation:
% This will cause the playback to be shifted down an octave:
V:1 transpose=-12
These can be combined:
% This will cause the notation to be displayed one octave higher, but playback to be shifted down an octave:
V:1 octave=1 transpose=-12
This video shows the process I used to learn tunes part-by-part using the tool:
If you want to add a two-bar click intro before a tune, here are ABC pattern templates I find work well for common styles of tunes:
Add this before the start of a reel, before any repeats:
% Reel two-bar click intro
V:1
V:2
%%MIDI program 128
^Cz3 ^Cz3|^Cz3 ^Cz3|
V:1
z8|z8|
Add this before the start of a jig, before any repeats:
% Jig two-bar click intro
V:1
V:2
%%MIDI program 128
^Cz2 ^Cz2|^Cz2 ^Cz2|
V:1
z6|z6|
Add this before the start of a slide, before any repeats:
% Slide two-bar click intro
V:1
V:2
%%MIDI program 128
^Cz2 ^Cz2 ^Cz2 ^Cz2|
V:1
z12|
Add this before the start of a slip jig, before any repeats:
% Slip Jig two-bar click intro
V:1
V:2
%%MIDI program 128
^Cz2 ^Cz2 ^Cz2|^Cz2 ^Cz2 ^Cz2|
V:1
z9|z9|
Add this before the start of a polka, before any repeats:
% Polka two-bar click intro
V:1
V:2
%%MIDI program 128
^Cz ^Cz|^Cz ^Cz|
V:1
z4|z4|
Add this before the start of a waltz, before any repeats:
% Waltz two-bar click intro
V:1
V:2
%%MIDI program 128
^Cz ^Cz ^Cz|^Cz ^Cz ^Cz|
V:1
z6|z6|
A chart showing the complete mapping of MIDI drum sounds to ABC notes is here:
For example, if you want a higher pitched click, for example for the first beat of the measures, change the:
values in the click intro patterns to:
You can add an ABC template containing all of these examples from the Add dialog and then copy and paste them into your tunes.
The following ABC annotations have been added to abcjs:
% Add a slide-up indication before the note
!slideup! or J
% Slide-up examples: !slideup!G2 JG2 % Add a slide-down indication after the note
!slidedown! or j
% Slide-down examples: !slidedown!G2 jG2
Examples result in:
This video demonstrates how to create a set of tunes that will play continuously in the player:
Summary of the process shown in the video:
1) Remove the X: tags from all but the first tune.
2) Make sure the tunes are all run together by deleting any extra blank lines between the tunes.
3) Delete the R: tags on all but the first tune to get rid of the stacked style directives at the top.
4) Add space above the T: tags for the tunes after the first one using a %%text directive.
5) Add a matching %%titlefont and %%subtitle font directives to the top of the set so that all the titles display with the same font.
The tool supports the standard shape note shapes for both 4-shape and 7-shape systems.
You can turn any note into a shape note shape by adding any of the following prefixes to the ABC note name:
!style=sn_do! C2
!style=sn_re! D2
!style=sn_mi! E2
!style=sn_fa! F2
!style=sn_so! G2
!style=sn_la! A2
!style=sn_ti! B2
!style=sn_do! c2
!style=sn_re! d2
!style=sn_mi! e2
!style=sn_fa! f2
!style=sn_so! g2
!style=sn_la! a2
!style=sn_ti! b2
Which produces the following notation:

The unfilled versions of the shapes are used for longer notes:
!style=sn_do! C4
!style=sn_re! D4
!style=sn_mi! E4
!style=sn_fa! F4
!style=sn_so! G4
!style=sn_la! A4
!style=sn_ti! B4
!style=sn_do! c4
!style=sn_re! d4
!style=sn_mi! e4
!style=sn_fa! f4
!style=sn_so! g4
!style=sn_la! a4
!style=sn_ti! b4
Produces the following notation:

If your browser supports MIDI input, you will find this additional option in the settings dialog: Allow MIDI input for ABC text entry
If checked, you can enter ABC melody notes (chords are not supported) into the editor area using a USB or Bluetooth MIDI keyboard or other MIDI input device:
This feature has been verified to work with the desktop version of Chrome and Firefox on a Mac, other browsers may also work as well.
This feature has been tested with both USB and Bluetooth MIDI keyboards as well as a USB WARBL wind controller on a Mac running Chrome.
To add a space, bar line, or other common useful ABC staff construction patterns after entering a MIDI note, you can use the MIDI text macro shortcuts described below.
There are two available modes for MIDI input, depending on whether you have also checked MIDI input is key and mode aware (if unchecked, enters note names with no accidentals).
When unchecked:
The note text entered will have only the note name and octave without any sharp, flat, or natural indication: (G, A, B, C D E F G A B c d e f g a b c' d' etc.)
If you require specific sharps, flats, or naturals on the notes, you will need to add them manually.
When checked:
The MIDI input is aware of the key and mode of the current tune and will enter additional sharps, flats, or naturals as required.
Note that since these accidentals will carry forward in playback to notes afterwards in the measure.
For example, you may have to manually edit the ABC after entering a natural note if a sharp or flat note will follow in the same measure.
For both MIDI input modes:
The range of the ABC notes for MIDI note entry is from C,, to c'' (MIDI notes 36 - 96).
The octave below C,, starting on C. (MIDI note 24) is used for inserting useful common ABC text macros.
This map shows the MIDI note number and the text inserted:
24: Space
25: Backspace
26: |
27: /
28: 2
29: 3
30: 4
31: (3
32: |:
33: :|
34: ||
35: |]
When using a MIDI wind controller like the WARBL, you should set up the response curves to generate as few transient notes as possible.
Additionally, you can map the buttons on the back of the WARBL to send three of the text macro triggers, which makes it possible to enter entire staves of ABC just from the WARBL.
Here are the WARBL breath settings and button mappings I use:
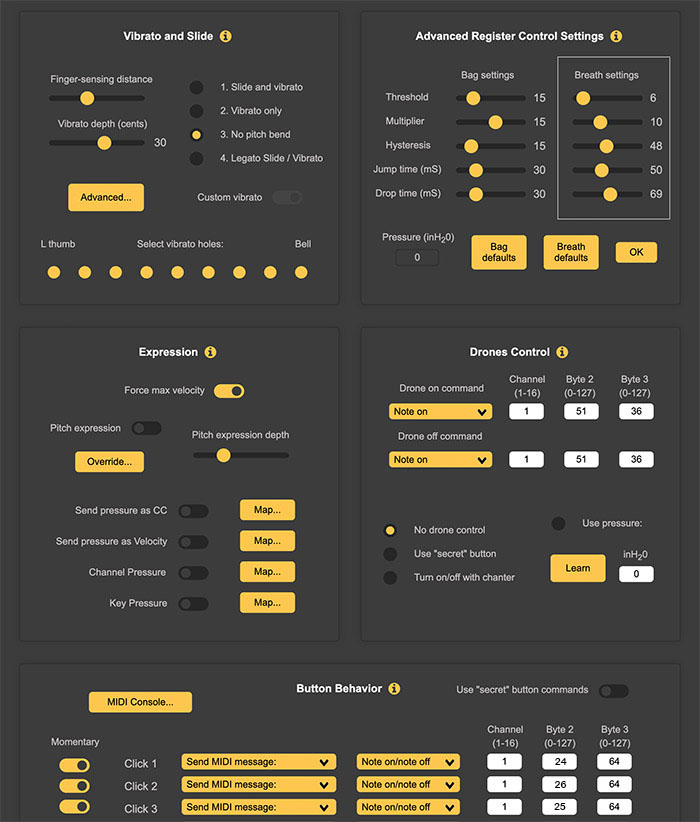
I've configured the three buttons on the back of the WARBL to insert a space, bar line, and backspace (MIDI notes 24, 26, and 25).
Setting them to "Momentary" speeds up the button response.
Here's a demo video showing entering the notes and bar lines for "The Kesh" jig into the tool entirely from my WARBL:
Note on using the MIDI Input feature on Firefox:
When first enabling MIDI input on Firefox, you will be asked by the browser to give the tool permission to access MIDI devices on your computer.
Once you grant permission, you will need to restart Firefox for MIDI input to work.
If you are trying to enter ABC chords, for example "D" or "Am", on an iPhone or iPad, iOS will, by default stick in "smart quotes" instead of standard double quotes.
To fix this, go into your device's Settings and under the General/Keyboard tab, and turn off "Smart Punctuation".
After you do this, you will be able to add standard double quotes.
if you are using GoodReader on iOS as your PDF reader and want to be able to play the tunes in my interactive PDF tunebooks, you'll need to change this one setting, available under the gear menu at the bottom of the app:
Enable Use Safari for Internet links:
The full specification for ABC notation can be found at:
Handy ABC 2.1 Quick Reference Card put together by Stephen Merrony:
The full playlist of demo videos and tutorials can be found on YouTube at:
For those who have asked for a version of the tool that is more optimized for single tune editing and playback, I've released a limited-functionality, online-only version of the tool:
ABC Transcription Tools Quick Editor
This version is optimized for single tune editing, only shows the notation for the first tune, and has the play controls for the tune being edited immediately below the ABC text editor area.
This version is missing the following features that are in the standard version:
1) No dedicated playback dialog or "Tune Trainer"
2) No ability to play selected portions of tunes
3) No PDF Export
Other than that, it behaves exactly like the standard version.
ABC files saved or shared from this version can be brought back into the standard or app versions for PDF export and use of the dedicated Player and Tune Trainer.
Other than that, it behaves exactly like the standard version.
Snapshots are shared between the standard version and Quick Editor version for quick transfer of ABC between the two editors.
Another way to transfer an ABC from the Quick Editor to the standard version of the tool is to click Sharing and then click Add Open in Editor, then click on Test Share URL. The ABC in the Quick Editor will then open in the Editor for the standard version of the tool.
If you want to run the tool offline, while online, you can try loading this version of the tool:
On first run of this version, the tool will cache all of it's code and resources for later use offline.
By default, when running the offline-enabled version, all instruments will be replaced by a piano sound which is embedded in the tool source.
Percussion, primarily for use by the metronome, is also available.
Also by default, reverb is not available offline since it also depends on reading a settings file from a remote site.
Offline playback with your preferred instruments is possible, full details in the User Guide for the offline version:
Another option for desktop users who need to run the tool offline is to download the source code archive .zip from my GitHub repo, unzip the source archive, and run abctools-offline.html.
Full project source code may be found at:
After downloading and unzipping the source code from the GitHub repo, you can run the tool by double-clicking the abctools.html file.
If you require the ability to play the tunes while not connected to the internet, run the abctools-offline.html file instead.
I can't support having all the instruments available offline, but I can include the Javascript encoded data for one instrument, an Acoustic Grand Piano, and for the percussion instrument as part of the tool source code tree.
When you start abctools-offline.html, it immediately grabs the online/offline state.
If an offline state is detected at tool start time, when playing tunes, all instruments are replaced with an acoustic piano sound, and the percussion sounds (MIDI program 128) are also available (for use in the metronome, primarily).
If the online status changes in the middle of using the tool, the change won't be detected until abctools-offline.html is reloaded.
Since these local sound resources are huge (about 4 megabytes), even bigger than the entire rest of the tool source, I don't want to burden everyone with having to load them for a case that only would be possible when running the tool from the source code in an offline state, so they are only included in abctools-offline.html as well as the offline check code.
My ABC tools use local browser storage to save the tool's settings, user preferences, and Snapshots.
Google Analytics are used in the tool to provide anonymized telemetry on the frequency of the use of specific features.
No personal data is sent with this telemetry, only event category and event name, for example that the import MusicXML or export MIDI features were used.
I use this data to prioritize new features and to better understand how people are using the tool.
TinyURL does allow me to see some shortened URLs as they are created using my TinyURL account API key.
I will never redistribute or in any way use a shortened Share URL you create.
Have an issue with a specific tune, want to report a bug, or suggest a new feature?
Click here for the project support page:
If you find my ABC Transcription Tools useful,
please consider tossing a few bucks into one of my virtual tip jars: